Section 15.6. Phase 4: Design the Menu Screen
15.6. Phase 4: Design the Menu ScreenOn the main menu screen now before you, you'll find two buttons :
Tip: If iDVD seems sluggish when you change screens, it's because the program is busily processing video in the background. To make it work faster, choose iDVD  Preferences, click the Projects icon, turn off "Enable background encoding," and then close the Projects window.Creating your DVD at the end of the process will take longer now, because the video hasnt been preprocessed. But at least you'll be able to work in the program without feeling like you're walking through quicksand.If things are still slow, your Mac may need more memory. iDVD consumes RAM like the ravenous triple-toed dire sloth of the Northern Antipodes consumes white-tailed wombats. (And triple-toed dire sloths can be very, very ravenous indeed.) Preferences, click the Projects icon, turn off "Enable background encoding," and then close the Projects window.Creating your DVD at the end of the process will take longer now, because the video hasnt been preprocessed. But at least you'll be able to work in the program without feeling like you're walking through quicksand.If things are still slow, your Mac may need more memory. iDVD consumes RAM like the ravenous triple-toed dire sloth of the Northern Antipodes consumes white-tailed wombats. (And triple-toed dire sloths can be very, very ravenous indeed.) 15.6.1. All about ThemesThe moving drop zones, any music that's playing, and the font for your buttons are all part of a theme : a unified design scheme that governs how the menus look and behave, complete with attractive backgrounds, coordinated typography, and background music. iDVD 6 offers 10 new eye-catching new theme families that include a host of stunning effects. Each theme family contains a main menu screen, a chapter navigation screen and an "extras" screen for all those bonus DVD features you can build with iDVD. It takes a lot of individual design decisions to make a theme. For example:
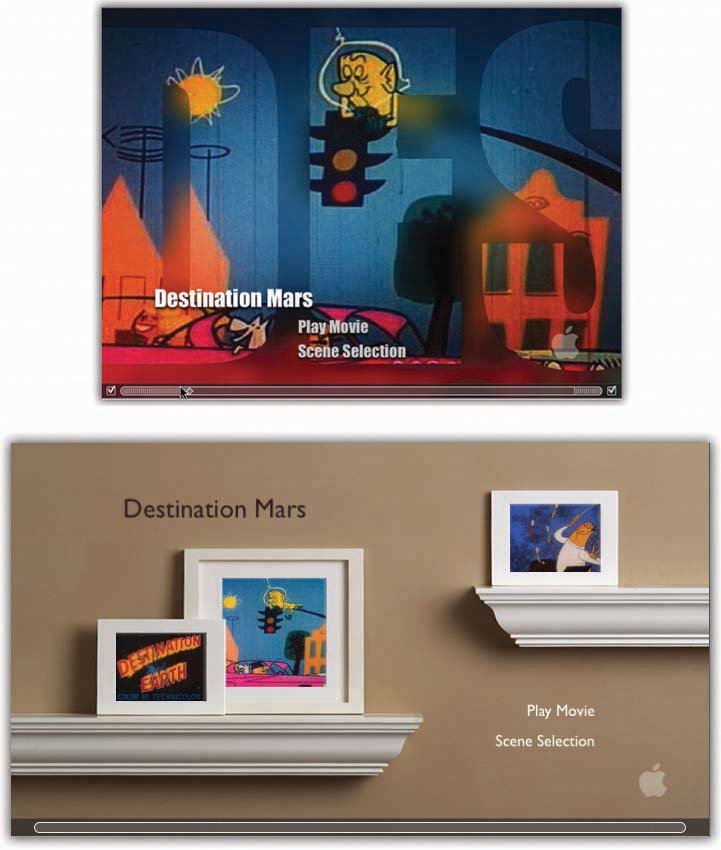
Figure 15-7 illustrates two very different looks for the same project. The difference lies only in the chosen theme. 15.6.2. Choosing a ThemeGoodness knows , you don't have to be satisfied with the Travel theme. A wide range of canned themes awaits your inspection. From the pop-up menu at the top of the Themes palette, choose a theme set . iDVD offers four built-in sets, each named for the version of iDVD that first included them: 6.0 Themes, 5.0 Themes, 4.0 Themes, and Old Themes (from iDVD 3). Within each theme, you can often click the flippy triangle (Figure 15-6) to reveal variations of that themea complementary menu design for the scene-selection screen, for your DVD extras page, and so on. In all, you have 69 menu designs to choose from, which ought to keep you busy for awhile. Tip: Many of the new iDVD 6 themes are designed to match the iMovie 6 themes described in Section 5.9.4. The idea is that both the DVD menu screens and the movie itself can now appear as a matched set. If you've bought additional themes online, this pop-up menu may offer other choices. In any case, you can use this pop-up menu to switch between them, or just choose All to see all installed themes in a single scrolling list. Scroll through the list of themes, clicking each one to see what it looks like in the main work area, or just rely on the little thumbnail icons to get a sense of the theme's overall flavor. Note: At first, clicking a different theme thumbnail may produce the baffling error message shown in Figure 15-9. For now, click Keepand then read the discussion in Section 15.6.4. If your DVD menu system consists of only a single screenthe main menu you've been looking at the whole timeit takes on your chosen theme instantly. A movie you've exported from iMovie, however, probably has chapter markers in it, and therefore your movie probably has at least one additional menu screen: your scene-selection screen. In that case, when you click a theme thumbnail, iDVD asks if you want to apply the Theme Family to the entire project, so that the main menu and the Scene Selection menus match; almost always, this is what you want. Figure 15-8 shows how. Note: You can also apply a theme to all the menus of a project later by choosing Advanced Apply Theme to Project. Or you can apply a theme only to the submenusnot the main screenby choosing Advanced Apply Theme to Submenus.) When you're happy with the way the new theme looks, you're ready to proceed with your iDVD design work. Fortunately, you don't have to commit to a theme at this moment; you can swap in a different theme at any time until you actually burn the DVD. Tip: You can buy additional themes, or download free samples, from other companies (such as iDVDThemePAK.com ). Install them by creating a folder called Favorites in your Library iDVD folder (the Library folder in the main hard drive window, not in your Home folder), and then putting them inside. 15.6.3. The Inevitable Paragraphs About Aspect Ratio As you probably know, there are two popular aspect ratios screen shapesfor television these days. There's the traditional shape, also known as squarish or 4:3 (that's the width-to-height ratio). And now there's widescreen, also known as 16:9. With every passing year, more people are switching to widescreen sets, because that's the shape of high-definition TV, and that's the future of television. iDVD 6, as it turns out, can create DVDs in either format (see Figure 15-7). Unfortunately, even if you have no intention of using different aspect ratios at different times, this issue is going to rear its ugly head in your everyday work. You'll notice, for example, that when you're clicking various menu themes to see what they look like, you'll frequently be interrupted by the warning shown in Figure 15-9, asking if you want to change your Project Aspect Ratio. Almost always, you'll want to click Keep; why would you want to change your movie's shape just because you're changing menu themes? Figure 15-9. You'll see this message whenever you select an iDVD theme that, behind the scenes, has been flagged with an aspect ratio that doesn't match your movie. Click Keep to keep the current settings.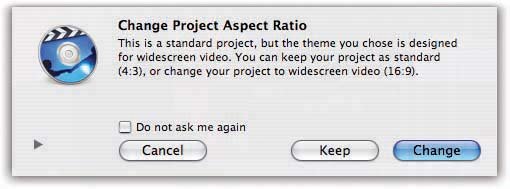 Unfortunately, that little dialog box will keep popping upand don't think that turning on the "Do not ask me again" checkbox will solve the problem. It won't. That checkbox doesn't mean "Always keep the aspect ratio I've already got. "In fact, it means, "Always change the aspect ratio to the preferred format for the theme I've just clicked," which is probably not what you want. (Each iDVD 6 theme has a "preferred" setting, either standard or widescreen, that it tries to switch to at every opportunity.) So how do you keep all of this straight without going insane? Here are two ways to deal with the frequent appearance of that Change Aspect Ratio box:
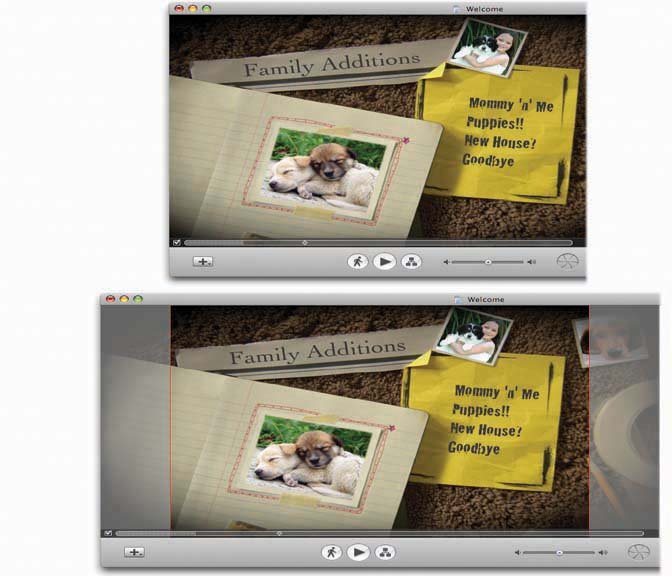
Now, it's worth noting that permitting iDVD to switch your project to the widescreen format may not be the worst thing in the world. It turns out that all of the iDVD 6 themes have been cleverly designed to look great on both standard and widescreen TV sets. Figure 15-10 explains all. So if the menu screens will always look good, regardless of TV shape, why not just choose widescreen format for every DVD you make? Because the video in your DVD isn't so accommodating ! If it's been shot widescreen, and it's played back on a standard set, you'll probably wind up with letterbox bars (Section 9.1.3) above and below. And if it's been shot in standard 4:3 format, then playing it on a widescreen set will result in black bars on the sides. The bottom line: Choose the aspect ratio for your DVD according to the aspect ratio of the video that's in it. 15.6.4. Editing MenusIf you like the way everything looks when you click a desired theme, terrific . You're good to go. Skip ahead to "Phase 5: Burn Your DVD." Note, however, that a great deal of flexibility and control await in the meantime. You don't have to accept every element of the theme as it appears when you first select it. You can move your buttons around, change the labels on them, and so on. Chapter 17 offers the full scoop on these procedures, but here are a few of the most common redesign tasks . 15.6.4.1. Editing titles and buttonsiDVD usually adds a title to your menu screens, often near the top of the page, and usually in a larger font than any other text. You can edit it just as you would a Finder icon name: Click inside it to open up an editing box, type your changes, and then press Enter or Return. Figure 15-10. Each of the new "widescreenable" themes comes in two versions: a standard 4:3 version (top) and a widescreen version (bottom). The question is, what happens if you create a widescreen DVDand then play it on a 4:3 standard television? |
| GEM IN THE ROUGH Secrets of the Theme Scrubber |
| iDVD 6's scrubber bar (the thin white scroll bar beneath the menu screen) lets you preview the animation for a certain theme. You can let it play automatically (click the Motion running-man button) or you can drag the scroll handle to zip through it, watching how the theme changes over time. Or press the arrow keys to step one frame at a time. Many themes, including the one shown here, include a "play once" introductiona preliminary animation that plays before your menu buttons even appear. It's represented in iDVD by a crosshatched area of the scrubber bar, to the left of the main section (which represents the looping portion of your menu animation). Some themes also have a crosshatched area at the end, a "play-out" portion that helps link back to the beginning of the loop. At times, you might want to turn off that introductory animationfor example, when you're designing secondary menu screens (like the Scene Selection screen). If you turn off the checkbox to the left of the scrubber, you hide the crosshatched section of the scrubber bar. You also eliminate the introductory portion, both as it plays in iDVD and on the final, burned DVD. Now only the main, looping portion of the menuscreen animation will play. (You can always restore the intro by turning the checkbox back on again.) Speaking of scrubber-bar secrets: If you turn off the Motion (running-man) button at the bottom of the iDVD screen, you bring the menu's animation to a halt. (The menu will be frozen on the finished DVD, too.) Once Motion is turned off, you can drag the scrubber. Choose View |

Note, by the way, that not all drop zones may be on screen at once; the drop zones in several themes take their time in parading onto the screen, or rotating through it. To give yourself a quick tour of all the drop zones in your chosen theme, drag the handle of the thin white scroll bar at the bottom of the menu window to cycle through the entire presentation; see the box in Section 15.6.5 for details.
iDVD offers three different ways to fill these empty gray spaces with videos and pictures:
-
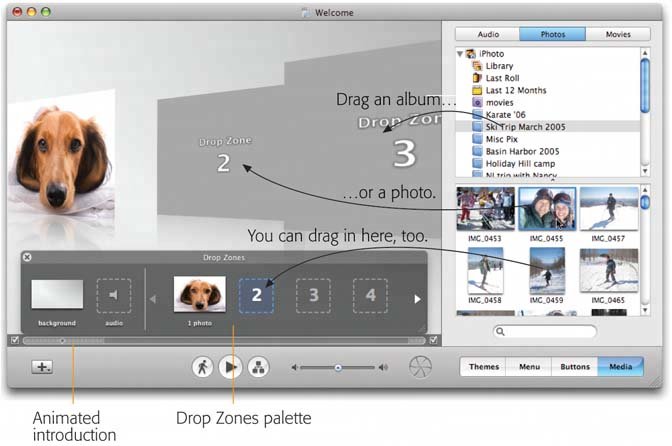
Drag directly into the full-size rectangle . This technique is shown in the top two examples in Figure 15-12. Most of the time, you'll be dragging videos or pictures from the Media pane. (Click the Media button at the lower-right corner of iDVD, and then click either Photos or Movies at the top.)
Figure 15-12. Double-click any drop zone to bring up the interactive Drop Zone palette shown here. Note that drop zones aren't always perfect rectangles or squares, so your video or photo may get clipped around the edges. You can fill a drop zone with individual photos, bunches of photos (for a slideshow effect), or movies.
-
Drag into the Drop Zone palette . The Drop Zone palette is a dark gray, transparent window that you can resize or drag around the screen, much like the Photo Settings palette in iMovie (also shown in Figure 15-12). To make it appear, double-click any full-size drop zone rectangle in the main monitor window. (You can also choose Project
Edit Drop Zones.) What's nice about the Editor is that it shows small thumbnail representations of all of the theme's drop zones at once, so you don't have to wait for them to cycle into view in the main display window.
Note: The drop-zone wells are also navigational bookmarks; if you click one, the monitor window displays that moment in the menu animation.
-
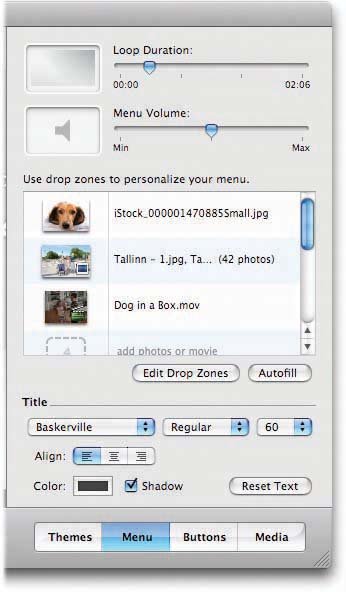
Drag into the Drop Zone list . This list appears when you click the Menu button (see Figure 15-13). Its primary feature is the Autofill button, which loads photos or moviesof iDVD's choosing, not yours automatically into the drop zones of the theme.
Figure 15-13. The Drop Zone list in the Menu pane offers a subset of the drop zone palette's features. Once again, you can drag items onto the drop-zone wells, or drag them away to delete them. Click Autofill to fill all drop zones with iDVDselected movies or pictures. It doesn't always work well, however, particularly in single-movie projects. In that case, it may add the same item to every drop zone.
No matter which view of the drop zones you're using, here's how they work:
-
Adding to a drop zone . Drag any video, photo album, image, or collection of images right into a drop zone outline to install it there. You can drag icons out of the Finder, or directly out of the Media pane.
Tip: Albums in drop zones can display 99 images at most. What you'll get is a mini-slideshow, right there within the drop zone. (More on dragging out of the Photos pane in Chapter 16.)
-
Replacing items in a drop zone . To replace what you've installed in a drop zone, just drag something new into it.
-
Removing items from a drop zone . To delete an item in the drop zone, drag it away from the spot, just as you'd drag something off the Mac OS X Dock or the Sidebar. You get a cute little puff of smoke to indicate the movie or picture's disappearance.
-
Editing a drop-zone slideshow or movie . If you've created a movie or slideshow drop zone, you have some additional editing powers available to youlike deciding what order the photos appear in the slideshow, or which part of the movie loops within the zone. Figure 15-14 tells all.
Figure 15-14. Top: To edit a drop-zone slideshow, double-click the thumbnail that represents it, whether in the Drop Zone palette (Figure 15-12) or menu list (Figure 15-13). The slideshow editor appears, identical to the one described in Section 16.6.4.1. Drag the pictures to specify their order, or click one and then press Delete to eliminate it. Click Return to go back to the menu screen.
Bottom: If you've dragged a movie into a drop zone, double-click it to produce this slider. Drag its endpoints inward to set the beginning and end points of its looping behavior. (Note, however, that no movie will loop longer than the limit established on the Menu pane.)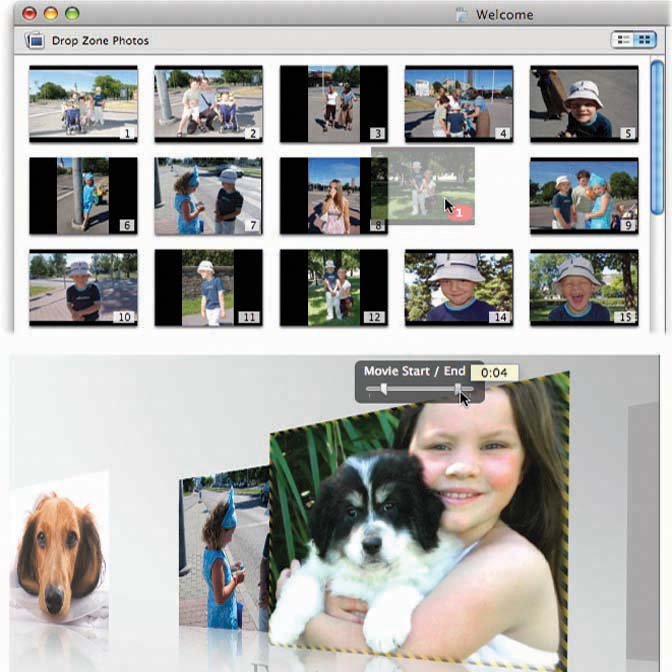
-
Add sounds . Drop zones have no sound, although you can import audio into the menu screen that contains the drop zone. See Section 17.5.
-
Turning on Motion . If you've installed video into a drop zone and it doesn't seem to be playing, click the running-man Motion button at the bottom of the iDVD window, or press
 -J. If it still doesn't seem to be playing, the menu duration may be set to 0 (Section 15.6.4.6).
 Turning off Motion also turns off any background audio track and brings motion menus and motion buttons to a standstill.
Note: The status of the Motion button has no effect on the final DVD, which always shows the animations and plays the music. This is a change from iDVD 5.
-
Changing the duration . Use the Menu pane to adjust the loop duration for your menus (how long a movie clip plays before starting over). Whatever time you specify here controls the loop length of movies in menu backgrounds, video buttons, and drop zones.
15.6.6. Redesigning the Theme
You can change every tiny aspect of your themethe music, the background, the colors, the fonts, and so onif you have the time and patience. If you're so inclined, turn to Chapter 17 for a full discussion of theme creation.
EAN: N/A
Pages: 203
- What Is a Virtual Private Network?
- Scaling IPsec Virtual Private Networks
- Deploying IPsec Remote Access VPNs Using Preshared Key and Digital Signature Authentication
- Comparing SSL VPNs to Other Types of Remote Access VPNs
- Strengthening SSL Remote Access VPNs Security by Implementing Cisco Secure Desktop