Section 6.20. Editing RAW Files
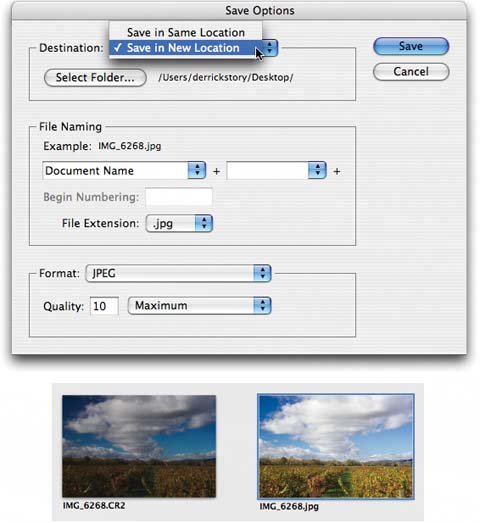
6.20. Editing RAW FilesAs noted in Chapter 4, iPhoto can handle the advanced photographic file format called RAWa special, unprocessed file format that takes up a lot of space on your memory card but offers astonishing amounts of control when editing later on the Mac. (Also as noted in Chapter 4, the RAW format is available only on certain high-end cameras .) Actually, iPhoto can do more than handle RAW files. It can even edit them sort of. iPhoto is, at its heart, a program designed to work with JPEG files. Therefore, when it grabs a RAW file from your camera, it instantly creates a JPEG version of it, which is what you actually see onscreen. The RAW file is there on your hard drive (deep within the labyrinth known as the iPhoto Library folder). But what you see onscreen is a JPEG interpretation of that RAW file. (This conversion to JPEG is one reason iPhoto takes longer to import RAW files from a camera than other kinds of files.) This trick of using JPEG lookalikes as stand-ins for your actual RAW files has two important benefits. First, it lets you work with your photos at normal iPhoto speed, without the lumbering minutes of calculations you'd endure if you were working with the original RAW files. Second, remember that your iPhoto photos are also accessible from within iDVD, iMovie, iWeb, Pages, and so onand these programs don't recognize RAW files. So the question naturally comes up: What happens if you try to edit one of these RAW-file stunt doubles? No problem. iPhoto accepts any changes you make to the JPEG version of the photo. Then, behind the scenes, it reinterprets the original RAW file, applying your edits; finally, it generates a new JPEG for you to view. 6.20.1. Outside RAW Image EditorsIt's nice that iPhoto comes with more powerful editing tools, and it's nice that you can use them with your original RAW files. Nevertheless, iPhoto still isn't Photoshop, and it still doesn't offer every conceivable editing tool. So what happens if you want to edit one of your RAW files in another program, while still using iPhoto to organize them? Here, life can get a little complicatedand a little different from the way iPhoto 5 handled things. First, return to Preferences and click the Advanced tab (Figure 6-17). Turn on "Use RAW files with external editor." You've just told iPhoto that you want to work with RAW files in a different program, which is probably Adobe Camera Raw (the RAW-file editor that comes with Photoshop). Figure 6-17. You can now send an edited RAW file out of iPhoto for more sophisticated editing in a program like Photoshop or Photoshop Elements with a quick double-click. The first step is to turn on the bottom checkbox in iPhoto's preferences.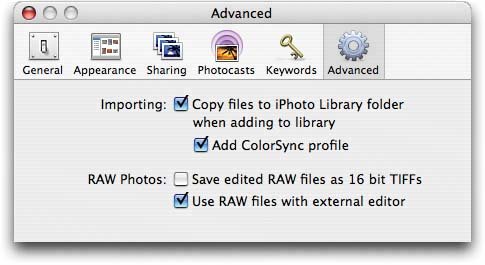 Now, if the RAW file is fresh off the camera and unedited, you can drag its thumbnail right out of iPhoto and onto the Dock icon of the external editing program (like Photoshop), just as in iPhoto 5. Photoshop responds by opening up the photo in its Adobe Camera Raw helper program. At this point, you now have Photoshop's advanced controls for super-fine-tuning that prize-winning shot. But iPhoto 6 offers an easier twist: You can just double-click the thumbnail. Thanks to your setting in Preferences, it opens promptly in Adobe Camera Rawno drag-and-drop necessary. Just make sure you haven't previously edited the picture in iPhoto. If you have, iPhoto sends the edited JPEG file to Photoshop instead of the RAW file. You can correct this case of mistaken identity by using the Revert to Original command in iPhoto to strip away your previous edits, and then double-click the picture to open it in your external RAW editor. But beware! You can't just click the Save button and smile, confident that you'll see the edited version of the photo when you return to iPhoto. (That may be how things work with JPEG graphics, as described earlier in this chapterbut not with RAWformat files.) Instead, you must use Camera Raw's Save command to save the edited picture as a new file on your hard drive (see Figure 6-18, top). You'll most likely want JPEG because that's the easiest format to work with in all of the iLife applications. (And remember, your original RAW file is still tucked away safely in the iPhoto Library if you want to revisit it. All you have to do is double-click its thumbnail again, and you're right back in Camera Raw.) When you click Save, a JPEG version of your edited RAW file is waiting for you on the Desktop. Click Done in Adobe Camera Raw to make it go away. Your last step, believe it or not, is to reimport the edited JPEG file back into iPhoto. First, though, you may want to make sure that the file number (say, IMG_6268.jpg) is the same as the original RAW version in iPhoto (IMG_6268.CR2). Why? Because you're going to wind up with the edited JPEG and the original RAW file side by side in your library (Figure 6-18, bottom). This roundabout method of editing a RAW file is not, ahem, the height of convenience. However, if you want to use high-level image controls for your RAW files, this is the path you must take, grasshoppa. Figure 6-18. Top: Once the Save dialog box is open, choose Save in New Location from the Destination popup menu. Navigate to your Desktop to plunk the edited file. You also have four formats to choose from (.jpg, .tif, .psd, and .dng). |
EAN: 2147483647
Pages: 183