8.3 Windows Media Player
8.3 Windows Media PlayerYou can use Windows Media Player ”one of the most useful freebie features of Windows XP ”to play sounds, play digital movies, or tune in to Internet radio stations . It's the Grand Central Station for digital music and movies, as well as the junction for your hard drive, CD player, CD burner , MP3 player, and the Internet (from which you can download new music files and movie clips). It's easy to see how excited Microsoft is about version 8, since shortcuts connecting you to it are everywhere. It appears in two different Start menu locations (including the Start
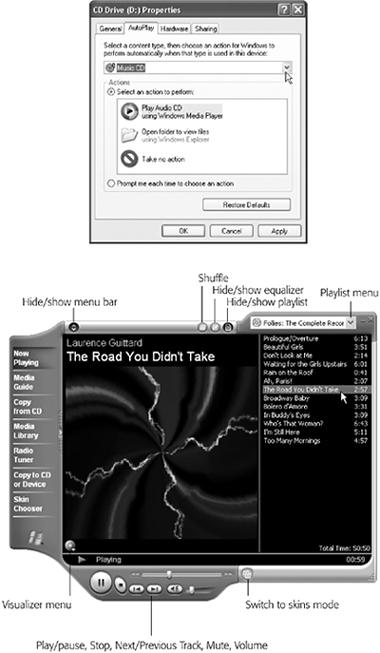
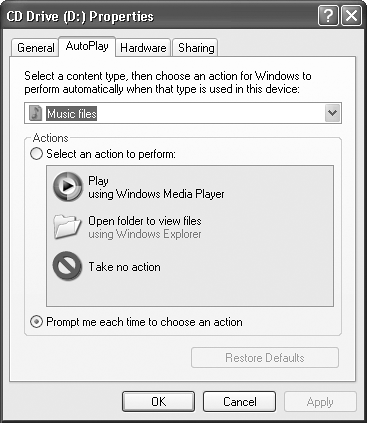
8.3.1 Windows Media.comThe first time you launch Media Player, it connects to the Internet in order to bring you to http://WindowsMedia.com, a Web site dedicated to pop culture in all its commercial forms: rock albums, movies, music videos , and so on. NOTE If you'd rather stifle Media Player's innate urge to go online every time you open it, choose Tools 8.3.2 The Lay of the LandBefore using Windows Media Player, you must first understand the peculiarities of its top edge and its left side. The top edge, as you may have noticed, isn't rectangular like most windows. Instead, it's the shape of ”well, a non-rectangle, which leaves no room for the standard menu bar. You can make it reappear either by pressing the Alt key, moving your mouse to where the menu bar should be, or by clicking the tiny double arrow in the upper-left corner (see Figure 8-7). You'll need to do just that, in fact, in order to take advantage of some of the features described in the following sections. Figure 8-7. Top: Windows politely asks what you want it to do with a music CD. Bottom: In the right pane, Media Player displays the album title and the titles of each track, if that information was encoded onto your music CD ”or if you have an Internet connection and Windows was able to find the name of your CD on the Internet's massive database of CDs and track names . (If you don't see this list of tracks, click the Show Playlist button, or choose View |
UP TO SPEED |
If you accept the proposed option ”to play the music ”Media Player opens and, sure enough, begins to play the music (Figure 8-7, bottom). As the music plays, you get to watch psychedelic screen-saver-like displays ”called visualizations by Microsoft ”that bounce and shimmer to the music.
NOTE
If all these fancy dancing -to-the-music graphics are slowing down your machine as you try to work in other programs, you can always turn them off (choose View  Now Playing Tools Show Visualizations to eliminate the checkmark in front of the menu command).
8.3.3.1 Fun with Media Player
When the work you're supposed to be doing leaves you uninspired, here are a few of the experiments you can conduct on the Media Player screen design:
-
Switch visualizations . To try a different visualization, click the Next Visualization or the Previous Visualization arrow (the tiny arrow buttons just below the shimmery display), or press Tab+Enter and then click the Video Settings button, or choose View
Visualizations. And if you tire of the displays built into Windows, then just download more of them from the Internet by choosing Tools Download Visualizations. NOTE
One of the most interesting choices is Album Art, which displays a picture of the album cover for whichever song is now playing.
-
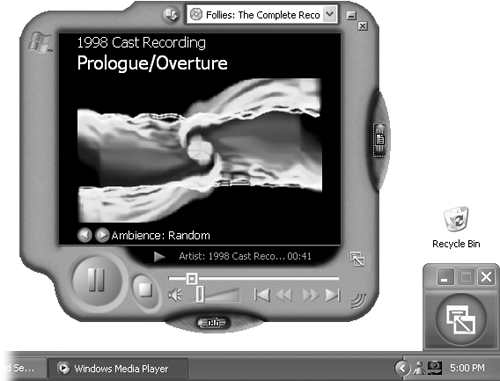
Shrink the window to show some skin . If the Media Player window is taking up too much screen space, making it harder for you to work on that crucial business plan as you listen to *NSync, press Ctrl+2 (or click the Skin Mode button in either the center or lower-right corner of the Media Player window, depending on whether the right playlist pane is open) to shrink the window (see Figure 8-8). Press Ctrl+1 to return the Media Player window to its full- sized glory . (Of course, you can also just minimize Media Player, as you would any window.)
Figure 8-8. At full size, the Media Player window occupies a large chunk of your screen (Figure 8-7), and shows off Microsoft's fledgling tendency to move beyond the rectangular window. In Skin Mode (left), it takes up less space on your screen and can use any of dozens of radical new design schemes. Skin Mode also produces a small control window (right), which appears in the lower-right corner of your desktop. Clicking this compact window produces a menu that offers, among other commands, "Switch to full mode."
-
Expand the window . On the other hand, if your PC is briefly serving as a glorified stereo system at a cocktail party, choose View
Full Screen (or press Alt+Enter). The screen-saver effect now fills the entire screen, hiding all text, buttons, and controls. If you have an available coffee table and a laptop to put it on, you've got yourself a great atmospheric effect. (When the party's over, just click the mouse, or press Alt+Enter again, to make the standard controls reappear.) -
Change the skin . In hopes of riding the world's craze for MPEG Audio Layer-3 (MP3) files (compact, downloadable, CD-quality sound files), Microsoft has helped itself to one of MP3-playing software's most interesting features: skins. A skin is a design scheme that completely changes the look of Windows Media Player (see Figure 8-9).
Figure 8-9. Not all skins are, shall we say, masterpieces of intuitive design; it may take you several minutes just to find the Stop button. When you find a skin you like, click Apply Skin (above the list). If you don't like any of the designs or just want to keep looking, click More Skins. Windows sends you to the Internet for a visit to Microsoft's grisly-sounding Skin Gallery. If nothing there strikes your fancy, either search the Web or check back later (Microsoft expands the collection periodically).
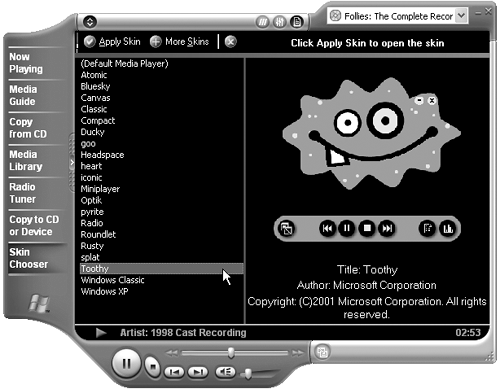
To choose a new skin, click the Skin Chooser button on the left side of the Media Player window. Then click each of the available skins to see a preview of its appearance. When you click the Apply Skin button (at the top left corner of the window), your player takes on the look of the skin you chose and shrinks down into the compact Skin mode, as described in the previous tip.
-
Fool around with the playback sequence . You can make the songs on the CD play back in a random order, just as though you'd pushed the Shuffle button on a CD player. To do this, just click the Shuffle button or press Ctrl+H ”the shortcut for the Play
Shuffle command. And if you love a particular CD so much that you'd like to hear it over and over again (instead of stopping at the end), press Ctrl+T ”the shortcut for Play Repeat. NOTE
These tricks work for whatever playlist you've currently selected ”not just an audio CD. (Playlists are described later in this chapter.)
-
Fool around with the sound . The View
Now Playing Tools submenu offers all kinds of options for summoning special-effects displays. Some of these options, including Captions and Lyrics, are available only if you've typed them in yourself. Don't miss , however, the graphic equalizer, a little row of sliders that lets you adjust the bass, treble, and other frequencies of the music to suit your particular speakers and your particular ears. And SRS WOW (another one of these menu options) simulates a 3-D sound experience through nothing more than stereo speakers or headphones (press Ctrl+Enter).
-
Read the "CD booklet." The large buttons at the left edge of Media Player include a button called "Copy from CD," which can be extremely useful even if you have no intention of copying songs from the CD. For example, it provides the most useful display of information from the CD you're listening to ”song titles, track links, singer names, and album information (that even includes a little review and, needless to say, an opportunity to buy another copy of the CD online).
8.3.4 Copying CDs to Your Hard Drive
You can copy an album, or selected tracks, to your hard drive in the form of stand-alone music files that play when double-clicked. Having CD songs on your hard drive affords you the following benefits:
-
You can listen to the songs you like, without having to hunt for the CDs they came from.
-
You can listen to music even if you're using the CD-ROM drive for something else (such as a CD-based game).
-
You can build your own playlist (set of favorite songs) consisting of cuts from different albums.
-
You can compress the file in the process, so that each song takes up very little disk space.
-
You can transfer the songs to a portable music player or burn them onto a homemade CD.
If you're sold on the idea, here's how you go about it:
-
Insert the music CD. Click the "Copy from CD" button on the left side of the Media Player window.
The list of songs on the CD appears. See the box below for information on ensuring that the album name and track names are correct.
-
Turn off the checkbox of any track you don't want to copy.
You've waited all your life for this: At last, you have the power to eliminate any annoying songs and keep only the good ones.
And while you're playing record-company executive, take a moment to drag the names of the songs up or down the list to rearrange them.
-
Choose Tools
Options. In the resulting dialog box, click the Copy Music tab. The dialog box shown in Figure 8-10 appears. Unless you intervene by clicking the Change button near the top, Windows will copy your song files into the My Documents
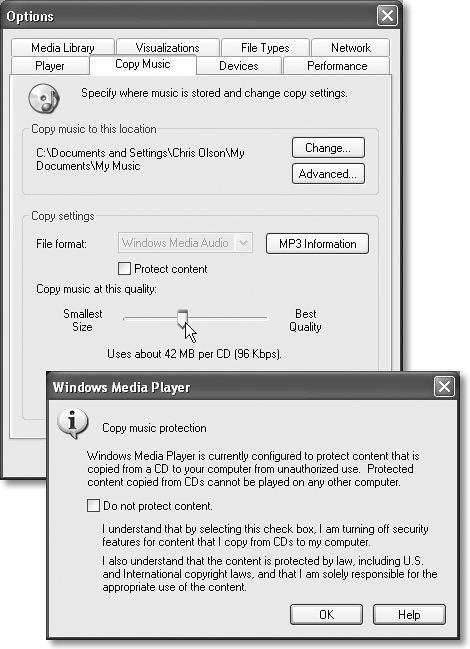
My Music folder. Figure 8-10. Top: Music files take up a lot of space on the hard drive. By adjusting this slider, you can specify how much Windows compresses the song files, with the understanding that you sacrifice sound quality as you make the file smaller. In general, the 96 K setting offers an excellent trade-off ”the resulting files sound just like a CD, but the entire CD consumes only about 42 MB on the hard drive. Experiment with the other settings to accommodate your ears and speakers. Bottom: This is what happens when lawyers get involved in software design. Windows is offering you the chance to copy-protect your own music so that you can't transfer the songs to other computers or portable music players. Unless you're a particularly self-destructive person, turn on "Do not protect content" and then click OK.
GEM IN THE ROUGH
Filling in Track NamesMost audio CDs don't come programmed to know their own names (and song names). To this day, millions of people insert music CDs into their computers and see the songs listed as nothing more than "Track 1," "Track 2," and so on ”and the album itself goes by the catchy name Unknown Album.
If your PC is online when you insert a certain music CD ”you lucky thing ”you'll bypass that entire situation. Windows takes a quick glance at your CD, sends a query to http://www.allmusic.com (a massive database on the Web containing information on over 200,000 CDs), and downloads the track list and a picture of the album cover for your particular disc.
If http://allmusic.com draws a blank, as it often does for classical recordings, no big deal. Media Player makes it easy to search the Web for this information at a later time. Just insert the CD, connect to the Internet, click "Copy from CD" at the left edge of the screen, and then click the Get Names button at the top of the screen. A wizard appears at the bottom of the screen to walk you through the process of finding your CD in the online database and, if you like, editing the track information that the Web site finds.
If the online database still doesn't know about your CD, you'll be offered the chance to upload your information to the Web database for the benefit of future generations.
You can also type in the names of your songs manually. Once again, click "Copy from CD" at the left side of the screen to view the list of tracks. Now right-click the track and, from the shortcut menu, choose Edit. A little text box opens so that you can type in the track information manually.
No matter how the track names and album art gets onto your PC, Windows XP saves this information in your music library (see Copying Music to Your Hard Drive later in this chapter). Therefore, the next time you insert this CD, the Media Player will recognize it and display the track names and album information automatically.
NOTE
While you're in this dialog box, consider clicking the Advanced button. It opens a dialog box that lets you specify which information gets added to the names of the files that you're about to copy. By turning on Track Number, Title, Artist and Album, for example, you'll ensure that your files wind up with names like "01 Back in the USSR Beatles White Album."
That's not especially useful when you're just looking at the files on your hard drive, because in Tiles or Details view, Windows displays this information anyway. Instead, this option is provided for the benefit of portable music players that only show a single line of information ”the song name ”while playing. By tacking this supplementary information onto each song's name, you ensure that you'll see a little more data when you glance at your music player screen.
What you're really interested in here, however, is the "Copy Music at this quality" slider. See Figure 8-10 for details.
-
Adjust the quality slider and then click OK.
You return to Windows Media Player.
-
Click Copy Music.
You'll find this button in the narrow strip above the list of songs.
Clicking it displays the message shown at bottom in Figure 8-10 (but just the first time you ever copy songs).
-
Turn on "Do not protect content" and then click OK.
Windows begins to copy the songs onto your hard drive. The Copy Music button changes to Stop Copy, which you can click to interrupt the process.
8.3.5 Organizing Your Music Library
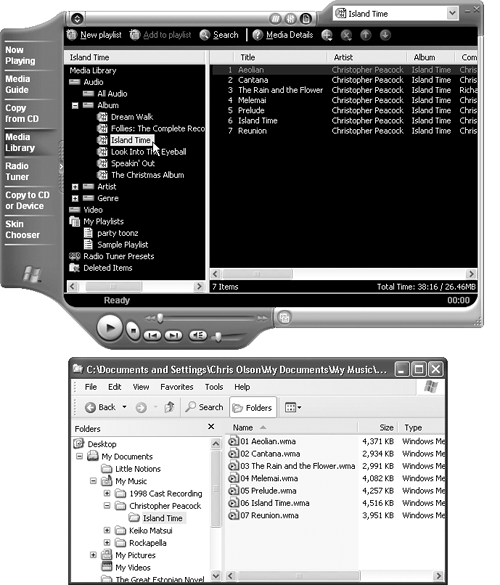
Every CD transferred to your hard drive winds up with an entry in the playlist menu, identified in Figure 8-7. Whenever you want to play back some music, just choose its name from this menu ”there's no need to hunt around in your shoeboxes for the original CD the songs came from.
But that's just the beginning of Media Player's organizational tools; see Figure 8-11.
Figure 8-11. Top: Clicking the Media Library button at the left side of the screen reveals a Windows Explorer-like display that lets you access your music in a number of ways: by album, by artist, by musical style ( genre ), and so on. You can even manage video clips with these controls ”if you're one of the six people who collect them. You can add songs to custom playlists just by dragging, as shown. Bottom: Behind the scenes, Windows builds a set of nested folders in the My Documents My Music folder. Within the My Music folder, you'll find a folder for each performer. Within the performer folder, there's a folder for each CD, and within that folder, you'll find icons representing the tracks you copied .
Transferring CD songs to your hard drive isn't the only way to log your files in the Media Player database. You can also add sound and video files to this master list using any of these methods :
FREQUENTLY ASKED QUESTION |
-
Use the Tools
Search for Media Files command (or press F3). -
Drag sound or video files directly from your desktop or folder windows into the right side of Media Player.
-
Choose File
Add to Media Library. From the submenu, choose Add Currently Playing Track, Add File, or (for files on the Web) Add URL. -
The Internet is crawling with Web sites that harbor downloadable music files that you can make part of your music library. To find them, click the Media Guide button at the left side of the Media Player window. You're shown a list of Microsoft Web sites, where you'll find lists, search engines, and other methods for finding music.
Once you've created a well-stocked fridge of music, you can call up a particular song by clicking the Search button (at the top of the Media Library list), by navigating the folder tree (at the left side of the Media Library list), or by using the playlist drop-down list (at the top right of the Media Player window).
8.3.5.1 Playlists
As noted above, each CD that you transfer to your hard drive becomes a playlist in Windows Media Player: a group of songs, listed in the folder tree at the left side, that you can play back with a single click. Media Player automatically turns your CDs into playlists, but you can also create your own, mixing and matching songs from different albums for different purposes (which you might name Work Music, Downer Tunes, Makeout Music, or whatever).
To create a new playlist, make sure you've selected the Media Library button at the left side of the screen. Then click the "New playlist" button above the list of folders. Type a name for the new playlist, click OK, and take satisfaction in the fact that it now appears on the left side of the screen (in the "folder" called My Playlists). To stock this playlist with songs from your entire collection, just drag their names from the song list on the right side, shown in Figure 8-11.
WORKAROUND WORKSHOP |
Once you've created a playlist of your own, you can rearrange its playback sequence just by dragging the songs up or down the right-side list.
8.3.5.2 Deleting things
Whenever you want to delete a song, a playlist, or anything else, the key is to right-click it. You'll find the Delete command in the shortcut menu.
NOTE
When you choose the command Delete from Library, Media Player doesn't obey immediately. Instead, it works like the Recycle Bin, moving the songs to a folder called Deleted Items (located in the playlist of the Media Library screen) so that you can restore them to another playlist if you change your mind. They're not really gone until you click the All Deleted Media "playlist," select the song names in the right-side list, right-click one of them, and then choose Delete from Library from the shortcut menu.
8.3.6 Burning Your Own CDs
The beauty of a CD burner is that it finally frees you from the stifling restrictions put on your musical tastes by the record companies. You can create your own "best of" CDs that play in any CD player ”and that contain only your favorite songs in your favorite order.
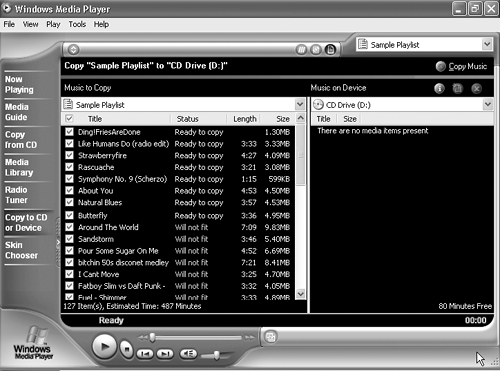
The easiest way to create a CD like this in Media Player is to assemble the songs you want in a custom playlist, as described in the previous section. Then, at the left edge of the Media Player window, click the "Copy to CD or Device" button. A screen that looks something like Figure 8-12 appears next.
Figure 8-12. Remember that a music CD can only hold so much music. (Just how much it holds depends on the quality setting you've specified for your music files.) If some of your songs say, "Will not fit," as shown here, turn off some songs (by clearing their checkboxes) until everything fits.
NOTE
To burn a CD without creating a playlist first, scamper through your media library, right-clicking each song you want and choosing Copy to Audio CD from the shortcut menu. Media Player copies each song name into a special playlist called Send To (it's listed in the My Playlists "folder" at the left side of the window). At that point, you have, in effect, created a playlist that you can treat just like the one described in these instructions.
Once you've assembled the audio CD-to-be, insert a blank CD into your burner, and then click the Copy Music button at the upper-right side of the window. The transfer process takes quite a bit of time and quite a bit of hard drive space, so budget appropriately for both. When the process is complete, your PC spits out the CD automatically.
8.3.7 Copying Music to a Portable Player
If you have a pocket gizmo that's capable of playing music, such as a Diamond Rio or a Pocket PC, the process for loading your favorite songs onto it is exactly the same as the process for burning your own CD. Just make sure that it's hooked up to your PC and that its name appears in the drop-down list of devices at the upper-right corner of the screen.
8.3.8 Internet Radio
The 2000s' twist on listening to the radio as you work is listening without a radio. Nowadays, the computer itself is used as a radio, one that can tune in to hundreds of radio stations all over the world, each brought to you by the Internet.
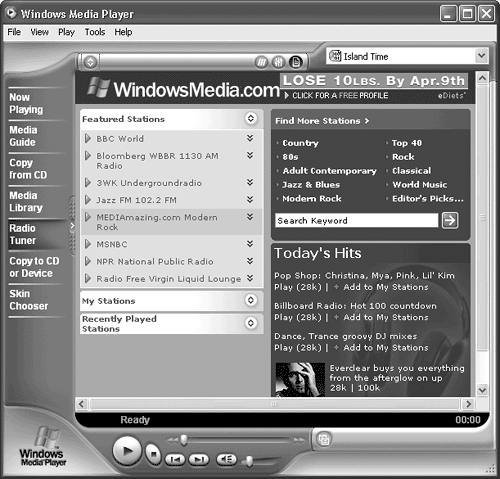
The first step in transforming your computer into a "radio" is to open Windows Media Player. Next, click the Radio Tuner button at the left to connect to the Internet, where you can select the stations you want to hear (see Figure 8-13). Click the green arrow next to a station's name to listen in. (You may have to wait for 30 seconds or so before the station "tunes in," and, of course, you can only listen when you're actually connected to the Internet.)
Figure 8-13. The left side of the Radio Tuner window lists your preset stations. (Microsoft starts you off with several popular stations in a collection named Featured Stations.) The right side provides search features to help you find stations you want to add to this canned list.
To create your own list (that will replace Microsoft's Featured Stations list), find your favorite stations by using the search features in the right pane. In the Search Keyword text box, type in the name of the show, a host, a city name, or whatever.
When you find a radio station you like, select it and then click the Add to My Stations link that appears below its name. (To remove a station from your preset list, select it and then click Remove from My Stations.)
NOTE
You need the Radio Tuner screen only to set up your list of favorite stations. After that, the radio stations appear in the "folder" labeled Radio Tuner Presets, located within your Media Library (Figure 8-11). You can play radio stations from the Media Library screen ”the same screen you use to play everything else in your multimedia world.
8.3.9 Video Clips
Media Player can also play movie files, such as those you've downloaded from the Internet, made yourself, or grabbed from a CD-ROM. The standard Windows movie-file format is .avi, but Media Player can also play files with the extensions .wmv, .wvx, .avi, .mpeg, .mpg, .mpe, .m1v, .mp2, .mpa, and .ivf.
NOTE
Media Player doesn't recognize two of the most popular video-file formats: QuickTime and RealVideo. To play these files, you'll need QuickTime Player (available free from http://www.apple.com/quicktime) or RealPlayer (from http://www.real.com), respectively.
8.3.10 DVD Movies
If your PC has a drive that's capable of playing DVDs, you're in for a treat. Media Player can play rented or purchased Hollywood movies on DVD as though it was born to do so ”a new feature in Windows XP.
Watching movies on your screen couldn't be simpler: Just insert the DVD. Windows XP automatically detects that it's a video DVD ”as opposed to, say, one that's just filled with files. Then, depending on the settings you made in the dialog box shown in Figure 8-7, it either opens Media Player automatically or offers to do so. (If not, no problem: Open Media Player yourself and then choose Play DVD or CD Audio [your DVD drive's name].)
Media Player starts out playing your movie in a relatively small window ”but you didn't come this far, and pay this much, just to watch movies on a slice of your screen. Your first act, therefore, should be to enlarge the picture to fill the screen. Pressing Alt+Enter is the easiest way, but you can also choose View Full Screen or click the Full Screen button (see Figure 8-14).
Figure 8-14. Once the DVD is playing, you control the playback using the standard Media Player controls (at the bottom-left edge of the window). To switch to a different "chapter," use the list at right (choose View Now Playing Tools Show Playlist if you don't see it). To change language or subtitle options, open the DVD View menu, as shown here. When you're playing the movie full screen, a "remote control" appears only when you move the mouse a bit. Then the variable-speed slider appears, along with the Rewind, Play/Stop, and other controls labeled here. It fades away again a few seconds after you stop moving the mouse.
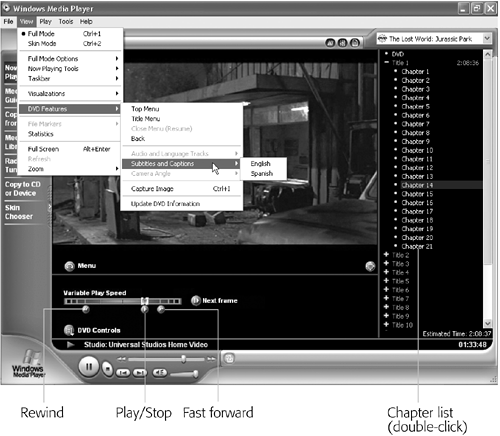
After you enlarge the screen, a slider appears for a few seconds at the lower-left corner of the screen, permitting you to speed backward or forward through the movie, and then fades away so as not to obscure Arnold Schwarzenegger's face. It's joined by the Rewind, Fast Forward, and other buttons identified in Figure 8-14. To pause the movie, jump around in it, or advance one frame at a time, just twitch the mouse to make the controls (and the playlist of DVD chapters) reappear.
NOTE
For real fun, turn on English subtitles but switch the soundtrack to a foreign language. No matter how trashy the movie you're watching, you'll gain much more respect from your friends and family when you tell them that you're watching a foreign film.
8.3.10.1 Ditching the Remote Control
When the remote control is hidden, you can always return it to the screen just by moving your mouse. But the true DVD master would never bother with such a sissy technique. The secret keystrokes of Media Player are all you really need to know:
| Function | Keystroke |
|---|---|
| play | Ctrl+P |
| stop | Ctrl+S |
| fast forward | Ctrl+Shift+F |
| rewind | Ctrl+Shift+B |
| louder | F10 |
| quieter | F9 |
| mute | F8 |
| next/previous "chapter" | Ctrl+F, Ctrl+B |
| full-screen mode | Alt+Enter |
| eject | Ctrl+E |
NOTE
Watching a movie while sitting in front of your PC is not exactly the great American movie-watching dream. To enhance your viewing experience, you can always connect the video-output jacks of your DVD-equipped PC (most models) to your TV.
Just be sure to connect the cables from the PC's video-output jacks directly to the TV. If you connect them to your VCR instead, you'll get a horrible, murky, color -shifting picture ”the result of the built-in copy-protection circuitry of every VCR.
EAN: 2147483647
Pages: 230