Section 9.3. Instant Slideshows
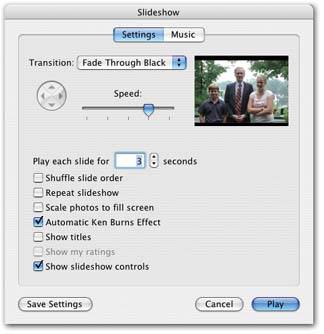
9.3. Instant SlideshowsAn instant slideshow, for the purposes of this book, is one that you begin by clicking the triangular Play button beneath the Source list without the Option key. It makes the Slideshow dialog box appear, so that you can make a few quick changes to the slideshow settings. (Slide selection and slide sequence, as described in the previous paragraphs, work the same way.) The Slideshow dialog box has two panelsSettings and Musicas shown in Figure 9-2. In iPhoto 5, you have more ways than ever to customize your slideshow: 9.3.1.9.3.1.1. TransitionsIn iPhoto 4, you were offered a mere four types of transition effects between slidesfor example, the crossfade or dissolve , in which one slide gradually fades away as the next "fades in" to take its place. These days, you have a choice of 13 transition effects:
In most cases, choosing a transition effect makes two additional controls "light up" just below the pop-up menu:
9.3.2. Slide TimingIf left to its own devices, iPhoto advances through your pictures at the rate of one photo every two seconds. If that seems too brisk or too slow, you can simply change the rate. In the Slideshow dialog box, use the "Play each slide for __ seconds" controls to specify a different interval, as shown in Figure 9-2. Tip: You can also adjust the speed during the slideshow, just by pressing the up or down arrow keys. Behind the scenes, iPhoto adjusts the number of seconds in the Slideshow dialog box accordingly . 9.3.3. Shuffle Slide OrderAn iPhoto slideshow normally displays your pictures in the order they appear in the photo-viewing area. But if you'd like to add a dash of surprise and spontaneity to the proceedings , turn on the "Shuffle slide order" checkbox. iPhoto will then shuffle the pictures into whatever order it pleases. 9.3.4. Repeat SlideshowWhen iPhoto is done running through all your photos in a slideshow, it ordinarily starts playing the whole sequence from the beginning again. If you want your photos to play just once through, turn off the "Repeat slideshow" checkbox. 9.3.5. Scale Photos to Fill ScreenIf any photos in your slideshow don't match your screen's proportions , you may want to turn on "Scale photos to fill screen." For example, if your slideshow contains photos in portrait orientationthat is, pictures taken with the camera rotatediPhoto fills up the unused screen space on each side with vertical black bars. Turning on "Scale photos" makes iPhoto enlarge the picture so much that it completely fills the screen. This solution, however, comes at a cost: Now the top and bottom of the picture are lost beyond the edges of the monitor. When the middle of the picture is the most important part, this option works fine. If the black bars bother you, the only other alternative is to crop the odd- sized pictures in the slideshow album so that they match your monitor's shape. (See "Cropping" on Section 8.5.)
Note: This option doesn't mean "Enlarge smaller photos to fill the screen"; iPhoto always does that. This option affects only photos whose proportions don't match the screen. 9.3.6. Automatic Ken Burns EffectApple first introduced what it calls the "Ken Burns effect" in iMovie, not iPhoto. It's a special effect designed to address the core problem associated with using still photos in a movie: namely, that they're still ! They just sit there without motion or sound, wasting much of the dynamic potential of video. And now your own humble slideshows can have that graceful , animated, fluid Ken Burns touch. No photo ever just sits there motionless on the screen. Instead, each one flies gracefully inward or outward, sliding and zooming. 9.3.7. Show TitlesEvery photo in your collection can have a namea title, in other words. If you turn on this option, iPhoto superimposes each photo's title during the slideshow in a small white-on-black box in the upper-left corner of the screen. Needless to say, the cryptic file names created by your digital camera (IMG00034. JPG) usually don't add much to your slideshow. But if you've taken the time to give your photos helpful, explanatory names ("My dog age 3 mos"), then by all means turn on the "Show titles" checkbox.
9.3.8. Show My RatingsAs described on Section 7.14, you can differentiate your stunning award-winners from the photographic dogs by adding ratings to each, on a one-to-five-star scale. If you turn on this option, iPhoto superimposes a small ratings bar on the bottom of each slideshow picture. (Unfortunately, you can't change the rating using this mini-bar, since it's for display purposes only. Of course, a quick mouse wiggle summons the full-blown control bar, complete with its own star-rating panel that you can change.) Note: The control bar and the star-rating panel occupy the same space near the bottom of the slideshow "canvas," so they can't both be onscreen at the same time. That's why the "Show my ratings" checkbox is grayed out whenever "Show slideshow controls" is turned on. 9.3.9. Show Slideshow ControlsYou can always summon iPhoto's new onscreen control bar by twitching the mouse during a slideshow; then, if a few seconds go by without any mouse activity, the bar politely fades away again. If you turn on "Display slideshow controls," however, then the control bar appears automatically every time this slideshow beginsno mouse wiggling requiredand remains onscreen all the time. 9.3.10. iTunes: The Soundtrack StorePerhaps more than any other single element, music transforms a slideshow, turning your ordinary photos into a cinematic event. When you pair the right music with the right pictures, you do more than just show off your photos; you create a mood that can stir the emotions of your entire audience. So if you really want your friends and family to be transfixed by your photos, add a soundtrack. That's especially easy if, like many Mac OS X fans, you've assembled a collection of your favorite music in iTunes. For the background music of an iPhoto slideshow, you have the choice of an individual song from your iTunes Library or an entire playlist . Gone are the days of listening to the same tune repeating over and over again during a lengthy slideshowa sure way to go quietly insane (unless, of course, you really like that song). The possibilities of this new feature are endless, especially combined with iPhoto's smart albums feature. You can create a smart album that contains, say, only photos of your kids taken in December, and give it a soundtrack composed of holiday tunes, created effortlessly using a smart playlist in iTunes. Instant holiday slideshow! Your first iPhoto slideshow is born with a ready-to-use soundtrackJ. S. Bach's Minuet in G. In fact, Apple sends iPhoto to you equipped with two Bach classicsthe Minuet in G and Jesu, Joy of Man's Desiring . They're listed in the Sample Music category. Not to knock Bach, but it's fortunate that you're not limited to two of his greatest hits. To switch to a soundtrack of your own choosing, click the Music button at the top of the Slideshow dialog box (Figure 9-3). If you use iTunes, every track in your iTunes Library automatically appears here. You can search and sort through your songs and playlists, just as though you were in iTunes itself. To get started, click the Music button near the top of the Slideshow dialog box. As shown in Figure 9-3, a folder called Sample Music appears at the top, containing the two Bach pieces mentioned above. If you have songs of your own in iTunes, click the Library icon to access them (this option is grayed out if you don't have any music files in iTunes).
Your iTunes playlists appear on this menu, too. (For iTunes songs, a playlist represents what an album is in iPhoto: a hand-picked subset of the larger collection.) In other words, you can use this list either to select an entire playlist to use as your soundtrack, or to call up a playlist for the purpose of listing the individual songs in it, thereby narrowing your search for the one song you seek.
Once you've settled on (and clicked) an appropriate musical soundtrack for the currently selected album, click Save Settings (to memorize that choice without starting the slideshow) or Play (to begin the slideshow right now). From now on, that song or playlist will play whenever you run a slideshow from that album. (It also becomes the proposed soundtrack for any new slideshows you create.) Alternatively, if you decide you don't want any music to play, turn off the "Play music during slideshow" checkbox above the list. Note: You can select multiple songs from the song list in the Slideshow dialog box, using the Shift-click and 9.3.11. Different Shows, Different AlbumsYou can save different slideshow settings for each icon in your Source list. To save settings for a specific photo album, for example, first choose the album from the Source list, then click the Slideshow icon in the lower pane of the iPhoto window to open the Slideshow dialog box. Pick the speed, order, repeat, and music settings you want, then click Save Settings. The settings you saved will automatically kick in each time you launch a slideshow from that album. |
 System Preferences, and open the Displays panel. In the Resolutions list, youll find all the resolutions that your monitor can handle, with the current resolution highlighted. If the selection says, for example, 1024 x 768, you know that photos must be at least 1024 pixels by 768 pixels to fill your screen without iPhoto having to stretch them to fit.
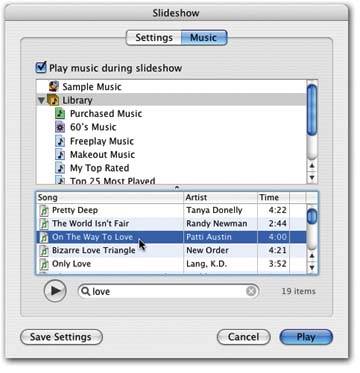
EAN: 2147483647
Pages: 314