Section 23.7. Tracks
23.7. TracksWhen you work in GarageBand, the timeline is your primary canvas. It's something like the timeline view in iMovie: a scrolling map of the overall project, marked at the top by a beat ruler that helps you figure out where you are in the song. Tracks are the horizontal, parallel stripes that represent instruments playing simultaneously . Which is lucky, because if this software could play only one instrument at a time, it would have to be renamed GarageSolo. You'll learn how to fill these gray stripes in the following chapters. For the moment, though, it's useful to learn your way around the tracks themselves . After all, like the musicians in a real garage band , they're paid very little, but respond well if you treat them with a little respect. As you read the following instructions, you might want to follow along by working with the Garage Door song you opened in the previous section (Section 23.1). 23.7.1. Creating a TrackYou can add a track in any of three ways.
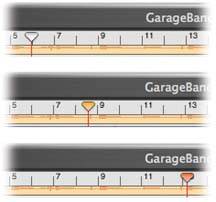
In any case, a new track appears below all the existing tracks. Tip: If you have a standard, preferred "combo"drums at the bottom, bass line above that, then piano, then guitar, and so onyou can save a lot of time by building an empty GarageBand template with this track structure. Save this empty file to your desktop. Each time you want to work from this template, open itand then before filling it with music, choose File  Save As and name the song youre about to create. Save As and name the song youre about to create. The number of simultaneous tracks that GarageBand can play depends on the horsepower of your Mac and which kind of tracks they are; Software Instruments make the Mac work a lot harder than Real Instrument recordings. On slower Macs, four or five tracks is about the limit; 10 or 12 tracks is typical on a Power Mac G4. If you have a fully tricked-out, top-of-the-line Power Mac G5 loaded with RAM, then you can build tracks into the dozens. Fortunately, there's a whole chapter's worth of tips and tricks for helping GarageBand overcome the strain of track- intensive compositions waiting in Chapter 33. Tip: As you add and work with tracks, keep your eye on the Playhead handle. As described in Figure 23-7, it's an early-warning system that lets you know when you're overwhelming your Mac.
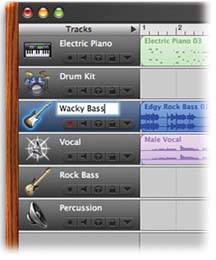
23.7.2. Rearranging TracksYou can rearrange your tracks' top-to-bottom order just by dragging them vertically. You might, for example, like to keep the track you're working on up at the top where it's easy to find. Or maybe you like to keep your tracks in traditional "score order" (that is, as the instruments would appear in standard full-orchestra sheet music). 23.7.3. Deleting a TrackBefore you nuke one of your tracks, scroll through the whole thing to make sure you're not about to vaporize some important musical material. (Consider zooming outtap Control-left arrow repeatedlyuntil the entire track fits on your screen.) Then click the track header to select it. Choose Track 23.7.4. Renaming a TrackClick a track's header to select it, and then click carefully , once, on its name. It's now a simple matter to edit the track's name, as shown in Figure 23-8.
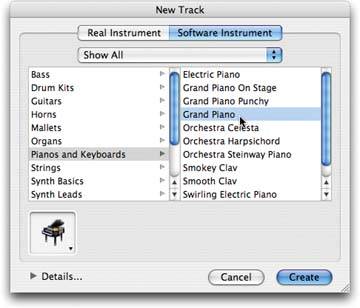
23.7.5. Track CharacteristicsThe importance of the New Track dialog box shown in Figure 23-6 depends on what kind of musical material you intend to record (that is, which of the two tabs you click):
Tip: Either way you can also choose an icon for the track, using the pop-up menu at the lower-left corner. Apple gives you 68 little graphics to choose fromevery instrument in GarageBand, plus silhouettes of singers. (These are purely graphic ornaments; they don't affect the sound in any way.)To open this palette of icons, by the way, you don't have to click the tiny, down-pointing triangle, as you might expect. Instead, click squarely on the icon itself. The broader target means quicker access. The appearance of the New Track dialog box is not, fortunately, the only chance you get to adjust these parameters. You can summon the same box at any time, even after recording into the track, by double-clicking the track header, or, if a track is already selected, by choosing Track Note: In fact, when you open the Track Info dialog box, you get a Details button at the bottom that you don't get in its New Track dialog box. Details on effects in Chapter 28.You also get a Master Track tab at the top of the dialog box; it's described in Chapter 29. |
EAN: 2147483647
Pages: 314