18.3. The Ken Burns Effect The only problem with using still photos in a movie is that they're still . They just sit there without motion or sound, wasting much of the dynamic potential of video. For years , professionals have addressed the problem using special sliding camera rigs that produce gradual zooming, panning, or both, to bring photographs to life. But this smooth motion isn't just about adding animation to photos for its own sake. It also lets you draw the viewer's attention where you want it, when you want it. For example: "Little Harry graduated from junior high school in 1963"slow pan to someone else in the school photo, a little girl with a ribbon in her hair"little suspecting that the woman who would one day become his tormentor was standing only a few feet away." Among the most famous practitioners of this art is Ken Burns, the creator of PBS documentaries like The Civil War and Baseball which is why Apple, with his permission, named the feature after him. You can endow any still graphics file with this kind of motion, either at the moment when you place it or import it from your hard drive, or anytime thereafter. 18.3.1. Applying the Ken Burns Effect In this example, you'll animate a photo that's in the iPhoto palette. -
Select the photo . Actually, you can select more than one, to process all of them in the same way. -
Turn on the Ken Burns Effect checkbox at the top of the window. Specify how long you want the picture to remain onscreen . Use the Duration controls, just as described on Section 18.1.1. -
Click Start. Use the Zoom controls until the photo is as big as you want it at the beginning of its time on screen. Drag inside the Preview screen to adjust the photo's position (Figure 18-4) . In other words, you're setting up the photo the way it appears at the beginning of the shot. Often, you won't want to do anything to it at all. You want it to start on the screen at its original sizeand then zoom in from there. But if you hope to create a zooming out effect, then drag the Zoom slider to the right (or type a larger number into the box), magnify the photo in the Preview screen, and finally drag the picture itself to center it properly.
Tip: It's actually possible to drag the photo partially or completely out of the frame , leaving an empty black void in its place. If you've done this accidentally , just nudge the Zoom slider slightly right, then left. The photo smartly snaps back into centered position. On the other hand, there are certain creative possibilities here. You can make a photo begin offscreen and then slowly slide into place, for exampleor even exit the screen by sliding off the opposite side.
-
Click End. Use the Zoom controls to set up the picture's final degree of magnification. Drag inside the Preview screen to specify the photo's final position. (Shift-drag to constrain your dragging to perfect vertical or horizontal adjustments .) In short, you've set up the starting and ending conditions for the photo. Take a moment now to click the Preview button. The animated photo goes through its scheduled motion within the Preview box, so that you can check the overall effect. Repeat steps 3 and 4 as necessary.
Tip: At any time, you can click the Reverse button to swap the settings of the Start and End positions . What was once a slow zoom in, left to right, becomes a slow zoom out, right to left.
-
Drag the thumbnail image out of the Photos palette and into the Movie Track . Or click the Apply button; iMovie plunks the image at the end of the movie. 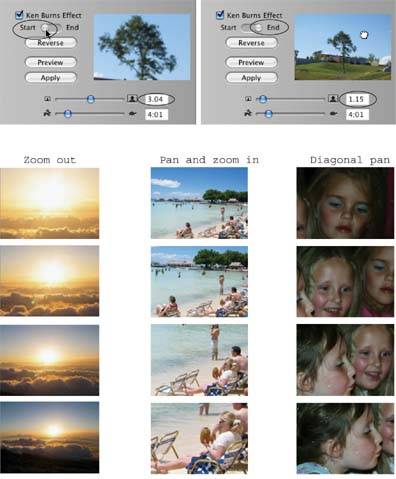 | Figure 18-4. Top: To set up the Ken Burns effect, establish the position and zoom level of the Start and End points separately. (At top right, you can see the little grabby hand cursor that lets you shift the photo within the frame.)
Bottom: Here are three possibilities. The zoom-out pictured at left results from the Ken Burns settings shown above. The center example makes the camera appear to zoom in on the woman holding the pineapple, even as the photo shifts position to center the pineapple. At right, the Zoom setting was the same (2.0) for both the Start and End points. The only thing that changes over time is the left-to-right position of the photo in the frame. | | Either way, iMovie now begins rendering your photo effect. You specified the beginning and ending positions of the photo; now iMovie is interpolating, calculating each intermediate frame between the starting and ending points you've specified. The red progress bar crawls across the face of the clip, showing you how much longer you have to wait. (Of course, you're free to work on other aspects of your movie in the meantime, although you may notice a slowdown .) After the rendering is complete, click the photo clip in the Movie Track and press the Space bar to play your Ken Burns-ized "photo movie" in the Monitor window. 18.3.2. Editing or Removing the Ken Burns Effect If a photo clip requires adjustment, touching it up is easy enough. Select it in the Movie Track (or wherever it is). Click the Photos button (if the Photos pane isn't already open ). Click Start or End, and reprogram the Ken Burns effect just as you did the first time around. (Feel free to edit the duration, too.) When you're finished, click Update. iMovie dutifully re- renders the clip with its new settings. And what if you want the photo to return to its original, virginal condition? In that case, click the Start button. Drag the Zoom slider all the way to the left, which both re-centers the photo and restores it to its original size . Click the End button and repeat. Finally, click the Update button. 18.3.3. Cropping or Moving a Photo Without Animating It If you decide that a certain still photo really should be still, click the clip in the Movie Track, turn off the Ken Burns Effect checkbox, and then click Update. The photo is now frozen at its first frame, at the same zoom and position it had when the Ken Burns checkbox was still turned on. GEM IN THE ROUGH
The Ken Burns Cropping Effect | | You already know that the Ken Burns effect can animate a photo over time, slowly (or quickly) zooming, panning, or both, depending on where the picture is when you click the Start and End buttons . But you can also zoom or shift the photo without animating it. In effect, you can use the Ken Burns tools to crop a photo as you place it into your Movie Track. This is a great trick for dealing with a vertical photo that you want to use in the horizontal orientation of a standard television. By zooming in until the black bars disappear, you've chopped off some of the top and bottom of the picture. To try this out, click a photo, make sure the Ken Burns checkbox is turned off, specify the duration, and then zoom in. Lastly, drag to shift the photo the way you like it. Here's a related trick that you may find useful. Suppose you've just Ken Burns-ized a photo. You change your mind. You want it to be still, but you like the way it ends . In that case, Option-click the Start button (in the Photos panel), and then click Update. Option-clicking copies the End position and zoom level into the Start position. The result is a clip that doesn't move or pan at all, but instead maintains the same zoom level and position for its entire duration. (You can Option-click the End button, too, if the Start position and zoom level are what you want to use for the entire clip.) |
What's neat is even when the Ken Burns effect is turned off, the Zoom slider and the little "move my photo around the frame" cursor still work. In other words, you can use the Ken Burns control to enlarge, crop, or shift a still photo without animating it.  |