Section 18.1. Importing Still Images
18.1. Importing Still ImagesYou might want to import a graphics file into iMovie for any number of reasons. For example:
Note: Of course, iPhoto can create video photo albums, too. And in iPhoto, you can opt to loop a slideshow (which iMovie can't do); rearranging and regrouping your photos is much easier than in iMovie, too. But building them in a movie has several advantages. First of all, your music options are much greater; you can import music straight from a music CD, for example, or record narration as you watch the slideshow. You have a full arsenal of tools for creating titles, credits, and special effects, too. As your life with iMovie proceeds, you may encounter other uses for the picture-importing feature. Maybe, when editing a home movie of your kids tussling in the living room, you decide it would be hilarious to insert some Batman -style fight-sound title cards ("BAM!") into the footage. Maybe you need an establishing shot of, say, a storefront or apartment building, and realize that you could save production money by inserting a still photo that passes for live video in which there's nothing moving. And maybe you want to end your movie with a fade-outnot to black, but to maroon (an effect described later in this chapter).
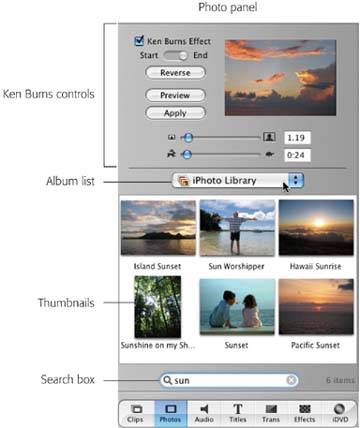
You have a delicious choice of two methods for bringing still photos into a project. The first and most convenient method is to choose the photo from among those you've organized in iPhoto, using iMovie's window into your picture collection. If you're not using iPhoto to organize your digital photos, you can also use the older method of importing pictures directly from the hard drive. 18.1.1. Snagging Pictures from iPhotoThe more you work with iMovie and iDVD, the more you appreciate the convenience of the way Apple has linked them to the other i-programs, like iTunes and iPhoto. Here's a classic case: When you click the Photos button (Figure 18-1), you're shown what amounts to iPhoto Lite: a scrolling panel of thumbnail images reflecting the contents of your entire iPhoto Library. Using the pop-up menu just above the thumbnails, you can even limit your view to the contents of one iPhoto album or folder . Once you've pinpointed the picture you want, you install it in your movie like this: 18.1.1.1. Phase 1: Specify the durationBecause you're importing a still image, it doesn't have a duration , as a movie clip might. (Asking "How many seconds long is a photograph?" is like asking, "What is the sound of one hand clapping?") Still, it's a clip, so iMovie has to assign it some duration. You can make your graphic appear on the screen for as little as three frames (a favorite of subliminal advertisers) all the way up to 30 seconds (a favorite of all other advertisers). There's a fast way and a precise way to change this number. The fast way is to drag the rabbit/ turtle slider shown in Figure 18-2. Tip: When you get right down to it, 30 seconds is plenty of time for looking at one particular photo, no matter how good it is. Still, if you need it to last longerperhaps because you're using it as a background for a series of opening creditsyou can always overcome the 30-second limit by placing the same photo into the Movie Track over and over again, side by side, 30 seconds long each. When more precision is required, you can also type the number of seconds and frames into the Duration box to the right of the slider. You can use a number of shortcuts to edit the numbers in this tiny box:
18.1.1.2. Phase 2: Specify the Ken Burns effectIf you turn on the Ken Burns Effect checkbox at the top of the Photos panel, you unleash a wild and arresting feature: the ability to pan and zoom smoothly across photos, in essence animating them and directing the viewer's attention. Details on Section 18.3.1. If you'd rather have your photo just pop onto the screen and remain stationary, make sure that the Ken Burns checkbox is turned off. (If you plan to export the movie to iDVD, however, you might want to read Section 32.8.4 to find out why you'd want to apply Ken Burns to every photo, even motionless ones.) 18.1.1.3. Phase 3: Insert the photoAt last you're ready to put the picture into the movie (a phrase that would hopelessly confuse Hollywood executives who already refer to movies as pictures). You can do so in either of two ways:
Tip: Speaking of slideshows: You can also drop a whole bunch of photos into the Movie Track at once. Select them in the Photos palette just as you would clips, then drag them en masse down to the Movie Track. Or click Apply to drop them all at the end of the Movie Track. You may notice, by the way, that black bars appear above and below (or along both sides of) certain photos, creating the traditional letterbox effect. That happens when a photo doesn't have the proportions that quirkly old iPhoto expects. See the next pages for the fix. 18.1.2. Importing Photos from the Hard Drive If you want to incorporate graphics that aren't in iPhoto, begin by making sure that no thumbnails are selected in the Photos palette. (If one thumbnail remains highlighted, Finally, choose File The new photo shows up instantly in the Clips pane or the Movie Track, depending on where you've directed incoming clips to go in iMovie's Preferences box. Once again, if black bars appear on the sides or top and bottom of the photo, see Section 18.3. Tip: iMovie can import graphics in any format that QuickTime can understand, which includes PICT, JPEG, GIF, Photoshop files, and even PDF files, for when an IRS form is exactly what you want to illustrate in your movie. Avoid the GIF format for photos, which limits the number of colors available to the image. But otherwise , just about any format is good still-image material. After you've imported a graphics file into your project, it's OK to delete, rename, or move the original graphics file you imported. iMovie doesn't need it anymore. And if you've been lying awake at night, wondering how iMovie can display your graphic even after the original file is gone, look no farther than the Media folder inside your movie's project file (or project folder). There you'll find copies of your imported graphics files, with their original names and at full resolution (so that the Ken Burns effect, if turned on, will have enough "margin" to animate your photo). You'll also find clip icons called Still 01, Still 02, Still 03, and so on; these are the rendered video clips, at 640 x 480 resolution, that iMovie made. 18.1.3. Working with PhotosOnce you've installed them in the Movie Track, photos behave a lot like standard movie clips. You can rename them, drag them around, click them to view them in the Monitor window, drag them back and forth from the Clip Viewer and Clips pane, delete them, incorporate them into titles or transitions, and so on. You can also adjust the timing of an imported picture. Just highlight its icon, adjust the Duration slider (or type new numbers into the Duration box), and then click the Update button just above those controls. (The Update button appears only when a single photo is selected. You can't change the timings of multiple photos at once.) If you haven't applied the Ken Burns effect (described later in this chapter), you can also change a photo's duration by double-clicking it and then typing a new duration into the Clip Info box. Using this method, you save yourself a click on the Photos button. Tip: If you've used still images in your movie, don't even think about turning your project into a DVD until you've read the troubleshooting steps on Section 32.8.4. Otherwise, you'll wind up with very jagged photos. |
 Select All), you can rapidly specify the new duration by just typing up the whole thing, including the colon, like this:
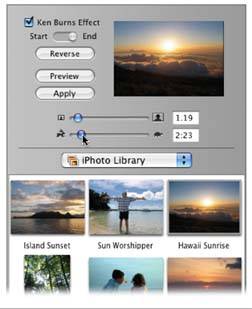
EAN: 2147483647
Pages: 314