Section 9.7. The Device Manager
9.7. The Device ManagerThe Device Manager is an extremely powerful tool that lets you troubleshoot and update drivers for gear you've already installed. It's a master list of every component that constitutes your PC: floppy drive, CD-ROM drive, keyboard, modem, and so on (Figure 9-11). It's also a status screen that lets you know which drivers are working properly, and which ones need some attention. You can open the Device Manager two different ways:
In each of these cases, you now arrive at the screen shown in Figure 9-11. Figure 9-11. The Device Manager lists types of equipment; to see the actual model(s) in each category, you must expand each sublist by clicking the + symbol. A device that's having problems is easy to spot, thanks to the red X's and yellow question marks. 9.7.1. Red X's and Yellow ?'s: Resolving ConflictsA yellow question mark next to the name indicates a problem with the device's driver. It could mean that either you or Windows XP installed the wrong driver, or that the device is fighting for resources being used by another component. It could also mean that a driver can't find the equipment it's supposed to control. That's what happens to your Zip-drive driver, for example, if you've detached the Zip drive. A red X next to a component's name, meanwhile, indicates that it just isn't working, or that you've deliberately disabled it, as described in a moment. At other times, the X is the result of a serious incompatibility between the component and your computer, or the component and Windows XP. In that case, a call to the manufacturer's help line is almost certainly in your future. Tip: To find out which company actually created a certain driver, double-click the component's name in the Device Manager. In the resulting Properties dialog box, click the Driver tab, where you'll see the name of the company, the date the driver was created, the version of the driver, and so on. 9.7.1.1. Duplicate devicesIf the Device Manager displays duplicate icons for a device (for example, two modems), remove both of them. (Right-click each and then choose Uninstall from the shortcut menu.) If you remove only one, Windows XP will find it again the next time the PC starts up, and you'll have duplicate devices again. If Windows XP asks if you want to restart your computer after you remove the first icon, click No, and then delete the second one. Windows XP won't ask again after you remove the second incarnation; you have to restart your computer manually. When the PC starts up again, Windows finds the hardware device and installs it (only once this time). Open the Device Manager and make sure that there's only one of everything. If not, contact the manufacturer's help line. 9.7.1.2. Resolving resource conflictsIf the "red X" problem isn't caused by a duplicate component, double-click the component's name, and then click the Resources tab. Here you'll find an explanation of the problem, which is often a conflict in resources (see Figure 9-12). Figure 9-12. The Resources tab should have all the information you need to resolve a problem. Any resource with a conflict is marked with a red circle with a slash, meaning "not working." Selecting a resource with a problem displays information about the conflict.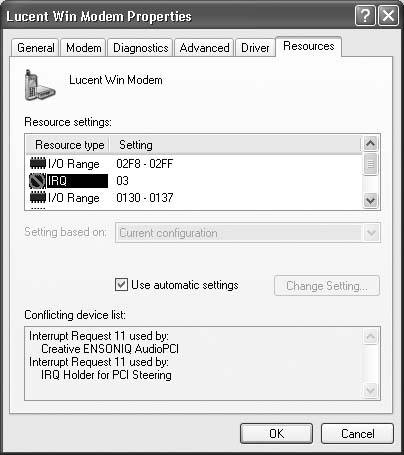 Click the name of the resource that's having the conflict, and then click the Change Setting button. (If the Change Setting button is grayed out, turn off the "Use automatic settings" checkbox.) Click the up/down control arrows next to the resource value, keeping an eye on the message in the Conflict Information box. When you select a value that has no conflict (as indicated by the Conflict Information box), move on to the next resource that indicates a conflict, and then click OK. When Windows XP installs a Plug and Play device, it can modify the settings for both the device and its driver in order to find a combination that works. Windows might even have to reconfigure other devices in the computer, so that the new device can function properly. But when you're working with a nonPlug and Play device, Device Manager can change the hardware settings only for the driver, not the device itself. In some cases, the driver may not be able to work with the device's settings. In these cases, you have to modify the settings of the hardware device itself using a program supplied by its manufactureror for really old gadgets, you'll have to flip jumpers or DIP switches right on the device itself. Or just sell the whole thing and move to Amish country. 9.7.2. Turning Components OffIf you click to select the name of a component, the icons at the top of the Device Manager window spring to life. The one on the far right is the Disable button (Figure 9-11), which makes your PC treat the component in question as though it's not even there. (You'll be asked to confirm your decision.) You can use this function to test device conflicts. For example, if a red X indicates that there's a resource conflict, you can disable one of the two gadgets, which may clear up a problem with its competitor. When you disable a component, a red X appears next to the component's listing in the Device Manager. To undo your action, click the device's name and click the Enable button in the toolbar (formerly the Disable button). 9.7.3. Updating Drivers with the Device ManagerIf you get your hands on a new, more powerful (or more reliable) driver for a device, you can use the Device Manager to install it. Newer isn't always better, however; in the world of Windows, the rule "If it ain't broke, don't fix it" contains a grain of truth the size of Texas. In the Device Manager, click the + button for the appropriate type of equipment, and then double-click the component's name to open its Properties box. On the Driver tab (see Figure 9-13), click the Update Driver button. The Update Device Driver Wizard walks you through the process. Figure 9-13. When you double-click a component listed in your Device Manager and then click the Driver tab, you find four buttons and a lot of information. The Driver Provider information, for example, lets you know who is responsible for your current driverMicrosoft or the maker of the component. Click the Driver Details button to find out where on your hard drive the actual driver file is; the Update Driver button to install a newer version; the Roll BackDriver button to reinstate the earlier version; or the Uninstall button to remove the driver from your system entirelya drastic decision.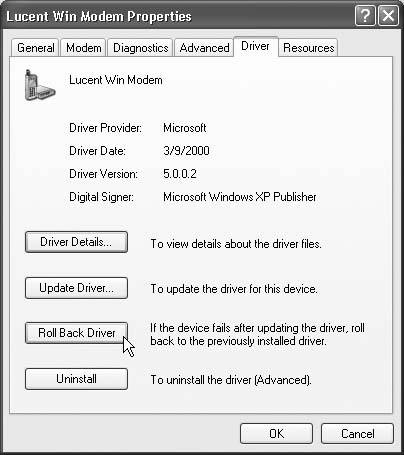 Along the way, the wizard will offer to search for a better driver, or display a list of drivers in a certain folder so you can make your own selection. Ignore the "Install the software automatically (Recommended)" option; you know where the driver is, and it's faster to find it yourself. Select "Install from a list or specific location (Advanced)," and then click Next. If the newer driver is on a disk, turn on the top checkbox ("Search removable media"), and then click Next. If you've downloaded it, turn on "Include this location in the search," and then click the Browse button to find and select it. In either case, you may have to restart the PC to put the newly installed driver into service. |
 Control Panel; open the System icon. Once again, click the Hardware tab to find the Device Manager button.
 EAN: 2147483647
Pages: 162