Section 4.2. The Folders of Windows XP
4.2. The Folders of Windows XPThe top-level, all-encompassing, mother-ship window of your PC is the My Computer window. From within this window, you have access to every disk, folder, and file on your computer. Its slogan may as well be: "If it's not in here, it's not on your PC." To see it, choose Start
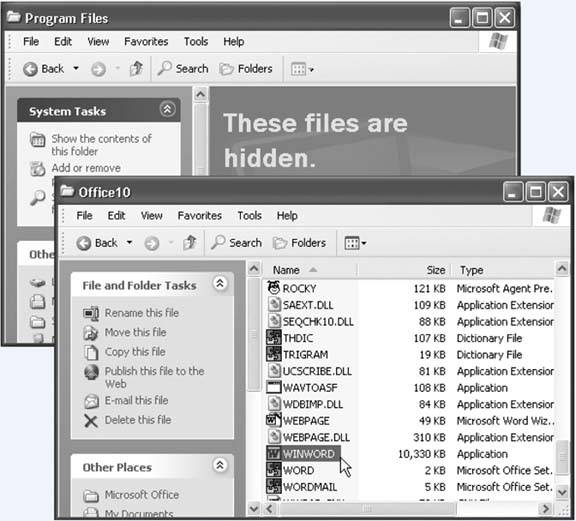
4.2.1. What's in the Local Disk (C:) WindowYou might be surprised to learn that your main hard drive window doesn't actually contain anything much that's useful to you, the PC's human companion. It's organized primarily for Windows' own benefit. If you double-click the Local Disk C: icon in My Computerthat is, your primary hard drive's icona direly worded message lets you know that these files are hidden. "This folder contains files that keep your system working properly," it says. "You should not modify its contents." (Figure 4-2 shows a similar message.) All of this important-sounding prose is aimed at the kind of person who, before the invention of this warning message, fearlessly or naively cruised through the important system files of their PCs, deleting and moving files until the computer was inoperable (and then calling Microsoft for tech support). Truth is, the C: drive also contains a lot of stuff that doesn't belong to Windowsincluding your files. So when you're just looking (but not touching) the Windows system files, or when you want to burrow around in your own folders, it's perfectly OK to click the "Show the contents of this folder" link. Suddenly the C: drive's formerly invisible contents appear. They include these standard folders:
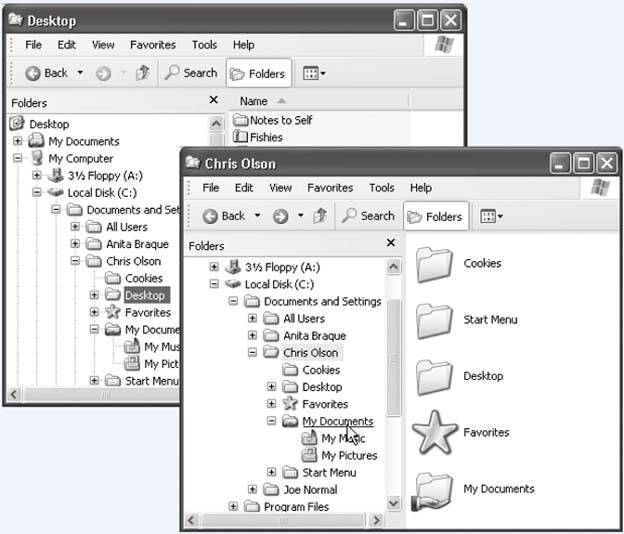
4.2.2. Your Account Folder Everything that makes your Windows XP experience your own sits inside the Local Disk (C:) In general, the only action you'll perform that involves this folder is periodically backing up the Local Disk (C:) Your account folder actually holds much more than this, but the rest of the folders are hidden, reserved for use by Windows itself. The hidden folders include: Application Data (which your programs may use to store user -specific settings and files), Local Settings (Internet Explorer's history list and cache file, for example), NetHood (shortcuts for the icons in your My Network Places window), My Recent Documents (document shortcuts, the ones that show up in the optional My Recent Documents submenu of the Start menu), and SendTo, which is described later in this chapter. Tip: Ordinarily, if your name is, say, Chris, you're not allowed to open the Frank's Documents folder; if you've been given a Limited XP account (Section 12.2.1), then double-clicking it produces only an error message. That's the Windows XP security system at work.But My Computer also contains a folder called Shared Documents. This folder is like the community bulletin board, in that everybody who uses this PC is free to deposit things, take things out, and read whatever resides there. See Chapter 12 for details. 4.2.3. Navigating My ComputerMost of the time, you can get where you're going on your computer using the commands, programs, and folders listed in the Start menu. But when you need to find something that isn't listed therewhen you need to burrow manually through the labyrinth of folders on the machineWindows offers two key methods of undertaking a folder quest. First, you can open the My Computer window, as described at the beginning of this chapter. From there, you double-click one folder after another, burrowing ever deeper into the folders-within-folders. As you navigate your folders, keep in mind the power of the Backspace key. Each time you press it, you jump to the parent window of the one you're now looking atthe one that contains the previous folder. For example, if you're perusing the My Pictures folder inside My Documents, pressing Backspace opens the My Documents window. (Backspace also works in most Web browsers, functioning as the Back button.) Likewise, the Alt key, pressed with the right and left arrow keys, serves as a Back and Forward button. Use this powerful shortcut (instead of clicking the corresponding buttons on the Standard toolbar) to "walk" backward or forward through the list of windows most recently opened. 4.2.4. Navigating with Windows ExplorerThe second method of navigating the folders on your PC is called Windows Explorer for long-time Windows veterans , a familiar sight. (Note that some people use the term "Windows Explorer" to refer to everyday folder windows. In this book, the term refers exclusively to the split-window view shown in Figure 4-3.) Using this method, you work in a single window that shows every folder on the machine at once. As a result, you're less likely to lose your bearings using Windows Explorer than burrowing through folder after folder, as described above. You can jump into Explorer view using any of these methods:
No matter which method you use, the result is a window like the one shown in Figure 4-3. As you can see, this hierarchical display splits the window into two panes. The left pane displays only disks and folders. The right pane displays the contents (folders and files) of any disk or folder you click. You can manipulate the icons on either side much as you would any other icons. For example, double-click one to open it, drag it to the Recycle Bin to delete it, or drag it into another folder in the folder list to move it elsewhere on your machine. This arrangement makes it very easy to move files and folders around on your hard drive. First, make the right pane display the icon you want to move. Then, set up the left pane so that you can see the destination folder or diskand drag the right-side icon from one side to the other. Tip: When you click a folder icon (not its + button) on the left side of an Explorer window, Windows expands that folder's listing and instantly closes whichever folder you previously expanded.If you really want to open two different "branches" (subfolders) of your folder tree simultaneouslyto compare the contents of two folders simultaneously , for examplejust click the little + symbols beside folder names instead of clicking the folder names. When you click the + buttons, Explorer leaves open the listings for the subfolders you've already opened. Figure 4-3. Front: Windows Explorer offers a treetop view of your computer's hierarchy. When you click a disk or folder in the left pane, the right pane displays its contents, including files and folders. |
 My Computer. You generally see several categories of icons (Figure 4-1):
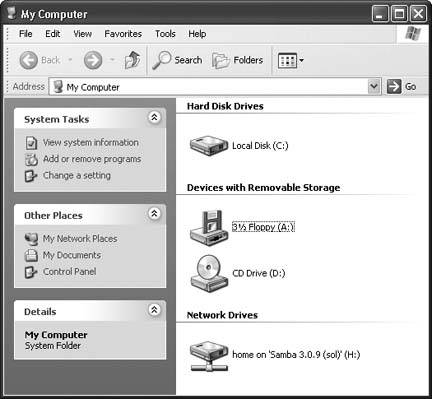
| SHORTCUT | DESCRIPTION |
|---|---|
| Left arrow | Collapses the highlighted folder, or if it's already collapsed , highlights its "parent" folder. (The + key on your numeric keypad does the same thing.) |
| Right arrow | Expands a highlighted folder, or if it's already expanded, highlights the first folder inside it. (Thekey on your numeric keypad does the same thing.) |
| *(on number pad) | Displays all of the selected folder's subfolders. |
| F6 or Tab | Highlights the other half of the window. |
| Alt+left arrow | Highlights whichever folder you last highlighted. |
| Backspace | Highlights the "parent" disk or folder of whatever's highlighted. |
| Ctrl+Z | Undoes whatever you just did in this Explorer window. |
| Home, End | Highlights first or last icon in the folder list. |
| A, B, C, | Highlights the first visible file or folder in the left-pane hierarchy that matches the letter you typed. Type the same letter again to highlight the next matching icon. |
You can also press the letter keys to highlight a folder or file that begins with that letter, or the up and down arrow keys to "walk" up and down the list.
EAN: 2147483647
Pages: 162