2.13. The Taskbar: All Versions The dark, translucent stripe across the bottom of your screen is the taskbar , one of the most prominent and important elements of the Windows interface (Figure 2-21). 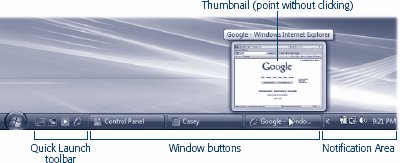 | Figure 2-21. On the left is the Quick Launch toolbar; drag favorite icons here for easy launching. In the middle are buttons for every program you're running (and every desktop window). When you see nothing but microscopic icons, point without clicking to view a thumbnail . | |
The taskbar has several segments, each dedicated to an important function. Its right end, the notification area (or system tray , as old-timers call it), contains tiny status icons. They let you know the time, whether or not you're online, whether or not your laptop's plugged in, and so on. The main portion of the taskbar helps you keep your open windows and programs under control. You can even dress up your taskbar with additional little segments called toolbars , as described in the following pages.
Tip: You can operate the taskbar entirely from the keyboard. Press  +T to highlight the first button on it. Then tap the left and right arrow keys to "walk" across its buttons. +T to highlight the first button on it. Then tap the left and right arrow keys to "walk" across its buttons.
This section covers each of these features in turn . 2.13.1. The Notification Area (System Tray) The notification area gives you quick access to little status indicators and pop-up menus that control various functions of your PC. Many a software installer inserts its own little icon into this area: fax software, virus software, palmtop synchronization software, and so on. Here's your system-tray crash course: -
To figure out what an icon represents, point to it without clicking so that a tooltip balloon appears. To access the controls that accompany it, try both left-clicking and right-clicking the tiny icon. Often, each kind of click produces a different pop-up menu filled with useful controls. -
See the time display at the lower-right corner of your screen? If you point to the time without clicking, a tooltip appears to tell you the day of the week and today's date. If you single-click , you get a handy date-and-time -changing panel. And if you right-click, you get a pop-up menu that lets you visit the Date & Time Control Panel applet. -
If you don't use a tray icon for a couple of weeks, Vista may summarily hide it. See Figure 2-22 for details. 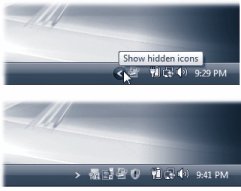 | Figure 2-22. Top: If you see a < button, Windows is telling you that it has hidden some of your notification-area icons .
Bottom: Click this button to expand the notification area, bringing all of the hidden icons into view . | |
NOSTALGIA CORNER
Turning Off Notification-Area Auto-Hiding | | In general, the temporary removal of notification-area icons you haven't used in a while is a noble ambition . Most of the time, you truly won't miss any invisible icons, and their absence will make the icons you do use stand out all the more. Still, you can tell Windows to leave your tray aloneto leave every status icon in full view all the time. To do so, right-click a blank area of the taskbar; from the pop-up menu, choose Properties. At the top of the resulting dialog box, click Notification Area, turn off the "Hide inactive icons" checkbox, and click OK.  If that seems a little drastic, don't miss the Customize button just to the right of that checkbox. It opens a list of every tray icon that would normally appear, if it weren't for Vista's efforts. Click in the Behavior column to produce a pop-up menu. Choose the status you want for each individual tray icon: "Hide when inactive," "Hide," or "Show." Before you click OK, though, you might enjoy the four new "System icons" checkboxes that debut in Vista. They offer quick hide/show switches for four important computer- related status icons: Clock, Volume, Network, and Power. |
2.13.2. Taskbar ButtonsNow with Thumbnails! Every time you open a window, whether at the desktop or in one of your programs, the taskbar sprouts a button bearing that window's name and icon. Buttons make it easy to switch between open programs and windows. Just click one to bring its associated window into the foreground, even if it has been minimized. On PCs that are fast enough to run Aero, in fact, the taskbar does more than display each window's name. If you point to a window button without clicking, you actually see a thumbnail image of the window itself . Figure 2-23 shows the effect. 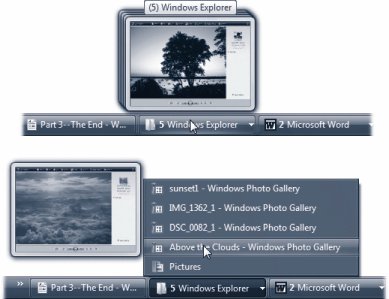 | Figure 2-23. Top: Pointing to a taskbar button without clicking produces these "live" thumbnail previews of the windows themselves , which can be a huge help. After all, you're much more likely to recognize the image of the brochure you're designing than some truncated text button label .
Bottom: If a taskbar button is grouped, then you see only one thumbnail (representing whichever window you opened first in that program). But if you click the button to open its pop-up menu, you can point to each listed window in turn to see its own preview . | |
Note: If you don't want these miniature window replicas to appearmaybe because your aging PC is wheezing under the graphical strain, or maybe because you just find the pop-up previews annoyingyou can turn them off. Right-click a blank spot on the taskbar. From the shortcut menu, choose Properties. In the resulting window, turn off "Show window previews (thumbnails)" and click OK.
2.13.3. Button Groups The taskbar is the antidote for COWS (cluttered, overlapping window syndrome), thanks in large part to taskbar button groups . In the old days, opening a lot of windows might produce the relatively useless display of truncated buttons, as illustrated in Figure 2-21. Not only were the buttons too narrow to read the names of the windows, but the buttons appeared in chronological order, not software-program order. Nowadays, though, when conditions become crowded, the taskbar automatically groups the names of open windows into a single menu that sprouts from the corresponding program button, as shown at bottom in Figure 2-23. Click the taskbar button bearing the program's name to produce a pop-up menu of the window names; now you can jump directly to the one you want.
Tip: The visual thumbnails aren't quite so useful when they sprout out of grouped taskbar buttons, because you're shown only one window thumbnail (the frontmost one). But once that clustered thumbnail is visible, you can click the taskbar button to view a more traditional list of windows. Best of all, if you now point to each name in the list, you get to see its thumbnail. You can move the cursor over the list of window names, admiring each thumbnail as it pops out.
Second, even when there is plenty of room, Windows aligns the buttons into horizontal groups by program . All the Word-document buttons appear, followed by all the Excel-document buttons, and so on. Despite these improvements (which appeared in Windows XP), most of the following time-honored basics still apply: -
To bring a window to the foreground, making it the active window, click its button on the taskbar. (If clicking a button doesn't bring a window forward, it's because Windows has combined several open windows into a single button. Just click the corresponding program's button as though it's a menu, and then choose the specific window you want from the resulting list, as shown in Figure 2-24.) 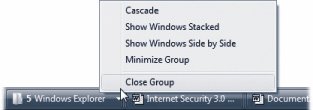 | Figure 2-24. The number on a button indicates that several windows are open in that program; the  is another cue that you must click to see a list of windows . is another cue that you must click to see a list of windows .
Right-clicking one of these buttons lets you perform certain tasks on all the hidden windows together, such as closing them all at once . | |
-
To hide the frontmost window, click its taskbar buttona great feature that a lot of PC fans miss. (To hide a background window, click its taskbar button twice: once to bring the window forward, then a pause, then again to hide it.) -
To minimize, maximize, restore, or close a window, even if you can't see it on the screen, right-click its button on the taskbar and choose from the shortcut menu (Figure 2-24, bottom). -
Windows can make all open windows visible at once, either by cascading them, stacking them, or displaying them in side-by-side vertical slices. (All three options are shown in Figure 2-25.) To create this effect, right-click a blank spot on the taskbar and choose Cascade Windows from the shortcut menu. 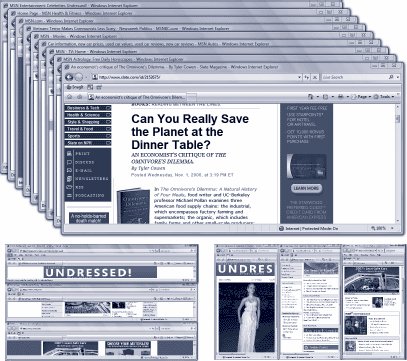 | Figure 2-25. Top: Cascading windows are neatly arranged so you can see the title bar for each window. Click any title bar to bring that window to the foreground as the active window .
Bottom: You may prefer to see your windows displayed stacked (left) or side-by-side (right). Either way, if you began by right-clicking the program's name on the taskbar, you arrange only the windows of one program; right-click a blank part of the taskbar if you want to cascade all windows of all programs . | |
Note: Actually, there's a fourth way to see all your windows at once: Flip 3D, described in the previous section. The cascading/stacking business is an older method of plucking one window out of a haystack.
NOSTALGIA CORNER
Bringing Back the Old Taskbar | | The taskbar's tendency to consolidate the names of document windows into a single program button saves space, for sure. Even so, it's not inconceivable that you might prefer the old system, in which there's one taskbar button for every single window. For example, once Windows stacks the names of your documents, you no longer can bring a certain application to the front just by clicking its taskbar button. (You must actually choose from its menu, which is a lot more effort.) To make Windows Vista display the taskbar the way it did in classic versions of Windows, right-click an empty area of the taskbar and choose Properties from the shortcut menu. Turn off the " Group similar taskbar buttons" checkbox and then click OK. |
-
To minimize all the windows in one fell swoop, right-click a blank spot on the taskbar and choose Show the Desktop from the shortcut menuor just press +D.
Tip: When the taskbar is crowded with buttons, it may not be easy to find a blank spot to click. Usually there's a little gap near the right end; you can make it easier to find some blank space by enlarging the taskbar, as described on page 98.
-
If you change your mind, the taskbar shortcut menu always includes an Undo command for the last taskbar command you invoked. (Its wording changes to reflect your most recent action"Undo Minimize All," for example.) 2.13.4. The Quick Launch Toolbar At the left end of the taskbarthat is, just to the right of the Start buttonis a handful of tiny, unlabeled icons. This is the Quick Launch toolbar, one of the most useful features in Windows. For details on this toolbar and the others in Windows Vista, see page 98. 2.13.5. Customizing the Taskbar You're not stuck with the taskbar exactly as it came from Microsoft. You can resize it, move it, or hide it completely. Most people don't bother, but it's always good to know what options you have. 2.13.5.1. Moving the taskbar You can move the taskbar to the top of your monitor, or, if you're a true rebel, to either side. To do so, first ensure that the toolbar isn't locked (which means that you can't move or resize the taskbaror any of its toolbars, for that matter). Right-click a blank spot on the taskbar to produce the shortcut menu. If "Lock the taskbar" is checked, select it to make the checkmark disappear. Now you can drag the taskbar to any edge of the screen, using any blank spot in the central section as a handle. Release the mouse when the taskbar leaps to the edge you've indicated with the cursor. When the taskbar is on the left or right edge of the screen, Windows Vista widens it automatically so that you can read the button names, which remain horizontal. In truth, this isn't a bad idea, considering your screen probably has more unused space horizontally than vertically. (Ergonomic studies have indicated that keeping your neck bent at a 90 degree angle to read vertical buttons isn't so hot for your spine.)
Tip: No matter which edge of the screen holds your taskbar, your programs are generally smart enough to adjust their own windows as necessary. In other words, your Word document will shift sideways so that it doesn't overlap the taskbar that you've dragged to the side of the screen.
2.13.5.2. Resizing the taskbar Even with the new button-grouping feature, the taskbar can still accumulate a lot of buttons and icons. As a result, you may want to enlarge the taskbar to see what's what. Begin by making sure that the taskbar isn't locked, as described above. Then position your pointer on the upper edge of the taskbar (or, if you've moved the taskbar, whichever edge is closest to the center of the screen). When the pointer turns into a double-headed arrow, drag to make the taskbar thicker or thinner.
Note: If you're resizing a taskbar that's on the top or bottom of the screen, the taskbar automatically changes its size in full taskbar-height increments . You can't fine-tune the height; you can only double or triple it, for example.If it's on the left or right edge of your screen, however, you can resize the taskbar freely .
2.13.5.3. Hiding the taskbar If you work on a smallish monitor, you may wish that the taskbar would make itself scarce now and thenlike when you're working on a word-processing or Web-page document that needs every pixel of space you can get. Fortunately, it's easy to make the taskbar hide itself until you need it. Start by right-clicking a blank spot on the taskbar, and then choose Properties from the shortcut menu. The dialog box that appears offers these options, among others: -
Auto-hide the taskbar . This feature makes the taskbar disappear whenever you're not using ita clever way to devote your entire screen to application windows and yet have the taskbar at your cursor tip when needed. When this feature is turned on, the taskbar disappears whenever you click elsewhere, or whenever your cursor moves away from it. Only a thin blue line at the edge of the screen indicates that you have a taskbar at all. As soon as your pointer moves close to that line, the taskbar joyfully springs back into view.
Tip: Alternatively, you can summon the taskbar just by tapping the key. (If your keyboard doesn't have one, Ctrl+Esc works, too.)
-
Keep the taskbar on top of other windows . This optionthe factory settingpermits no other window to cover up the taskbar. Your program windows automatically shrink as necessary to accommodate the taskbar's screen bulk. (If you turn off this option, full-screen application windows overlap the taskbar.) |