Section 13.6. Editing Your Shots: All Versions
13.6. Editing Your Shots: All VersionsStraight from the camera, digital snapshots often need a little bit of help. A photo may be too dark or too light. The colors may be too bluish or too yellowish. The focus may be a little blurry, the camera may have been tilted slightly, or the composition may be somewhat off. Fortunately, Photo Gallery lets you fine-tune digital images in ways that, in the world of traditional photography, would require a fully equipped darkroom, several bottles of smelly chemicals, and an X-Acto knife . Note: Photo Gallery can edit photos in only three graphics formats: .JPEG, TIFF, and WPD. You can't paint in additional elements, mask out unwanted backgrounds, or apply 50 different special effects filters in Photo Gallery, as you can with editing programs like Photoshop and Photoshop Elements. Nonetheless, Photo Gallery is designed to handle basic photo fix-up tasks , many of which work with a single click. All Photo Gallery editing is performed in a special editing mode, in which the photo appears at nearly full-screen size , and tool icons appear at the top (Figure 13-15). You enter Edit mode by double-clicking a photo's thumbnail, either in Photo Gallery or in an Explorer window, and then clicking the Fix button on the toolbar.
You exit Edit mode by clicking "Back To Gallery" (top left of the window). 13.6.1. Ways to ZoomBefore you get deeply immersed in the editing process, it's well worth knowing how to zoom and scroll around, since chances are you'll be doing quite a bit of it.
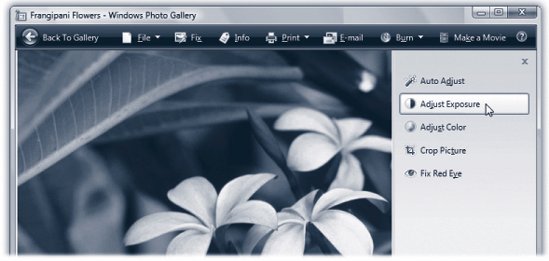
Note: The second icon on the toolbar below the photo means, "Fit the photo in the window once again, no matter how much zooming I did." Ordinarily, when you zoom into an open photo, the cursor changes to a friendly little white gloveyour clue that you can now scroll the photo in any direction just by dragging. That's more direct than fussing with two independent scroll bars. But when the Fix pane is open, you have to press the Alt key to drag-scroll. 13.6.2. Ten Levels of UndoAs long as you remain in Edit mode, you can back out of your last 10 changes. To change your mind about the last change you made, just click the Undo button at the bottom of the Fix pane. To retrace even more of your steps, click the But once you leave Edit modeby returning to the galleryyou lose the ability to undo your individual edits. At this point, the only way to restore your photo is to use the Revert command, which removes all the edits you've made to the photo since importing it (page 454). 13.6.3. Auto AdjustThe Auto Adjust button provides a simple way to improve the appearance of less-than -perfect digital photos. One click makes colors brighter, skin tones warmer, and details sharper. (If you've used Photoshop, the Enhance button is a lot like the Auto Levels command.)
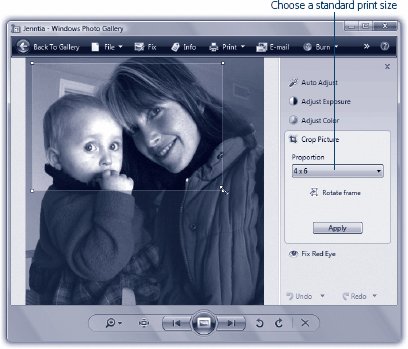
It works by analyzing the relative brightness of all the pixels in your photo and attempting to balance the image by dialing the brightness or contrast up or down and intensifying dull or grayish-looking color . Usually, this approach at least makes pictures look somewhat richer and more vivid . To enhance a photo, just click the Auto Adjust button in the Fix pane. That's it...there's nothing to select first, and no controls to adjust. As you use the Auto Adjust button, remember that Photo Gallery's image-correcting algorithms are simply best guesses at what your photo is supposed to look like. It has no way of knowing whether you've shot an overexposed , washed-out picture of a vividly colored sailboat, or a perfectly exposed picture of a pale-colored sailboat on an overcast day. Consequently, you may find that Auto Adjust has no real effect on some photos and only minimally improves others. Remember, too, that you can't enhance just one part of a photo. If you want to selectively adjust specific portions of a picture, you need a true photo-editing program like Photoshop Elements. 13.6.4. CroppingThink of Photo Gallery's cropping tool as a digital paper cutter . It neatly shaves off unnecessary portions of a photo, leaving behind only the part of the picture you really want. You'd be surprised at how many photographs can benefit from selective cropping. You can eliminate parts of a photo you just don't want, improve a photo's composition (filling the frame with your subject often has greater impact), or fit a photo to specific proportions (an important step if you're going to turn your photos into standard-size prints). Here are the steps for cropping a photo:
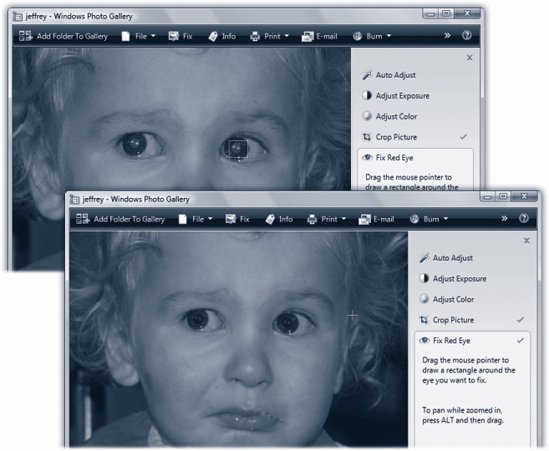
Note: Remember that cropping always shrinks your photos. Remove too many pixels, and your photo may end up too small (that is, with a resolution too low to print or display properly). 13.6.5. Red-EyeYou snap a near-perfect family portrait: the focus is sharp, the composition is balanced, everyone's smiling. And then you notice it: Uncle Mitch, standing dead center in the picture, looks like a vampire bat. His eyes are glowing red, as though illuminated by the evil within. Red-eye is light reflected back from your subject's eyes. The bright light of your flash passes through the pupil of each eye, illuminating and bouncing off of the blood-red retinal tissue at the back of the eye. Red-eye problems worsen when you shoot pictures in a dim room, because your subject's pupils are dilated wider, allowing even more light from the flash to shine on the retina . The best course of action is to avoid red-eye to begin withby using an external flash, for example. But if it's too late for that, and people's eyes are already glowing demonically, there's always Photo Gallery's Red-Eye tool. It lets you alleviate red-eye problems by digitally removing the offending red pixels. Figure 13-18 shows how.
Truth be told, the Red-Eye tool doesn't know an eyeball from a pinkie toe. It just turns any red pixels black, regardless of what body part they're associated with. Friends and family members look more attractiveand less like Star Trek charactersafter you touch up their phosphorescent red eyes with Photo Gallery. 13.6.6. RotateUnless your digital camera has a built-in orientation sensor, Photo Gallery imports all photos in landscape orientation (wider than they are tall). The program has no way of knowing if you turned the camera 90 degrees when you took your pictures. You can use either of these methods to turn them right-side up:
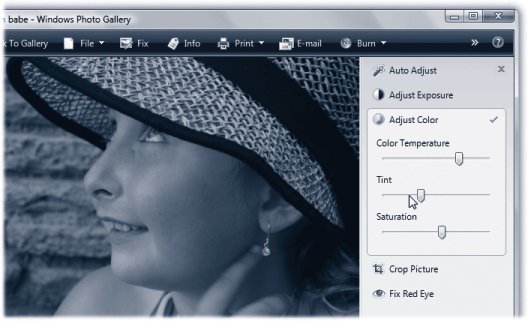
Tip: After importing a batch of photos, you can save a lot of time and mousing if you first select all the thumbnails that need rotating (by Ctrl-clicking each, for example). Then use one of the rotation commands above to fix all the selected photos in one fell swoop. 13.6.7. Exposure and Color AdjustmentsPlenty of photos need no help at all. They look fantastic right out of the camera. And plenty of others are ready for prime time after only a single click on the Auto Adjust button, as described earlier. If you click Exposure or Adjust Color on the Fix pane, though, you can make gradations of the changes that the Auto Adjust button makes. For example, if a photo looks too dark and murky, you can bring details out of the shadows without blowing out the highlights. If the snow in a skiing shot looks too bluish, you can de-blue it. If the colors don't pop quite enough in the prize-winning-soccer-goal shot, you can boost their saturation levels. In short, there are fixes the Adjust panels can make that no one-click magic button can touch. 13.6.7.1. Exposure (Brightness and Contrast)When you move the Brightness slider, you're making the entire image lighter or darker . In other words, if the picture's contrast is already exactly as you want it, but the whole picture could use darkening or lightening, Brightness should be your tool of choice. The Contrast slider, on the other hand, affects the difference between the darkest and lightest tones in your picture. If you increase the contrast, you create darker blacks and brighter whites. If you decrease the contrast (too much), you create flat or muddy tones. 13.6.7.2. Color BalanceOne of the most common failings of digital cameras (and scanners ) is that they don't capture color very accurately. Digital photos sometimes have a slightly bluish or greenish tinge, producing dull colors, lower contrast, and sickly-looking skin tones. In fact, the whole thing might have a faint green or magenta cast. Or maybe you just want to take color adjustment into your own hands, not only to get the colors right, but to also create a specific mood for an imageicy blue for a freezing day, for example. The Adjust Color panel offers three sliders that wield power over this sort of thing:
Tip: Drag the Saturation slider all the way to the left for an instant black-and-white rendition of your shot. 13.6.8. Reverting to the OriginalPhoto Gallery includes built-in protection against overzealous editinga feature that can save you much grief . If you end up cropping a photo too much, or cranking up the brightness of a picture until it seems washed out, or accidentally turning someone's lips black with the Red-Eye tool, you can undo all your edits at once with the Revert command. Revert strips away every change you've ever made since the picture arrived from the camera. It leaves you with your original, unedited photoeven if it's been months or years since you made the changes. The secret of the Revert command: whenever you use any editing tools, Photo Gallerywithout prompting and without informing youinstantly makes a duplicate of your original file. With an original version safely tucked away, Photo Gallery lets you go wild on the copy. Consequently, you can remain secure in the knowledge that in a pinch , Photo Gallery can always restore an image to the state it was in when you first imported it. No longer must you make copies of your photos just so you'll have a safety copy if your edits don't work out, or dream up some elaborate naming and folder-filing scheme to accommodate them. Note: Vista keeps your unedited original photos in your Personal  AppData Local Microsoft Windows Original Images folder. (Its OK to open this folder to inspect its contents and even open photos inside, but don't delete, move, or rename any of them; you'll wind up completely confusing Photo Gallery.)If you back up your PC using Vista Backup (page 641), turning on the option to back up photos and images ensures that these originals are backed up. AppData Local Microsoft Windows Original Images folder. (Its OK to open this folder to inspect its contents and even open photos inside, but don't delete, move, or rename any of them; you'll wind up completely confusing Photo Gallery.)If you back up your PC using Vista Backup (page 641), turning on the option to back up photos and images ensures that these originals are backed up. To restore an original photo, undoing all cropping, rotation, brightness adjustments, and so on, double-click the thumbnail of an edited photo. Click Fix on the toolbar, and then click Revert (at the bottom of the Fix pane). Photo Gallery asks you to confirm the changeafter all, you're about to throw away all the editing you've done to this photo, which could represent a lot of time and effortand then, if you click OK, swaps in the original version of the photo. You're back where you started. Tip: Clearly, Photo Gallery has all the basics covered. But if you want more editing controlfor example, if you want to edit only part of an image, or you want to add text or somethingyou'll have to rely on another program.Fortunately, Photo Gallery plays well with others. Once you've opened a photo, you can use the Open pop-up menu (on the toolbar) to send it off to any other graphics programsay, Photoshop Elementsfor additional tweaking.You're still protected by the warmth and security of the Revert to Original command. |
 button next to the Undo button. The resulting pop-up menu lists your last 10 editing steps. Choose how far you want to "rewind," or click Undo All to back out of everything youve done since opening the photo.
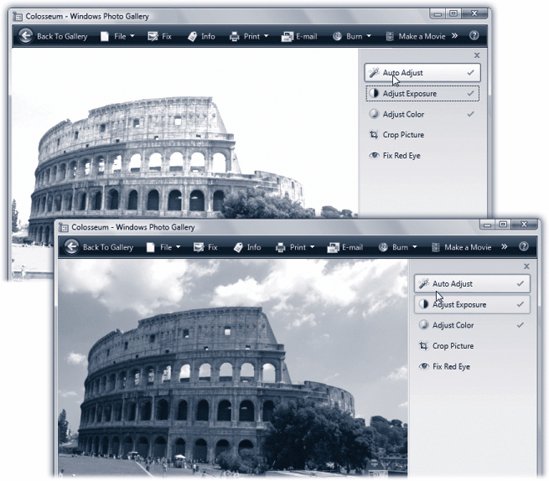
EAN: 2147483647
Pages: 284