| You could spend all day playing with the workflows Apple gives you, making minor tweaks and seeing how they affect the workflow's progress. You could even download more preassembled workflows from www.automatorworld.com/category/workflows/, if you were so inclined. Still, those options don't give you the kind of hands-on experience you need if you ever want to automate your Mac on your own. That's why the following pages walk you through building three different Automator actions from scratch. Along the way, you'll learn several tricks that you'll find handy when you start building your own workflows.
Tip: If you're feeling lazy, you can download the completed workflow projects from this book's "Missing CD" page at www.missingmanuals.com.
8.2.1. Emailing an iTunes Song So you're listening to a song in iTunes, and you're seized by an overwhelming urge to email it to someone. Maybe you think your mom would like to hear the new Aaron Carter hit, or that your brother would be interested in your latest GarageBand opus. The traditional process for emailing a song is a huge pain: locating the song in iTunes, Control-clicking it, choosing Show Song File from the shortcut menu, creating a new message in Mail, addressing it, typing out a subject and short body message, dragging the song file from the Finder into the email message, and, finally, clicking Send. Life, frankly, is too short. Automator can greatly simplify this process. With a simple three-action workflow, you can locate a song from your iTunes Library, set up all the email information you want in a dialog box, and have Automator attach the song file automatically. Figure 8-7 shows what the final workflow will look like.
Note: Remember that your recipient may not be able to play the song if it came from the iTunes online music store. The song is copy-protected , and will play back on a maximum of five computers. (MP3 files, GarageBand compositions, and songs you've ripped from your own CDs, of course, have no such restrictions.)
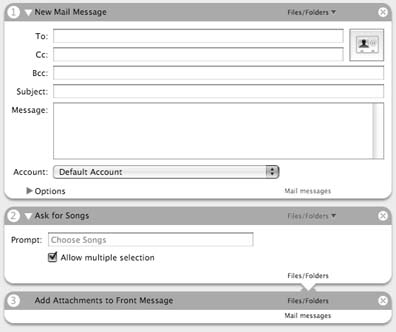 | Figure 8-7. Your new workflow will create a new Mail message (top), let you pick a song in your iTunes Library (middle), and then attach the song to the email message. This action is a heck of a lot easier than trying to do all the steps manually. | |
Here's how to build the workflow: -
Open a new Automator workflow window . Either choose File  New or press -N. New or press -N. -
In the Library list, click Mail. From the Actions list, drag the action called New Mail Message action into the Workflow pane . This action lets you specify the recipient, subject, and content of your new email message. (You can even add an email address straight from your Address Book. Just click the address card button in the upper-right corner.) On the other hand, your workflow won't do you much good if you can only send email to the same person every time. Therefore, to make the workflow more general, you'd be wise to expand the Options triangle and turn on Show Action When Run. That way, you can specify a different recipientand subject, and email account, and so oneach time you run the workflow (Figure 8-8, top). -
In the Library list, click iTunes. Drag the Ask for Songs action to the bottom of the Workflow pane . The Ask for Songs action lets you pick out one song (or more, if "Allow multiple selection" is on) from your iTunes Library (Figure 8-8, middle). Whichever songs you pick are attached to your new email message.
Note: Whatever you type into the Prompt box will appear as a message in the song-selection dialog box. You can make it say, for example, "Pick a song, any song!"
-
Once again, click Mail in the Library list. This time, drag the Add Attachments to Front Message action to the bottom of the Workflow pane . This final action takes the result of the previous actionin this case, the chosen iTunes song file(s)and attaches them to the front Mail message. You're left with a message window like the one shown at the bottom of Figure 8-8. Choose File Save ( -S), give your workflow a name , and save it somewhere easy to find. If you save it in your Home Library Workflows folder (which you may have to create yourself), your workflow will show up in the My Workflows folder in the Automators Library list.
Tip: And if you really find this workflow useful, save it as a standard, double-clickable application and stash it in your Dock. Details on Section 8.3.
Just click the Run button to test out your new workflow! 8.2.2. Burning an iPhoto Picture CD iPhoto (Section 10.15) is a fantastic program for organizing digital photos. It even has its own photo-backup feature, which burns selected albums' photos to a blank CD or DVD. However, iPhoto's backup feature burns a disc that maintains iPhoto's complex and user - hostile Library folder structure. That's great if you expect one day to restore the backup to iPhoto , because the backup maintains all your keywords, ratings, albums, comments, and other iPhoto data. 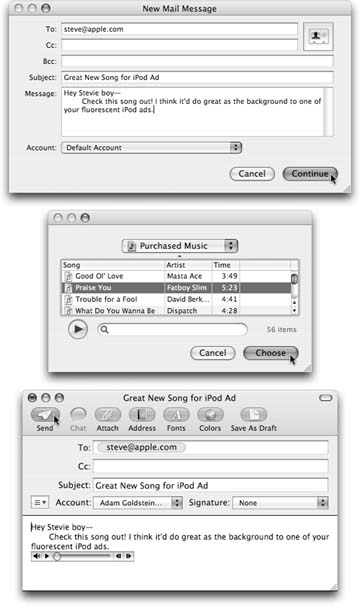 | Figure 8-8. Top: The dialog box of the New Mail Message action. If you have more than one email account, you can select the one you'd like to send the message from in the pop-up menu at the bottom of this window.
Middle: The dialog box of the Ask For Songs action. You can search for songs using the field at the bottom, pick one of your playlists using the pop-up menu at the top, and even sample a song by clicking the Play button.
Bottom: The result: an email message with your text, subject, recipient, and attachment. Just click Send to be off with your message.(You could also have used the Send Outgoing Messages action at the end of your workflow to do this step automatically.) | |
But it's not so great if you want to hand the CD or DVD to anyone who doesn't use iPhoto (like a Mac OS 9 person or a Windows person), because they'll have a devil of a time figuring out where all the photos are in the convoluted Library folder structure. If you build an Automator workflow to back up your photos instead, you (a) can burn a disc containing only the photos in one simple folder; (b) have more control over which photos are backed up; and (c) learn even more tricks for automating sophisticated operations. Figure 8-9 shows what the final workflow will look like. 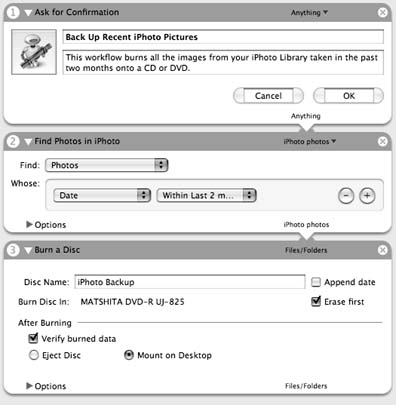 | Figure 8-9. Top: The first action presents a dialog box telling you what this workflow does.
Middle: The second action rounds up all iPhoto images that match certain criteriain this case, all images taken in the past two months.
Bottom: The last action, in a single step, burns those images onto a CD or DVD. It works regardless of whether your Mac has an internal or external burner . Try that simplicity on a PC! | |
Here's how to put it together: -
Create a new Automator workflow (  -N). In the Library list, click Automator . -N). In the Library list, click Automator . The Automator category, as described earlier in this chapter, contains actions that aren't specific to any single program. -
Drag the Ask for Confirmation action into the Workflow pane. Fill in the text as shown at the top of Figure 8-9 . You've just directed Automator to begin its work by displaying a dialog box (Figure 8-10). 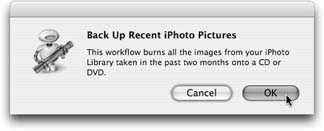 | Figure 8-10. The explanatory dialog box from the iPhoto Backup workflow. Making the dialog box appear is optional, but it's helpful if you come back to your workflow in a few months and forget what it's supposed to do. | | -
Switch to the iPhoto category in the Library list. Drag the Find iPhoto Items action to the bottom of the Workflow pane . By "iPhoto items," this action really means "iPhoto albums or photos." When you first drag it into place, the action is set to find albums , but that's easy to change. -
In the Find pop-up menu, select Photos . Due to a quirk in the way Automator handles iPhoto actions, iPhoto now opens in the background. Once you're done building your workflow, you can safely quit iPhoto. -
In the "Whose" section of the action, choose Date from the first pop-up menu and "Within Last 2 months" from the second . You're directing Automator to back up only the photos you've taken in the past 60 days. If you want to back up your entire iPhoto Library, on the other hand, you could select Any Date in the second pop-up menu (if, in fact, so many photos will fit on a single disc). Using these pop-up menus , you could also instruct the workflow to back up only the photos in a certain album; those containing a certain phrase in their names , titles, or comments; pictures having a certain height or width; and so on.
Tip: If you wanted to be extremely specific, you could click the + button at the right end of the action to add another row of criteria, and then another. You could wind up making Automator back up only the photos taken within the last two months that are taller than 800 pixels and have Edna in their names.
-
In the Library list, click System. Drag the Burn a Disc action to the bottom of the Workflow pane . Give your disc a creative namelike "iPhoto Backup"and you're done. When you click Run, your workflow springs into action. If there isn't a blank CD or DVD in your Mac, Automator asks for one. Skip to Section 8.3 to see how to save the result as a double-clickable icon on your desktop. 8.2.3. Converting and Renaming Images This workflow is the most complicated of these examples, but also the one that saves you the most time. It processes any set of graphics files by converting them to the space-saving JPEG format, shrinking them to reasonable pixel dimensions for sending by email or posting on the Web, saving them in a new folder, and renaming them. If you often need to put pictures on your Web site, or you just like to email pictures to friends , this workflow can be a godsend. -
Create a new Automator document ( -N). In the Library list, click the Finder category . How will you tell Automator which photos to convert? Earlier in this chapter, you read about the Get Specified Finder Items action in one of Apple's sample workflows. Trouble is, that action requires that you tell Automator which images to convert ahead of time . It doesn't let you choose the images at runtime (in other words, as your workflow is running), which would be far more useful. No, if you want to be asked which photos to process when your little program runs, you need the Ask for Finder Items action. -
Drag the Ask for Finder Items action into the Workflow pane . When this workflow runs, an Open dialog box appears so you can choose the graphics you want converted.
Note: Make sure that the Type pop-up menu says Files. (You can't really select a folder to convert to an image.)
The "Start at" pop-up menu lets you specify what disk location the Open dialog box will present when it first opens. You can save yourself (or whoever will be enjoying your workflow) some time by setting it to the folder that will most likely contain the photos to be processed . Fill in the Prompt box with whatever message you want to appear in the Open dialog box. Something like, "Please choose the photos you'd like to have converted" would work fine. Finally, it's a good idea to turn on Allow Multiple Selection, so that you can pick several images to convert at once. -
Drag the Copy Finder Items action to the bottom of the Workflow pane . This action copies the files you specified in the previous step into a new foldera safety step that leaves your original images untouched. You can specify any folder you'd like in the "To" pop-up menu, but the Pictures folder is probably the best place to store your newly copied images. -
Drag the Rename Finder Items action to the bottom of the Workflow pane . From the pop-up menu at the top of this action, choose Add Text. Then, in the Add field, type ( small ). (Put a space before the opening parenthesis.) Finally, make sure that the pop-up menu on the right says "after name." Why go through all this? First, by appending a standard suffix onto each image file's name, you'll have a standardized naming system: "Joe's Great Dane (small)," "Mary's Labrador (small)", and so on. Second, the suffix tells you, at a glance, that the image has been scaled down. Finally, and most usefully, having "(small)" in each of your image's names makes it easy to find all the images you've converted; all you have to do is use Spotlight (Chapter 3) to search for files with "(small)" in their names. Of course, this action hasn't actually converted the images to a smaller size yet. That's the work of the next action you'll add. -
In the Library list, click Preview. Drag the Scale Images action to the bottom of the Workflow pane . Choose "By Percentage" in the pop-up menu, and type 50 in the text field. That's how you tell Automator, "I want you to shrink each of my images by half."
Note: Automator will shrink each image's height and width by 50%, so technically, you're making your new images a quarter the area of the originals . If you truly want your new images to be half the area of the originals, use 70.71 for the scaling percentage. (That's 50 times the square root of two, if you're scoring at home.)
-
Drag the Change Type of Images action to the bottom of the Workflow pane . From the To Type pop-up menu, choose JPEG. In the previous step, you scaled down the images' dimensions; in this step, you're converting their file format to one that takes up less space ( assuming they weren't JPEG files to begin with). Your final images will be significantly smaller than the originals, consuming as little as one-tenth the disk space (depending on the quality of the originals), which makes them perfect for emailing or posting on the Web.
Tip: Most of the actions in this example offer an Options panel at the bottom. When you expand this triangle, you see an option called Show Action When Run.If you turn on this checkbox, the workflow, when run, will pause at this juncture and ask what to do. For example, instead of using this action to churn out JPEGs, the workflow could ask you what file format you want. In step 5, it could ask you how much to scale down the images' dimensions. And so on.
-
Drag the Open Images in Preview action to the bottom of your list of actions in the Workflow pane . This action is optional. If you choose to include it, Preview opens at the end of the conversion process and presents you with the newly shrunken images for your inspection. This step also gives you an indicationbesides the standard choo sound that Automator makesthat your workflow has successfully completed its mission. Save your new workflow for later use, and read on for some neat tricks you can do with it. |