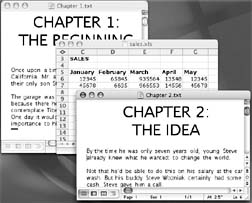
5.5. How Documents Know Their Parents
| < Day Day Up > |
| Every operating system needs a mechanism to associate documents with the applications that created them. When you double-click a Microsoft Word document icon, for example, it's clear that you want Microsoft Word to launch and open the document. In Windows , most documents bear a three-letter file name suffix. If you double-click something called memo.doc , it opens in Microsoft Word. If you double-click memo.wri , it opens in Microsoft Write, and so on. Mac OS 9 uses a similar system, except that you never see the identifying codes. Instead, it relies on invisible, four-letter creator codes and type codes . Apple carefully monitors and tracks these four-letter codes, in conjunction with the various Mac software companies, so that no two creator codes are alike. As a Macintosh/Unix hybrid, Mac OS X uses both creator codes (like Mac OS 9) and file name suffixes (like Windows). It's possible to live a long and happy life without knowing anything about these codes and suffixes. Indeed, the vast majority of Mac fans may never even encounter them.
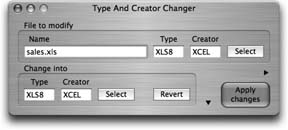
But if you're prepared for a little bit of technical bushwhacking, you may discover that understanding creator/type codes and file name suffixes can be useful in troubleshooting, keeping your files private, and appreciating how Mac OS X works. 5.5.1. Type and Creator CodesA Macintosh document's four-letter creator code identifies the program that will open it. If you're curious to see these usually invisible codes, download a program like Type and Creator Changer (available from the "Missing CD" page at www.missingmanuals.com), and drag the icon in question onto its icon (Figure 5-8).
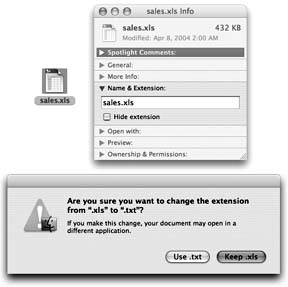
As a little experimentation will soon show you, the creator code for a program and the documents it creates are identicalMSWD for Microsoft Word, FMP7 for FileMaker Pro, and so on. That's the entire point: The creator code tells the Mac which program to open when you double-click a particular document. Type and Creator Changer also reveals the second four-letter code in the DNA of most Macintosh icons: the type code . This code specifies the document's file format. Photoshop, for example, can create graphics in a multitude of different formats: GIF, JPEG, TIFF, and so on. If you inspect your Photoshop documents, you'll discover that they all share the same creator code, but have a wide variety of type codes. Tip: If the type code is supposed to identify the file format of a document, does a standard application have a type code?It does: APPL. When you double-click a document, Mac OS X checks to see if it has a creator code. If so, it then consults an invisible database of icons and codes. This database is the master index that lists the correspondence between creator codes and the applications that generate them. Together, the type and creator codes also specify which picture appears on a particular icon. If the desktop file discovers a matchif, say, you double-clicked a document with creator code BOBO, which corresponds to the AppleWorks entry in your desktop databasethen the corresponding program opens the document, which now appears on your screen. 5.5.2. File Name ExtensionsIn Mac OS X, plenty of documents don't have type and creator codes. Documents created by Cocoa applications (Section 5.8), for example, generally don't. That's because Mac OS X is a Unix operating system. In Unix, type and creator codes are unheard of. Instead, what determines which program opens when you double-click a document is its file name extension , just as in Windows. A file name extension is identifiable by a suffix following a period in the file's name, as in Letter to Mom.doc . (Actually, the file name extension can be much longer than three letters. It can even identify the name of the program that will open when you double-click something. The file called Registration.setup, when double-clicked, launches the Mac OS X Setup application.) The bottom line is that Mac OS X offers two different mechanisms that associate documents with the programs that created them. Mac OS X looks for type and creator codes first. Where they're absent, the file name suffixes kick in. 5.5.3. Hiding and Showing File Name Extensions Mac OS X comes set to hide most file name extensions on the premise that they make the operating system look more technical and threatening . If you'd like to see them, however, choose Finder You can hide or show these suffixes on an icon-at-a-time basis, too (or a clump-at-a-time basis). Just highlight the icon or icons you want to affect and then choose File 5.5.4. Reassigning Documents to ProgramsUnfortunately, type and creator codes aren't of much use when you encounter a document created by a program that you don't have. If someone emails you a MIDI file (a file-exchange format for music) that she exported from the Finale sheet music program, you won't be able to open it simply by double-clicking, unless you, too, have Finale installed. Even if you have a different sheet music program on your hard drive, just double-clicking the MIDI file won't, by itself, open it. The file name extension system, meanwhile, has problems of its own. File name extensions are even less likely to pinpoint which parent program should open a particular document. Suppose you've downloaded a graphic called Sunset.JPG. Well, almost any program these days can open a JPEG graphicAppleWorks, Word, Preview, Safari, and so on. How does Mac OS X know which of these programs to open when you double-click the file? The answer is simple. You can reassign a document to a specific program (or all documents of its kind). Here's the rundown.
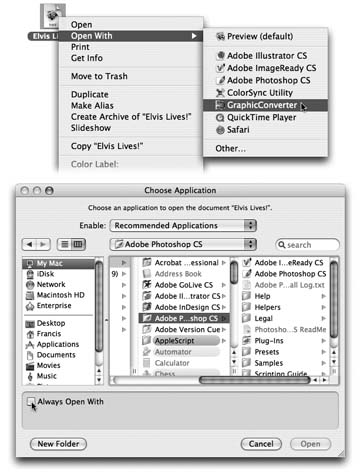
5.5.4.1. Reassigning a certain documentjust onceDouble-clicking a graphics file generally opens it in Preview, the graphics viewer included with Mac OS X (see Section 10.16). Most of the time, that's a perfectly good arrangement. But Preview can only display graphicsit can't edit them. What if you decide to edit a graphics file? You'd want it to open, just this once, into a different programPhotoshop Elements, for example. To do so, you must access the Open With command. You can find it in two places:
Study the submenu for a moment (Figure 5-10, top). The program whose name says "(default)" indicates which program usually opens this kind of document. From this pop-up menu, choose the name of the program you'd rather open this particular file, right now, just this once. 5.5.4.2. Reassigning a certain documentpermanentlyAfter opening a TIFF file in, say, Photoshop Elements for editing, you haven't really made any changes in the fabric of your Mac universe. The next time you double-click that file, it will open once again in Preview. If you wish this particular file would always open in Photoshop Elements, the steps are slightly different. In fact, there are three different ways:
Tip: You can use a similar trick to reassign the parenthood of a whole flock of selected icons at once. Once you've selected them, keep the Option key pressed as you choose File  Show Inspector. In the "Open with section of this specialized Get Info window, choose a new program from the pop-up menu. The message at the top of the window"22 items," for examplereminds you that you're changing the whole batch at once. Show Inspector. In the "Open with section of this specialized Get Info window, choose a new program from the pop-up menu. The message at the top of the window"22 items," for examplereminds you that you're changing the whole batch at once. 5.5.4.3. Reassigning all documents of one typeSo much for reassigning one document (or group of documents) at a time. What if you're writing, say, a book about Mac OS X, and you've been taking a lot of screenshots? Mac OS X saves each captured screen illustration as a graphics file in something called PNG format. That's all fine, except that every time you double-click one of these, it opens into Preview, where you can't paint out unwanted details.
You could reassign all of these file name files, one at a time, to a different program, but your grandchildren would have grandchildren by the time you finish. In this case, you want to tell Mac OS X, "For heaven's sake, make all PNG files open in Photoshop from now on!" To make it happen, use the Get Info method described previously. (You can't do it by using the File Start by highlighting any PNG file. Choose File From its pop-up menu, choose the program you want to open this kind of document from now on. (If the one you prefer isn't listed, use the Other option, which opens the Choose an Application dialog box so that you can navigate to the one you want. Find and double-click the program.) This time follow up by clicking Change All beneath the pop-up menu. (This button is dimmed until you've actually selected a different program from the pop-up menu.) Mac OS X asks you to confirm by clicking Continue or pressing Enter. From now on, double-clicking any similar kind of document opens it in the newly selected program. |
| < Day Day Up > |
EAN: 2147483647
Pages: 506