| Most of the time, you'll use the Dock as either a launcher (you click an icon once to open the corresponding program, file, folder, or disk) or as a status indicator (the tiny black triangles , identified in Figure 4-1, indicate which programs are running). But the Dock has more tricks than that up its sleeve. You can use it, for example, to pull off any of the following stunts. 4.3.1. Switch Applications The Dock isn't just a launcher; it's also a switcher. For example, it lets you: -
Jump among your open programs by clicking their icons. -
Drag a document (such as a text file) onto a Dock application (such as the Microsoft Word icon) to open the former with the latter. (If the program balks at opening the document, yet you're sure the program should be able to open the document, add the  and Option keys as you drag.) and Option keys as you drag.) -
Hide all windows of the program you're in by Option-clicking another Dock icon. -
Hide all other programs' windows by Option- -clicking the Dock icon of the program you do want (even if it's already in front). This is just a quick summary of the Dock's application-management functions; you'll find the full details in Chapter 5. 4.3.2. Operate the Dock by Keyboard Control If you turn on keyboard navigation , you can operate the Dock entirely from the keyboard; see Section 5.6126. TROUBLESHOOTING MOMENT
Recovering from a MicroDock | | What is a MicroDock? It's what you get when you try to store 355 JPEG files by dragging them onto a folder in the Dock, but you just miss the folder (thanks to its tendency to scoot aside). As a result, you drop all of the graphics directly onto the Dock. They dutifully appear as shown here, at the size of subatomic particles. Now you have a problem. How do you get the Dock back to normal? If you dragged the icons off the Dock one at a time, you'd spend two presidential administrations doing it. The easiest way to return to a normal Dock is to delete the Dock preferences file from your Home  Library Preferences folder. The file is named com.apple.dock. plist , and you can just drag it into the Trash. (If youre really obsessive about your Dock setup, you can create a backup of this file now, while everything is working properly. In the event of a MicroDock, you can replace the messed-up preferences file with the backup.) Library Preferences folder. The file is named com.apple.dock. plist , and you can just drag it into the Trash. (If youre really obsessive about your Dock setup, you can create a backup of this file now, while everything is working properly. In the event of a MicroDock, you can replace the messed-up preferences file with the backup.) When you log out and log back in again, you'll be back to the standard Apple Dock.  |
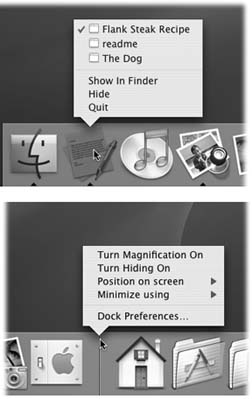
4.3.3. Secret Menus Don't get so enamored of single-clicking the Dock icons that you miss this one. If you Control-click a Dock iconor, if you're in no hurry, hold down the mouse button on ita hidden menu sprouts out of it (Figure 4-5).
Tip: Another reminder: If you've equipped your Mac with a two-button mouse, you can right-click something instead of Control-clicking it. Either action summons the shortcut menu, anywhere in Mac OS X.
If you've clicked a minimized window icon, this shortcut menu says only Open (unless it's a minimized Finder window, in which case it also says Close). But if you've clicked any other kind of icon, you get some very useful hidden commands. For example: -
[ Window names .] The secret Dock menu of a running program usually lists at least one tiny, neatly labeled window icon, like those shown in Figure 4-5. This useful Mac OS X feature means that you can jump directly not just to a certain program, but to a certain open window in that program.
For example, suppose you've been using Word to edit three different chapters. You can use Word's Dock icon as a Window menu to pull forward one particular chapter, or (if it's been minimized) to pull it upeven from within a different program.
Tip: The Finder tile that's always at the beginning of the Dock is, in effect, its own Window menu. By holding the mouse down on this icon for a moment, you produce a menu that lists all open desktop windows.The Window menu at the top of the Finder screen does the same thing. But the Dock is available no matter what program you're using.
-
Keep In Dock/Remove From Dock . Here's another item that's relevant only to program icons in the Dock. Whenever you launch a program, Mac OS X puts its icon in the Dock marked with a little black triangleeven if you don't normally keep its icon there. As soon as you quit the program, its icon disappears again from the Dock. If you understand that much, then the Keep In Dock command makes a lot of sense. It means, "Hello, I'm this program's icon. I know you don't normally keep me in your Dock, but I could stay here even after you quit my program. Just say the word." If you find that you've been using, for example, Terminal (Chapter 16) a lot more often than you thought you would, this command may be the ticket.
Tip: Actually, there's a faster way to tell a running application to remain in the Dock from now on. Just drag its icon off the Dock and then right back onto ityes, while the program is running. You have to try it to believe it.
On the other hand, what if a program's icon is always in the Dock (even when it's not running) and you don't want it there? In that case, this command says Remove From Dock instead. It gets the program's icon off of the Dock, thereby returning the space it was using to other icons. (You can achieve the same result by dragging the icon away from the Dock, but evidently too many Mac fans weren't aware of this trick.) Use this command on programs you rarely use. When you do want to run those programs, you can always use Spotlight to fire them up.
Note: If the program is already running, using Remove From Dock does not immediately remove its icon from the Dock, which could be confusing. That's because a program always appears in the Dock when it's open. What you're doing here is saying, "Disappear from the Dock when you're not running"and you'll see the proof as soon as you quit that program.
-
Open at Login . This command, new in Tiger, lets you specify that you want this icon to open itself automatically each time you log into your account (Section 5.6). It's a great way to make sure that your email Inbox, your calendar, or the Microsoft Word thesis you've been working on is fired up and waiting on the screen when you sit down to work. Before Tiger came along, this feature was buried deep in the Accounts panel of System Preferences. (To make this item stop auto-opening, choose this command from its Dock icon again, so that the check mark no longer appears.) -
Show In Finder . Choose this command to highlight the actual icon (in whatever folder window it happens to sit) of the application, alias, folder, or document you've clicked. You might want to do this when, for example, you're using a program that you can't quite figure out, and you want to jump to its desktop folder in hopes of finding a Read Me file there.
Tip: If you want to reveal an icon in the Finder, there's a much faster way: -click its Dock icon.
-
Hide/Show . This operating system is crawling with ways to hide or reveal a selected batch of windows. Here's a case in point: You can hide all traces of the program you're using by choosing Hide from its Dock icon. (You could accomplish the same thing in many other ways, of course; see Section 5.4.1.) What's cool here is that (a) you can even hide the Finder and all its windows, and (b) if you press Option, the command changes to say Hide Others. This, in its way, is a much more powerful command. It tells all of the programs you're not usingthe ones in the backgroundto get out of your face. They hide themselves instantly.
Note: Once you've hidden a program's windows, this command changes to say Show, which is how you make them reappear.
-
Quit . You can quit any program directly from its Dock shortcut menu (Finder and Dashboard not included). You don't have to switch into a program in order to access its Quit command. (Troubleshooting moment: If you get nothing but a beep when you use this Quit command, it's because you've hidden the windows of that program, and one of them has unsaved changes. Click the program's icon, save your document, and then try to quit again.) Of course, thanks to Mac OS X's state-of-the-art memory management features, there's less need these days to quit programs at all. Still, you might be thankful for this quick-quitting feature when your boss is coming down the hallway and the Dilbert Web site is on your screen where a spreadsheet is supposed to be.
Tip: If you hold down the Option keyeven after you've opened the pop-up menuthe Quit command changes to say Force Quit. That's your emergency hatch for jettisoning a locked-up program.
4.3.4. Conduct Speed Tests When you click an application icon in the Dock, its icon jumps up and down a few times as the program launches, as though with excitement at having been selected. The longer a program takes to start up, the more bounces you see. This has given birth to a hilarious phenomenon : the counting of these bounces as a casual speed benchmark for application-launching times. "InDesign took twelve bouncemarks to open in Mac OS X 10.3," you might read online, "but only three bouncemarks in 10.4."
Tip: If you find the icon bouncing a bit over the top, try this: Choose  Dock Dock Preferences. In the Dock preference pane (shown in Figure 4-4), turn off "Animate opening applications." From now on, your icons wont actually bounceinstead, the little triangle underneath it will simply pulse as the application opens. (You can still see how long a program takes to open, but now you have to count the pulsemarks.) Dock Dock Preferences. In the Dock preference pane (shown in Figure 4-4), turn off "Animate opening applications." From now on, your icons wont actually bounceinstead, the little triangle underneath it will simply pulse as the application opens. (You can still see how long a program takes to open, but now you have to count the pulsemarks.)
4.3.5. Do Your Filing Once you've tried stashing a few important folders on the right side of your Dock, there's no going back. You can mostly forget all the other navigation tricks you've learned in Mac OS X. The folders you care about are always there, ready for opening with a single click. Better yet, they're easily accessible for putting away files; you can drag files directly into the Dock's folder icons as though they were regular folders.
Tip: When you try to drag something into a Dock folder icon, the Dock icons scoot out of the way; the Dock assumes that you're trying to put that something onto the Dock. The trick here is to -drag the icon you're trying to drop onto a folder, which makes the existing Dock icons freeze in place. Without the key, you wind up playing a frustrating game of chase-the-folder.
4.3.6. Great Things to Put in Your Dock Now that you know what the Dock's about, it's time to set up shop. Install the programs, folders, and disks you'll be using most often. They can be whatever you want, of course, but don't miss these opportunities: -
Your Home folder . Many people immediately drag their hard drive icons onto the right side of the Dockor, perhaps more practically, their Home folders (see Section 1.8). Now they have quick access to every single file in every single folder they'll ever use. -
The Applications folder . Here's a no-brainer: Stash the Applications folder here, so you'll have quick pop-up menu access to any program on your machine.
Tip: If you click and hold on the Applications folder's icon, a list of its contents pops up. That much you already knew.But remember that in Tiger, you can highlight a command in an open menu just by typing the first couple letters of its nameand that goes for Dock pop-up menus, too. In other words, once you've popped open your Applications menu, you can open any program inside it just by typing sa for Safari (for example), without having to scroll through a hundred programs with the mouse.Then again, if your mouse has a scroll wheel, you'll often find it faster to whip through a menu's commands by rolling that.
-
Your Applications folder . As an even more efficient corollary, create a new folder of your own. Fill it with the aliases of just the programs you use most often and park it in the Dock. Now you've got an even more useful Applications folder. -
The Documents folder . The Documents folder in your Home folder is another primary center for your Mac activity. Stash it here for quick access. -
The Shared folder . If you're using the Mac's accounts feature (Chapter 12), this is your wormhole between all accountsthe one place you can put files where everybody can access them (Section 12.6.2).
Tip: Ordinarily, dragging an icon off the Dock takes it off the Dock.But if you press as you drag, you drag the actual item represented by the Dock icon from wherever it happens to be on the hard drive! This trick is great when, for example, you want to email a document whose icon is in the Dock; just -drag it into your outgoing message. (Option- -drag, meanwhile, creates an alias of the Dock item.)
|