2.8. Get Info By clicking an icon and then choosing File  Get Info, you open an important window like the one shown in Figure 2-11. Its a collapsible, multi-panel screen that provides a wealth of information about a highlighted icon. For example: Get Info, you open an important window like the one shown in Figure 2-11. Its a collapsible, multi-panel screen that provides a wealth of information about a highlighted icon. For example: -
For a disk icon, you get statistics about its capacity and how much of it is full. -
For a document icon, you see when it was created and modified, and what programs it "belongs" to. -
For an alias, you learn the location of the actual icon it refers to. UP TO SPEED
Stuffing , Zipping, and Archiving | | Mac OS X comes with a built-in command that compresses a file or folder down to a single, smaller iconan archivesuitable for storing or emailing. It's just like using StuffIt in previous Mac OS versions, except for two big changes. First, Mac OS X 10.4 creates .zip files, the same compression format used in Windows . That means that you can now send .zip files back and forth to PC owners without worrying that they won't be able to open them. In Tiger, these files open even more reliably in Windows . (Pre- Panther /Tiger Mac owners can open .zip files, too. They just use the free StuffIt Expander as usual.) Second, the software that does the compressing is built right in. Control-click a file or folder, and choose "Create Archive of [the icon's name ]" from the shortcut menu. (Of course, you can use the Action menu instead.) Mac OS X thoughtfully creates a .zip archive, but leaves the original behind so you can continue working with it. Opening a .zip file somebody sends you is equally easy: Just double-click it. Zip!it opens. On the other hand, Tiger is the first Mac OS X version that does not come with StuffIt Expander, the free unstuffing program that recognizes .zip files, .sit files, and just about any other form of compressed files. If you don't already have a copy of Expander from a previous Mac OS version, you're supposed to download and install it yourself, which is well worth doing. You can get it from, for example, this book's "Missing CD" page at www.missingmanuals.com. |
-
If you open the Get Info window when nothing is selected, you get information about the desktop itself (or the open window), including the amount of disk space consumed by everything sitting on or in it. -
If you highlight 11 icons or more simultaneously, the Get Info window shows you how many you highlighted, breaks it down by type ("23 documents, 3 folders," for example), and adds up the total of their file sizes. That's a great opportunity to change certain file characteristics on numerous files simultaneously , such as locking or unlocking them, hiding or showing their file name extensions (Section 5.5.2), changing their ownership or permissions (Section 12.10), and so on.
Note: This "11-or-more" business is a peculiar change from Mac OS X 10.3, which displayed this grand-total effect when two or more icons were highlighted. If you highlight fewer than 11 icons, Tiger opens up individual Get Info windows for each one.
2.8.1. Uni-window vs. Multi-window In Mac OS X versions 10.0 and 10.1, a single Info window remained on the screen all the time as you clicked one icon after another. (Furthermore, the command was called Show Info instead of Get Info. Evidently "Show Info" sounded too much like it was the playbill for a Broadway musical.) The single info window was great for reducing clutter, but it didn't let you compare the statistics for the Get Info windows of two or three folders side by side. POWER USERS' CLINIC
Secrets of the Non-Apple Mouse | | Apple still includes a one-button mouse with every desktop Macintosh. But millions of peoplenot only Windows PC usersprefer a two-button mouse, preferably with a little scroll wheel on top. Feel free to get one. They're cheap. Companies like Macally, Logitech, and Microsoft sell them specifically for the Macintosh, or you can try a generic mouse from some random PC-mouse company. Most of the time, PC mice work just fine on the Mac, even without having to install any software drivers. (And when a driver is necessary, you'll have good luck with a shareware driver like USB Overdrive, found at www.usboverdrive.com.) Most of the time, right-clicking something on the screen is the same as Control-clicking itthat is, it makes a shortcut menu appear. If your mouse has a little scroll wheel on the top, a world of shortcuts and conveniences awaits you. For example, you can pick menu items from an open menu just by spinning the scroll wheel to move up or down the commands. If you press Shift as you twirl the wheel, many programs let you scroll the window horizontally instead of vertically. This surprising trick works in, for example, the Finder, Microsoft Excel, the Desktop panel of System Preferences, and the Open or Save dialog boxes for certain programs. And in Microsoft Office programs, pressing Control while you turn the wheel zooms the entire document up or down, magnifying or shrinking it. |
Beginning in 10.2, Apple returned to the old way of doing Get Info: A new dialog box appeared each time you get info on an icon (unless you've highlight 11 or more icons, as described above). But the uni-window approach is still available for those occasions when you don't need side-by-side Get Info windowsif you know the secret. Highlight the icon and then press Option-  -I (or hold down Option and choose Show Inspector from the File menu). The Get Info window that appears looks slightly different (it lacks a Minimize button), and it changes to reflect whatever icon you now click. -I (or hold down Option and choose Show Inspector from the File menu). The Get Info window that appears looks slightly different (it lacks a Minimize button), and it changes to reflect whatever icon you now click. 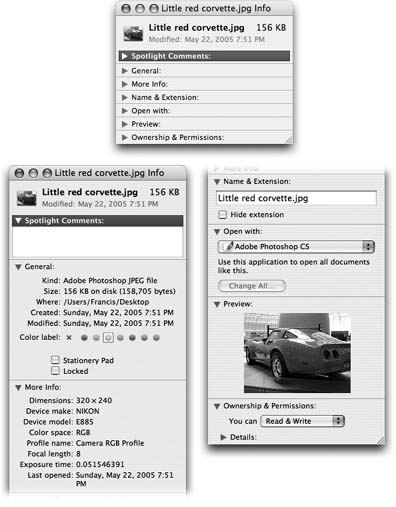 | Figure 2-12. Top: The Get Info window can be as small as this, with all of its information panes collapsed .
Bottom: Or it can be as huge as this (it's shown here split in two because the book isn't tall enough to show the whole thing)if you click each flippy triangle to open its corresponding panel of information. The resulting dialog box can easily grow taller than your screen, which is a good argument for either (a) closing the panels you don't need at any given moment or (b) running out to buy a really gigantic monitor. | |
2.8.2. The Get Info Panels Apple built the Get Info window out of a series of collapsed "flippy triangles ," as shown in Figure 2-12. Click a triangle to expand a corresponding information panel. Depending on whether you clicked a document, program, disk, alias, or whatever, the various panels may include the following: -
Spotlight Comments . Here, you can type in random comments for your own reference. Later, you can view these remarks in any list view, as illustrated on Section 1.5.4and find them when you conduct Spotlight searches. -
General . Here's where you can view (and edit) the name of the icon, and also see its size , creation date, most recent change date, locked status, and so on. If you click a disk, this info window shows you its capacity and how full it is. If you click the Trash, you see how much stuff is in it. If you click an alias, this panel shows you a Select New Original button and reveals where the original file is. The General panel always opens the first time you summon the Get Info window. -
More Info . Just as the name implies, here you'll find more info, most often the dimensions and color format (graphics only) and when the icon was last opened. These morsels, new in Tiger, are also easily Spotlight-searchable. -
Name & Extension . On this panel, you can read and edit the name of the icon in question. The "Hide extension" checkbox refers to the suffix on Mac OS X file names (the last three letters of Letter to Congress.doc , for example). As described on Section 5.5.2, many Mac OS X documents, behind the scenes, have file name extensions of this kindbut Mac OS X comes factory-set to hide them. By turning off this checkbox, you can make the suffix reappear for an individual file. (Conversely, if you've elected to have Mac OS X show all file name suffixes, this checkbox lets you hide file name extensions on individual icons.) -
Memory . You'll see this option only when showing info for Classic programs (those that haven't been updated for Mac OS X). There are three different memory statistics: Suggested Size (the software company's official recommendation), Minimum Size (below which the program won't even runa number you shouldn't change), and Preferred Size. This final number is the one you should feel free to adjust, arming the program with more memory if it seems unstable or slow in your Classic world (Chapter 6). -
Open with . This section is available for documents only. Use the controls on this screen to specify which program will open when you double-click this document, or all documents of its type. (Details on Section 5.5.4.1.) -
Preview . On this panel, you see a handsome, very large thumbnail image. In the case of spreadsheets, Word documents, HTML documents, and so on, this is nothing to write home aboutyou see only a magnified version of the generic document icon. But when you're examining pictures, text files, PDF files, sounds, clippings, and movies, this feature can be extremely useful. As you click each icon, you see a magnified thumbnail version of what's actually in that document. A controller lets you play sounds and movies, where appropriate. -
Languages . The menus and dialog boxes of well-written Mac OS X programs (iMovie and iPhoto, for example) appear by magic in whatever language you choose. The trouble is, your hard drive carries a lot of baggage as a result; it must store the wording for every menu and dialog box in every language. If you're pretty sure you do most of your computing in just one language, expand the Languages tab, select all of the languages you don't speak, and click Remove. You'll save disk space and clutter. -
Ownership & Permissions . This is available for all kinds of icons. If other people have access to your Mac (either from across the network or when logging in, in person), this panel lets you specify who is allowed to open or change this particular icon. See Chapter 12 for a complete discussion of this hairy topic. Here and there, you may even see other panels in the Get Info window, especially when you get info on application icons. For example, iPhoto, iMovie, and iDVD each offer a Plugins panel that lets you manage add-on software modules. |