| There are any number of reasons why you might want to incorporate songs from your iTunes collection into your GarageBand compositions: -
You want to extract a certain drum hit or a particular orchestral chord for use in your own composition, like generations of rap artists before you. -
There's an "unplugged" guitar-and-voice recording that you'd like, just for practice, to enhance with some other tracks in GarageBand. -
You want to record a vocal line onto a pop song that doesn't have one. -
You yearn to play your own version of American Idol and play or sing along with the prerecorded track. In any case, you're generally free to go. You can drag almost any kind of file right out of iTunes into an empty spot in GarageBand's timeline to install it there as a Real Instrument trackand then layer additional tracks on top of it. The file format doesn't matter: MP3, WAV, AIFF, Apple Lossless, or AAC. Make that unprotected AAC. GarageBand won't accept songs that come with copy protection. Unfortunately, that includes everything you've bought from Apple's $1-a-song iTunes Music Store, which come in protected AAC format. If you absolutely , positively want to bring iTunes songs in, you have three alternatives. First, you could burn the song to a CD, and then re-rip the CD into your iTunes collection. This process eliminates the copy protection, leaving behind a music file that you're free to drag into GarageBand. Second, you could spend $32 on Audio Hijack Pro (Section 8.2.2). But if you prefer something less time-consuming than the CD method, and less expensive than the Hijack method, you can use the free software called Soundflower (a download from the "Missing CD" page of www.missingmanuals.com). It's a "virtual cable" that lets you route the audio from any Mac program into any Mac programsay, from iTunes into GarageBand. -
Install Soundflower . Installing the software requires you to restart your Mac. -
Open System Preferences. Click the Sound icon. Click the Output tab, and then select "Soundflower (2 ch)" as the output source . Figure 9-5 illustrates this step. -
Quit System Preferences. Open GarageBand. Choose GarageBand  Preferences . Preferences . The Preferences dialog box opens. -
Click the Audio/MIDI button. From the Audio Input pop-up menu, choose Soundflower (2 ch) . In essence, you've just "plugged in" the other end of the virtual cable. -
Close the Preferences window. Select a blue Real Instrument track, position the Playhead where you want to begin recording, and click the round, red Record button (or type the letter R key) . GarageBand begins recording. Of course, there's nothing playing yet. -
Switch into iTunes and double-click the song you want to play . It doesn't have to be iTunes; you can route the audio from any Mac program into GarageBand at this point. (In fact, you have to be a little careful, since all audio 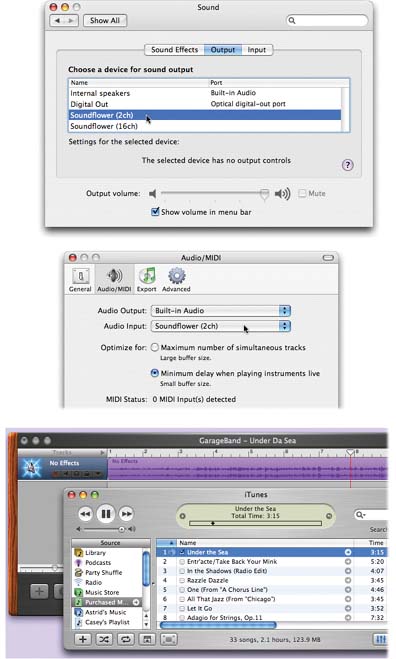 | Figure 9-5. Top: In System Preferences, tell your Mac to route all of its audio (including iTunes playback) through the Soundflower virtual cable instead of your built-in speakers . You won't hear anything, but you'll be able to record virtually anything into GarageBand.
Middle: Now, in GarageBand Preferences, you "plug in" the other end of the Soundflower cableby telling the program to use Soundflower as its input.
Bottom: Finally, you're ready to record. For best results, start GarageBand recording before you switch to iTunes and begin playing, so you won't accidentally chop off the beginning of the song. When it's all over, you can always trim off any "dead air" at the beginning of the track. | | will be part of what GarageBand records. So if your Mac happens to beep or say "It's eleven o'clock," that audio will be part of your GarageBand mix, too!) In any case, GarageBand is now dutifully recording your iTunes track, copy-protected or not. You can't hear anything, because Soundflower is intercepting all of the signal that would normally be routed to your speakers. But both the sound waves in the GarageBand region in progress and the bouncing level meters in the track-mixer panel (Section 8.1.1) should inform you that GarageBand is merrily receiving the audio. -
When the song appears to be over, click the Play button or tap the Space bar to stop the recording . You've just transferred your music into GarageBand. Now, at this point, there are a few cleanup maneuvers you might want to make. For example: -
Trim off any silence at the beginning of the track . Almost always, there's a little bit of unwanted dead space at the front of the track, which was the time that GarageBand began recording before you switched into iTunes to begin the playback. The easiest way to trim it is to drag the left end of the purple region to the right, until it bumps up against the first sound waves. 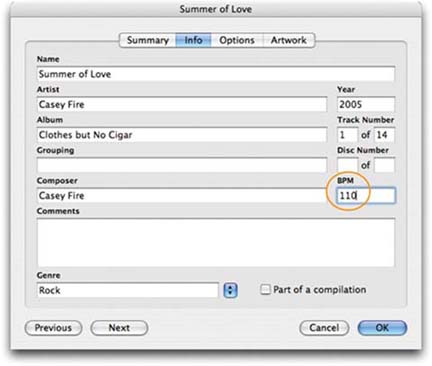 | Figure 9-6. To see if your iTunes track was tagged by its creator with certain inalienable beats-perminute details, click the song in iTunes and then choose File Get Info (or press -I). This dialog box appears. On its Info tab, check the BPM box circled here. | |
-
Slide the track into place . Most of the time, you'll want the track to begin at the beginning of the GarageBand projectat 0:00. In that case, after trimming it, drag the whole region to the left as far as it'll go. -
Match the tempo . This is a tricky one. If your goal in transferring the song to GarageBand was to edit or embellish it, you may want to make sure that it aligns with GarageBand's beat ruler, so that every "ONE! Two, three, four" of the recording aligns with GarageBand's own conception of time.
Note: If the tempo changes during the imported song, forget it. GarageBand can't handle tempo changes.
Sometimes you get lucky, and the song comes with beats-per-minute information embedded right into the downloaded file. (Figure 9-6). Otherwise, though, you'll have to resort to trial and error. Choose GarageBand Preferences, click the General tab, and turn on "During playback and recording for the metronome. Then check the Control menu to make sure that the metronome is, in fact, on. Now start the song playing (or cyclingsee Section 1.5). As it plays, fiddle with the tempo slider (Section 4.5) until the clicks of the metronome mesh as much as possible with the beats of the song. It may help if you turn down the track volume slightly, so you can hear the metronome better. |