8.2. The Master Track
| < Day Day Up > |
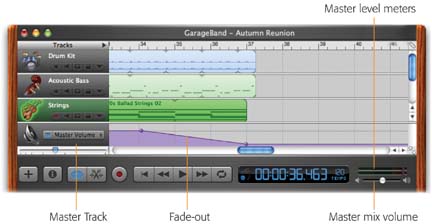
| It's nice that you can control the volume of individual tracks, and of individual sections of music along their lengths. But as a final step before unveiling your masterpiece to the world, you'll want to look over the master volume for the entire mix and set up any master effects, like reverb, that you want to apply to the entire garage band . Tip: Perform the following adjustments after adjusting the mix of your individual tracks. You apply most of these all-track changes using the Master Track . It's an additional horizontal track that appears at the bottom of the track list, as shown in Figure 8-5.
To make it appear, choose Track If you've learned to manipulate the effects, overall volume, and volume graphs for individual tracks, you already know how to operate them for the Master Track. The only difference is that you're now affecting all tracks simultaneously . 8.2.1. Overall VolumeSet the overall volume level for your song using the master volume slider identified in Figure 8-5. Play back the entire song, watching the volume-level meters just above the slider to make sure that they don't cross into the red zone during the loudest portions of the music, and that the two little clipping indicators don't light up. (See the box on Section 8.1.2 for more detail on using these meters .) The point is to make sure the music will sound good when other people play it on their computers, iPods, or CD players. Volume that's too low to hear the detail, or so high that you're introducing distortion, will seriously hinder your chances of getting picked for American Idol . Tip: Don't get into the habit of using this master slider to adjust GarageBand's playback volume while you're working on your compositions. For that purpose, use the speaker-volume keys on the top row of your keyboard. Or, if you don't see them on your keyboard, use the  System Preferences, click Sound, and turn on "Show volume in menu bar.")Use the master output volume slider only to determine the final volume level for your piece, as it will be when you export it to iTunes, post it online, and so on. System Preferences, click Sound, and turn on "Show volume in menu bar.")Use the master output volume slider only to determine the final volume level for your piece, as it will be when you export it to iTunes, post it online, and so on. | |||
| FREQUENTLY ASKED QUESTION Real-time Automated Mixing? | |||
| Hey, I was at my buddy's place the other day. He paid $600 for his mixing software, but it does something cool. He can adjust the tempo and processing effects for a track while the music is playingand the software memorizes it and recreates it automatically the next time the piece plays back. Is there any way to make GarageBand automate the tempo and effects like this ? As you now know, GarageBand 2 can memorize the movement of its track-volume and pan-position knobs , simulating the effect of automated mixes . But in a true-blue automated console, you can also automate things like tempo changes and effects. If you're really desperate, you can simulate this scenario with a tricky workaround right in GarageBand. As you can read in Chapter 10, it's possible to export a partial or finished GarageBand mix and then bring it right back in as a frozen, but full-quality, unified track. All you have to do is find a piece of software that can record the playback as you fiddle with tempo and effects, thus capturing your real-time adjustments for posterity. Fortunately, exactly such a program exists. It's Audio Hijack Pro, a handy little $32 shareware utility that can capture virtually any sound that's passing through the Mac. Most people use Audio Hijack for things like capturing Internet radio broadcasts, but you can put it to another use entirely. (You can download it from the "Missing CD" page at www.missingmanuals.com.) All you have to do is set up Audio Hijack to record the output from GarageBand, as shown here. Play your piece, making any tempo or effects adjustments you like during the playback. When it's over, you'll find an AIFF file on your desktop, named after GarageBand. Drag this icon right back into an empty Real Instrument track in GarageBand. From here, follow the procedure described on Section 10.12. 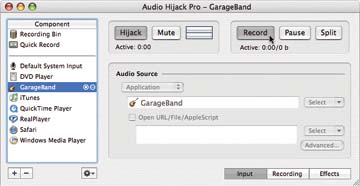 |
8.2.2. Fade-ins, Fade-outs
Create fade-ins, fade-outs, and other whole-song volume fluctuations by turning on the Master Volume checkbox and then manipulating the horizontal master-volume graph, exactly the way you would adjust an individual track's graph.
8.2.3. Reverb and Effects
Set up reverb, compression, and any other whole-song processing effects by doubleclicking the Master Track's header (where it says Master Volume at the left edge of the window). Doing so produces the Track Info dialog box for the Master Track, as shown in Figure 8-6.
In this dialog box, you can specify a degree of echo, reverb, equalization, or compression. You can also apply any of the GarageBand "additional effects" like Bitcrusher, Chorus, Flanger, and so on, using the pop-up menu in the middle of the Details panel. All of these effects are described at length in Chapter 7.
|

Tip: If you create a combination of effects that sounds particularly appropriate for your style of music, and you think you might use them later for subsequent compositions, click the Save Master button shown in Figure 8-6. You're asked to type a name for this effects preset, and then click Save. From now on, you'll see your new Master Track preset listed in the right-side list of the Track Info dialog boxor at least until you use the Delete Master button to remove it.
8.2.4. Key Changes
If your name is Barry Manilow, you're all over this new feature.
In GarageBand 2, there's a new editable graph, much like the volume and pan curves you've already read about. This one, though, controls the key of the music as it plays. Figure 8-7 shows the details.
|
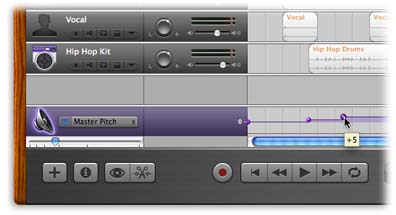
You can spice up your arrangement by taking it up a half-step (+1 on the transposition curve) for the last chorus, for example, or even morea favorite trick of Mr. Manilow and many a Broadway composer.
What's nice is that GarageBand is intelligent about what it transposes. Loops (green and blue) change key, for example, and so do MIDI regions you've recorded (Software Instruments). But when you use the master pitch curve, GarageBand leaves certain other elements untouched:
-
Drum tracks . In other words, the actual "keys" being played back won't turn into different drum sounds.
-
Audio files dragged in from the Finder (orange) . Apple's guessing that these are sound effects and other nonmusical items, and that you probably want them left alone.
-
Real-Instrument recordings (purple) . GarageBand can indeed transpose digital recordings like these, but within limits; transposing one by a large increment makes it sound funny . So Apple leaves it to you to transpose your own recordings manually, region by region, as described on Section 5.4.
| < Day Day Up > |