| Next time you listen to the radio, notice how each song ends. A few of them end with a dramatic climactic stopping chord, but most gradually fade out. GarageBand not only lets you create convincing fade-outs for your songs, but even lets you adjust the volume graph for individual tracks along their lengths. For example, you can make the piano part loud during the introduction of the piece, and then pull back to a softer level when your singing begins. This business of adjusting the relative volume levels of a song's tracks is called mixing . It's both an art and a science; two different people mixing the same song can create totally different psycho -musical effects. You're no longer wearing the composer's hat, or even the rock star's hat. You're now assuming the engineer's and producer's roles. Here are the tools at your disposal, as described in the following pages: -
You can adjust the relative overall volume levels of the tracks. -
You can create volume fluctuations within a track. -
You can adjust the left-to-right positions of your track instruments in the stereo "soundstage." -
You can make overall volume changes ”to all tracks at once ”to create, for example, a fade-out at the end of the song. 8.1.1. Overall Track Volume The most basic mixing skill is knowing how to adjust track volumes relative to each other. That is, you might want to make the drum track a little quieter, the vocals a little louder, and so on. The key to this basic mixing feature is the track mixer , a little panel that sprouts when you click the small triangle identified by the arrow cursor in Figure 8-1. 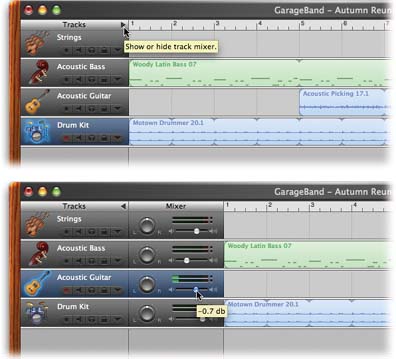 | Figure 8-1. Top: If you point your cursor at various Garage- Band screen controls and wait a moment, a tiny balloon pops up to tell you what it does ”in this case, the track mixer.
Bottom: When you click the little triangle, the track mixer panel appears. Here, you can adjust the overall volume level of a track and use the knob to specify where it sits in the left-to-right stereo "soundstage" when you listen with headphones or stereo speakers . | |
Using the volume slider that you find here is simple enough: -
Drag the tiny, white, round handle to decrease or increase the track volume. -
Click inside the slider to make the volume handle jump to that spot, without having to drag. -
Option-click one of the tiny speaker icons, or anywhere along the slider's length, to restore the track volume to its original factory-set volume level. (Note to studio veterans : Technically, you're setting the track to 0 decibels. Note to everyone else: And why is "normal" zero? It's a long story with its origins in the world of recording-studio equipment, but the bottom line is that on this kind of meter, 0 dB means, "anything higher will distort."Absolute silence, incidentally, is represented on these meters as “96 dB.)
Tip: If you can't seem to adjust the slider at all, it's because you've programmed in volume changes using the Track Volume track described next. The track mixer slider is "live" only if you've never fiddled with the track's volume track.
GEM IN THE ROUGH
Check One, Check Two | | You can use the track volume slider shown in Figure 8-1 even while the song is playing back. Why is that so useful? Because the two tiny graphs just above the volume slider illustrate the volume level of the left and right stereo channels in real time. They light up with tiny bars, as illustrated here, resembling the digital LED level meters on modern studio equipment. When you're preparing your song for release to the masses, observe these meters while the song plays back. You want to adjust the volume so that they dance primarily in the green area, slipping into the yellow area only during the loudest passages What you don't want is for the graph to extend into the red bars, or, worse , for the two tiny dots at the right end ”the clipping indicators ”to illuminate. That's a sign that the volume is so loud that distortion may result. You'll be pumping out too much signal for the speakers on the other end, resulting in a garbled, overblown sound. (Once the two clipping-indicator dots have turned red, they stay red to get your attention. They return to black only when you stop and resume playback, telling them, in effect, "OK, OK, I get it ”I've got a clipping problem. I'll fix it.") As the music plays, you'll notice that while these volume meters are bouncing around, every so often, one graph bar will remain illuminated for a second. That's your peak volume meter. It remains illuminated for a moment to help you spot the high points of your track volume. You can boost or reduce the volume of green Software Instrument tracks whenever you feel like it. But when it comes to Real Instrument recordings, the time to pay attention to these level meters is while you're recording. If the microphone or line input setting was too loud or too soft, adjusting the track volume slider may not rescue the recording. 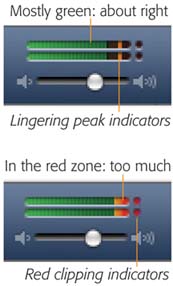 |
8.1.2. Volume Adjustments Within a Track All this time, GarageBand has been concealing a little secret from you. Each track can, at your command, sprout a real-time graph of its volume over time. By dragging this "rubber band" line up or down, you can program in gradual (or sudden) volume changes that GarageBand will incorporate into the playback. To reveal this graph, use one of these techniques: To hide the volume track, repeat the same procedure. 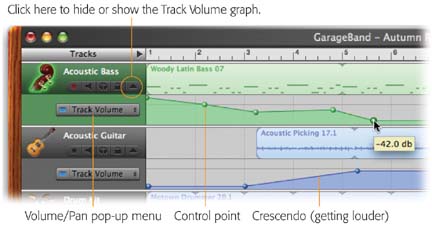 | Figure 8-2. Each track has its own volume graph, which you can manipulate by dragging along its length, exactly as in iMovie.
Each little round handle is a control point that marks a volume change ”or at least the beginning or end of one. | |
This graph of track volume comes in handy in many ways. For example, you can begin the piece with its instrumental introduction at full volume, and then pull back the band so that you can hear the singing. You can also create professional-sounding fade-ins and fade-outs at the beginnings and ends of your songs. The key to turning on this feature is the Track Volume in the track header. When you turn it on, a horizontal line appears in the volume track, stretching from edge to edge. This line is a graph of the track's volume, which you can manipulate like a rubber band. Here's how it works: -
If you've also opened the track mixer panel (Figure 8-1), adjusting the overall track volume makes this horizontal volume graph float up or down accordingly . -
Click directly on the line and drag upward or downward. The original click produces a small spherical handle ”a control point ”while the drag produces a slant in the line from its original volume level. Simultaneously drag left or right to adjust the timing of this fluctuation. -
To make the volume take another dip or swoop, click elsewhere on the volume line and drag again. You've just created a second control point, which you can now position independently. -
To remove a volume fluctuation, click the control point to select it, and then press the Delete key. (Alternatively, drag a control point so far to the right or left that it overlaps the adjacent one.) The little round ball disappears, and the "rubber band" of the volume graph snaps back to the previous control point, stretched tight. -
To make a sudden volume change, zoom way in, then drag a control point carefully until it's almost directly below the previous or next one. (Don't drag it directly underneath ”if you do that, the other handle will disappear. In that case, use the Edit  Undo command to restore it.) Undo command to restore it.) -
Consider making your volume adjustments while the music plays back. GarageBand dutifully changes the mix in real time as you fiddle. -
You can drag a group of control points higher or lower ”thus proportionally boosting or decreasing the volume for an entire stretch of music ”by selecting them en masse first. You can also drag a group of control points sideways , making the volume fluctuation take place sooner or later. Figure 8-3 has the details.
Tip: In fact, you can use that same trick to drag the entire volume graph up or down for the length of the song. To select all of the handles in the entire volume track, click the volume track header ( marked by the words "Track Volume" at the left edge of the window).
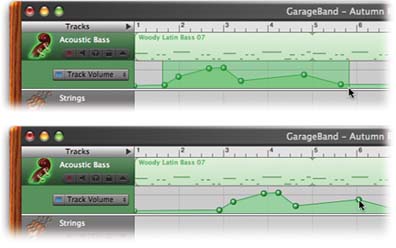 | Figure 8-3. Top: You can select a group of control points either by Shift-clicking the ones you want, or, as shown here, by dragging horizontally through them.
Bottom: Then, you can drag the group either horizontally (to change the timing) or vertically (to change the overall level of the volume change), using one of them as a handle. | |
-
To restore the original, straight-line condition of a clip's volume, select all of the orange handles (see the previous Tip) and press Delete. (Of course, you can also delete only a subset of them by first dragging a selection, as shown in Figure 8-3, at top.) -
When you're finished editing volume fluctuations, you can click to turn off the tiny, square blue "light" next to the words Track Volume (identified in Figure 8-2). GarageBand will remember all of the changes that you've made ”you'll still hear the volume changes on playback ”but it dims all of the handles and rubber-band graph lines, so you won't drag something out of alignment by accident At this point, you have another way to adjust the overall volume of the track, maintaining the relative fluctuations you've set up: Use the overall-volume slider shown at bottom in Figure 8-1. 8.1.3. Overall Track Pan Position The beauty of stereo is that there are two speakers or headphones, which happens to correspond very nicely with the number of ears on your head. When you listen to music in stereo, part of the realism stems from the instruments' varied placement in the stereo sound field or soundstage . In other words, some instruments seem to be coming from the left side of the room, some from the right, and some from directly in front of you, almost as though you were listening to them live. Over the ages, record producers have become very skilled at exploiting this phenomenon . When they mix the song, they use knobs or software to specify where each track should sound like it's coming from ”left, right, center, or anywhere along the scale. In short, they spend a lot of time thinking about the pan position of each instrument (that is, its position along the sonic panorama before you). As it turns out, GarageBand provides this flexibility, too. All you have to do is to open the track mixer panel, as described in Figure 8-1. Unless you intervene, every instrument starts out sounding like it's coming out of both speakers ”left and right ”with equal volume. Every instrument starts out with a center pan position; accordingly, every track's pan knob starts out with the little white notch pointing straight up to the center position. 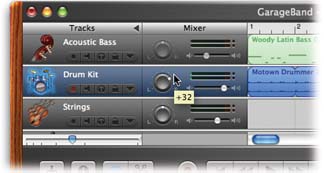 | Figure 8-4. You can't really gauge the effects of the pan control unless you're listening with headphones, or sitting between two stereo speakers. And it probably goes without saying that you should keep the music playing while you make these adjustments. | |
Here's how to work this knob (Figure 8-4): -
Don't even bother grabbing the tiny rim of the knob and then dragging the mouse along it. This will effectively turn the knob, but it requires the precision of a neurosurgeon. Instead, click one of the tiny white dots around the outside of the knob (or, for extreme panning, click the letter L or R). Instantly, the white notch on the knob turns to face your click.
Tip: Ordinarily, this knob "clicks" into numeric positions that are multiples of 16: 32, 48, and so on. If you press Shift and drag inside the round knob, however, you can dial up any numeric value you want.
-
Option-click anywhere on the knob to reset it to center, making its little white notch point straight up again. Leaving everything set to the center is fine if people are going to be in mono anyway ”from a Power Mac speaker, say, or over the Internet in a file that you've distilled down to a single mono track to make it a quicker download. Most professionally recorded songs, however, feature instruments that are carefully spread out across the stereo field. In general, the most important instruments ”the soloist, the drummer , bass player, and maybe the guitars ”stick with center positions, but the "flavor" instruments might be spread out to the left and right sides. You can inject some fun into the process by introducing variations on this formula. If you're singing a duet ”maybe even a duet with yourself ”you could put the two voices on opposite channels, so it sounds like they're really facing each other. (The more you turn the pan knob, for example, the farther to the left or right you place that instrument.) Using volume, pan, and reverb together, in fact, you can dial up a pretty convincing sonic impression of a track's position in three-dimensional space. 8.1.4. Pan Adjustments Within a Track In GarageBand 2, there's more to the panning story than fiddling with that set-it-and-forget-it Pan knob. Now you can make a track's sound move around in the stereo field, thanks to the new track panning curve feature. You open and edit this graph exactly as illustrated in Figures 8-2 and 8-3. But once you've opened the volume graph, choose Track Pan from the little pop-up menu identified in Figure 8-2. At this point, any adjustments you make to the graph affect its right-to-left stereo-field position, not its volume. As the graph line moves upward, the sound shifts to the left ear; downward shifts the sound to the right ear. The idea here, of course, is to give you the freedom to move "players" around on the "stage." Sometimes you might want a musician to "walk" into center stage during a solo, and then return to the original position; other times, you might want to create a special effect by having a voice or an instrument leap, impossibly quickly, back and forth between the listener's ears. |