q 9.7(a) Make sure the SWT project is selected.
q 9.7(b) Using the Eclipse main menu bar, select New/Class.
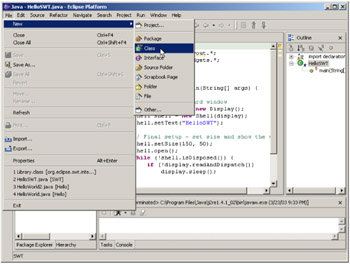
Figure 9.51:
Creating a new class using the main menu bar's New/Class option.
q 9.7(c) Make sure the Source Folder is SWT'.
q 9.7(d) Leave Package blank.
q 9.7(e) Leave Enclosing type unchecked.
q
9.7(f) Enter Prompt in the
q 9.7(g) Make sure public is checked, abstract and final unchecked.
q 9.7(h) Leave Superclass as java.lang.Object, Interfaces blank.
q 9.7(i) Make sure public static void main(String[] args) is checked.
q 9.7(j) Leave the other two unchecked.
q 9.7(k) Select Finish.
Figure 9.52:
Setting the fields properly for a new class.
This will create a class Prompt in the default package (because you left package blank) in project SWT, as shown in Figure 9.53.
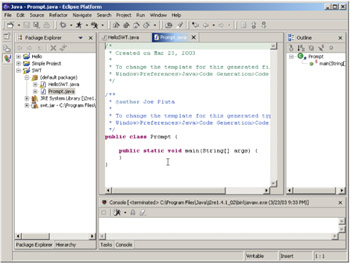
Figure 9.53:
The result of the addition of the new class Prompt.
As usual, you can do this one of two ways: write the code or import the code. Option 1 is to modify the source manually. If you'd rather skip this step, go on to Option 2 to import the code.
Enter the new code.
q 9.8(a) Enter the following source code after the comments.
import java.util.Hashtable;
import org.eclipse.swt.*;
import org.eclipse.swt.graphics.*;
import org.eclipse.swt.layout.*;
import org.eclipse.swt.widgets.*;
public class Prompt {
// Resources
Display display;
Shell shell;
Color red, white;
// Fields
Text f1;
Label f2;
public Prompt() {
}
public void run() {
init();
setLayout();
createWidgets();
show() ;
cleanup();
}
private void init() {
// Create a standard window
display = new Display();
shell = new Shell(display);
shell.setText("Prompt3");
// Create some colors
red = new Color(display, 255, 0, 0);
white = new Color(display, 255, 255, 255);
}
private void setLayout() {
// Create the layout for the widgets
GridLayout grid = new GridLayout();
grid.numColumns = 2;
grid.makeColumnsEqualWidth = true;
shell.setLayout(grid);
}
private void createWidgets () {
// Create my widgets
Label l1 = new Label(shell, SWT.NONE);
l1.setText("Item Number:");
f1 = new Text(shell, SWT.BORDER SWT.SINGLE);
f1.setTextLimit(20);
Label l2 = new Label(shell, SWT.NONE);
l2.setText("Description:");
f2 = new Label(shell, SWT.NONE);
f2.setText(" ");
Button bl = new Button(shell, SWT.PUSH);
b1.setText("Find");
b1.addListener(SWT.Selection, new Listener() {
public void handleEvent(Event event) {
doFind();
}
});
Button b2 = new Button(shell, SWT.PUSH);
b2.setText("Exit");
b2.addListener(SWT.Selection, new Listener() {
public void handleEvent(Event event) {
doExit() ;
}
});
}
private void doFind() {
String desc = getDescription(f1.getText());
if (desc == null)
{
f1.setForeground(white);
f1.setBackground(red);
f2.setText("Not Found");
f2.setForeground(red);
}
else
{
f1.setForeground(null);
f1.setBackground(null);
f2.setText(desc);
f2.setForeground(null);
}
}
private void doExit() {
shell.close() ;
}
private static final Hashtable items;
static {
items = new Hashtable();
items.put("DOG", "My Puppy");
items.put("CAT", "My Kitty");
items.put("OCTOPUS", "Calamari Kid");
}
private String getDescription(String item)
{
return (String) items.get(item);
}
private void show() {
// Final setup - size the display show it
shell.setSize(200, 100);
shell.open();
while (!shell.isDisposed()) {
if (!display.readAndDispatch())
display.sleep();
}
}
private void cleanup() {
// When done, clean up resources
display.dispose();
red.dispose();
white.dispose();
}
public static void main(String[] args) {
new Prompt().run();
System.exit(0);
}
}
q 9.8(b) Save the source code.
Figure 9.54:
Save the source code. This figure shows the use of the Eclipse tool bar's Save tool.
q 9.8(c) Press Ctrl-Home.
Your display should now be similar to Figure 9.55.
Figure 9.55:
The top of the source code after you press Ctrl-Home.
q 9.8(d) Insert the supplied CD-ROM into your CD-ROM drive.
q 9.8(e) Right-click on the SWT project and select Import ...
Figure 9.56:
Use the popup menu in the Package Explorer to Import a file into the SWT project.
q 9.8(f) Select File system and click Next.
Figure 9.57:
Select File system as the source for the import.
q 9.8(g) Enter R :\Source\Step 9 in the From directory field, where R is the drive letter of your CD-ROM drive, and press the Tab key.
Figure 9.58:
Enter R ”\Source\Step 9, where R is the drive where you loaded the CD-ROM.
q 9.8(h) Left-click on the Step 9 folder.
Figure 9.59:
Select the Step 9 folder by left-clicking on it.
This will cause the contents of the Step 9 folder to appear in the right-hand pane, as shown in Figure 9.60.
Figure 9.60:
The contents of the Step 9 folder will appear in the right-hand pane.
Select Prompt.java by clicking on its checkbox.
q 9.8(i) Select Prompt.java and click Finish.
Figure 9.61:
Select only Prompt.java, then click Finish.
If you also executed Option 1, you'll get the following dialog box. Click Yes and skip to Step 9.9.
q 9.8(j) Select Yes on the confirmation box that pops up.
Figure 9.62:
This prompt is used to be sure you really want to overwrite your source.
If you didn't execute Option 1, your display should look just like the one shown in Figure 9.63.
Figure 9.63:
Open up the source for Prompt.java by double-clicking on it.
q 9.8(k) Open Prompt.java.
Your display should now look like Figure 9.64.
Figure 9.64:
The source for Prompt.java.