| Exporting to iTunes is as simple as choosing File > Export to iTunes. Before you begin exporting, however, there are a few things you'll need to do to prepare your songs. In the next series of exercises, you'll set your GarageBand preferences to create a playlist in iTunes. Then you'll evaluate each song to make sure that you are exporting the whole song, and you'll check the output levels for clipping. Finally, you'll export your songs to a new playlist in iTunes. Since you'll be working with the finished mixed songs from the other lessons, this is a great time to practice your ear training so that you can hear beyond the basic music. As you play the different songs, listen for the levels and placement of the tracks in the stereo field, and see if you notice any of the arrangement rules and techniques you learned in Lessons 6 and 7. Let's take a moment to review the song arrangement rules from Lesson 6. Here's a summary of these rules: Rule #1: Decide what type of song you are going to write, and choose instruments and parts that will work for that song. Rule #2: Make sure your song has a beginning, middle, and end. Rule #3: Sprinkle your music with catchy, stand-out riffs to liven up the song, but don't flood your song with these riffs, or you'll drown the other tracks. Rule #4: Add a few breaks in the music so your song can breathe.
Setting GarageBand Preferences for iTunes The first step in preparing a song to export to iTunes is to set your song and playlist information in the Export pane of the GarageBand preferences. Let's open the first song and set up the song and playlist information. 1. | Choose File > Open and select Eyewitness from the Lesson_08 folder.
| 2. | Choose GarageBand > Preferences to open the General Preferences window.
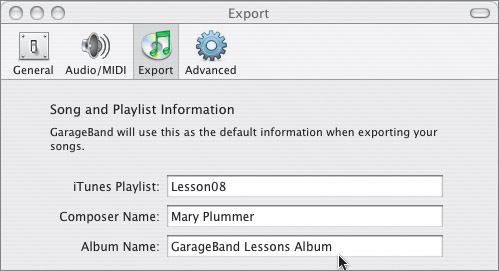
| 3. | Click the Export button at the top of the General Preferences window to open the Export pane.
 The Export pane opens within the General Preferences window.
Next, you'll need to name your iTunes playlist and album. By default, GarageBand names the playlist and album after the registered user of the computer.
| 4. | Type Lesson08 in the iTunes Playlist field.
| 5. | Type GarageBand Lessons Album in the Album Name field.
 | 6. | Close the General Preferences window.
|
Now that you've set up the export information, iTunes will automatically create a playlist titled Lesson08 and include the composer's name as well as the album name information in the playlist. Evaluating the Song's Output Level Once you've set your export preferences, it's time to check the output levels for the song to make sure that it isn't clipping. Remember, the Master Output Volume meters are located in the lower-right corner of the GarageBand window. You can use the Master Output Volume slider to raise or lower the output level as needed. Also, since training your ears takes practice, remember to listen beyond the basic song for the left-to-right placement of the different instruments in the stereo field, as well as the balance between the volume levels of the different tracks. Let's play the song and check the output levels. If the levels are too high, you'll need to lower the output. If the levels are too low, you'll need to raise the output. 1. | Press the spacebar to begin playback. As the song plays, watch the Master Output Volume meters for signs of clipping.
If you see any clipping (red) in the meters, stop playback.
 You should discover clipping around the 15th, 20th, and 25th measures.
| 2. | Click the clipping indicators (red dots) to reset them.
| 3. | Click-drag the Master Output Volume slider to lower the output volume to just above halfway on the slider.
 | 4. | Press the left arrow key several times to back up the playhead a few measures.
| 5. | Play the rest of the song to check the new output levels.
If your levels are still clipping, use the Master Volume Output slider to lower them again. But be careful not to set your levels too low. Ideally, your levels should peak in the highest green to yellow portion of the meter.
| 6. | Press Cmd-S to save your project with the new corrected levels.
|
Tip It's a good idea to always save your project with the corrected levels before outputting to iTunes. That way, if you decide to output the song again, or go back to work on the song later, the levels will be correct.
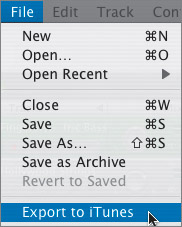
Exporting a Song Files are exported to iTunes in AIFF (Audio Interchange File Format) at 44.1 kHz (kilohertz). This is an audio file format the can be exported to an audio CD. Your songs can then be burned to an audio CD, downloaded to an iPod, or converted to another format, such as MP3, from within iTunes. When you export a song to iTunes, the entire song, from the beginning of the first measure to the end of the last region, is exported. Let's export the song Eyewitness to iTunes. 1. | Choose File > Export to iTunes to export the song.
 GarageBand begins to mix down your song.
The mixdown process means that all of the different tracks are mixed (at the current levels) into one stereo pair (left and right) for iTunes.
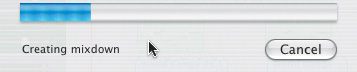 A mixdown window shows the progress of the mixdown. You can cancel the export process during mixdown by clicking Cancel.
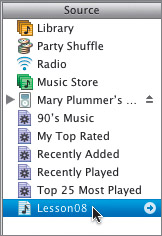
When mixdown is complete, iTunes launches with your song in the new playlist. If your iTunes window does not open, click the iTunes icon in the Dock.
Note If you have more than one version of iTunes on your computer (for example, OS 9 and OS X versions), GarageBand may export to the older version of iTunes. Launch the most recent version of iTunes before you export. | 2. | Click the playlist you created, Lesson08, to open the new playlist (if it is not already open).
 Note If the playlist appears with your name (user name) instead of Lesson08, change the playlist name in the GarageBand preferences and export again. | 3. | Select Eyewitness in the playlist to select the song.
| 4. | Press the spacebar to play the song in iTunes.
You don't have to listen to the whole song.
| 5. | Press the spacebar to stop playing the song.
Let's leave iTunes open so we can export a few more songs.
| 6. | Press Cmd-H to hide iTunes.
| 7. | Click the GarageBand icon in your Dock to return to GarageBand.
 |
Exporting Selected Tracks Now that you know how easy it is to export a complete song, let's look at exporting selected tracks. Sometimes you want to export only specific tracks. Perhaps you recorded a rough lead vocal track, and you want to practice singing (Karaoke style) to the song without hearing the rough lead vocal track. In that case, you would simply mute the vocal track in the Timeline, and then export the song. Any track that is muted in the Timeline will not be exported. This method works great if you are the lead singer and want to practice your vocals when you're at home, in the car, wherever. You can simply mute the vocal track, export the song to iTunes, and then burn it to a CD or download it to your iPod. Also, coordinating a time and place to rehearse can be one of the most challenging things for a band. You can use GarageBand to export custom mixes of your original songs so that you can practice even if you can't all be at the same place at the same time. Let's open the finished mix of Highway Bound and export several different versions that would be good for rehearsing. 1. | Choose File > Open and select Highway Bound from the Lesson_08 folder.
First, you'll export the finished mix. You don't have to check the levels on this one, though it's a good habit if you want to for practice.
| 2. | Choose File > Export to iTunes to export the song.
| 3. | Click the GarageBand icon in the Dock to return to GarageBand.
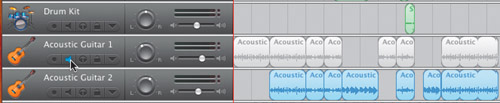
Now, let's create rehearsal versions for the first guitar player who plays the Acoustic Guitar 1 track. The first version will be just the Acoustic Guitar 1 track soloed so the guitarist can practice along with the sound of the finished part. The second version will be the finished song with the Acoustic Guitar 1 track muted so the guitarist can practice playing along with the other band members without hearing the guitar part already recorded in the song.
Before you export a new version of the song, you'll want to save the project and rename it accordingly.
| 4. | Press Shift-Cmd-S to open the Save As window.
| 5. | Name the project Highway Bound Guitar1 only and save it to your GarageBand Songs folder.
| 6. | Click the Solo button on the Acoustic Guitar 1 track to solo the track.
The Acoustic Guitar 1 track solos and all of the other tracks and regions turn gray to indicate they have been muted.
| 7. | Choose File > Export to iTunes to export the guitars-only version of the song.
The new version of the song is exported to iTunes.
Now you'll export a version of the song with the Acoustic Guitar 1 track muted.
| 8. | Click the GarageBand icon in the Dock or press Cmd-Tab to switch back to GarageBand.
| 9. | Press Shift-Cmd-S to open the Save As window.
| 10. | Name the new version of the song Highway Bound -Guitar1, and click Save.
| 11. | Click the Mute button on the Acoustic Guitar 1 track to mute the track, and press Cmd-S to save the song with the muted track.
This time, the Acoustic Guitar 1 track and regions are gray to indicate they have been muted.
 | 12. | Choose File > Export to iTunes to export this version of the song.
| 13. | Click the iTunes icon in your Dock to see your playlist with all three versions of the song Highway Bound.
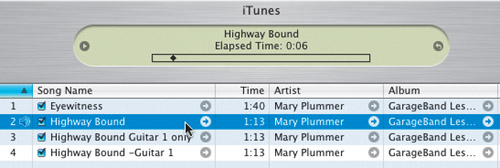 | 14. | Double-click each of the Highway Bound versions and listen to the first few seconds to make sure you exported it correctly.
|
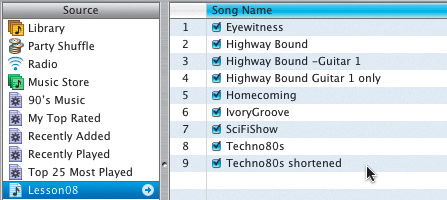
Here's what you should have: Highway Bound: Full song with all tracks Highway Bound Guitar1 only: Full song with Acoustic Guitar 1 track only Highway Bound -Guitar1: Full song minus the Acoustic Guitar 1 track
Exporting with a Cycle Region Sometimes you may only want to export part of a song rather than the entire project through the last region in the Timeline. To export music whose duration is shorter than that of the actual song in the Timeline, you can create a cycle region that contains only the elements you want to include in your export. Exporting with a cycle region will export a song from the beginning to the end of the region. Let's open Techno80s and try exporting the song without a cycle region. Then we'll export it again with a cycle region in order to shorten the song and exclude the empty track space at the end of the applause sound effect. 1. | Click the GarageBand icon in the Dock, and then choose File > Open and select Techno80s from the Lesson_08 folder.
Notice the control points that were used to fade in and out the Crowd Applause 01 region. The song actually ends before the end of the last region.
| 2. | Play the song once to hear the final mix, and listen carefully to the ending.
As you listen to the ending, watch the playhead to hear when the applause actually ends.
Let's export the song as-is to see what happens to the ending when it is exported.
| 3. | Choose File > Export to iTunes to export the song.
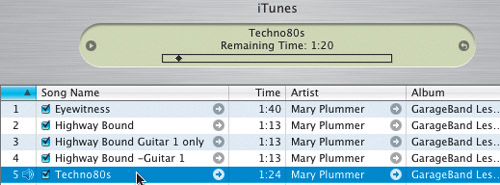
| 4. | Click your iTunes icon in the Dock to see the updated playlist.
| 5. | Double-click Techno80s in the iTunes playlist to listen to the exported mix.
 Did you notice the long silence at the end of the song? That's because you used control points to fade out the ending. But when you export, you include the end of the last region, even if it has been faded out earlier. Let's create a cycle region over the entire song, ending with the last control point on the Techno80s applause track. Did you notice the long silence at the end of the song? That's because you used control points to fade out the ending. But when you export, you include the end of the last region, even if it has been faded out earlier. Let's create a cycle region over the entire song, ending with the last control point on the Techno80s applause track.
| 6. | Click the GarageBand icon in the Dock to return to GarageBand.
| 7. | Press Shift-Cmd-S to open the Save As window.
| 8. | Change the name of the song to Techno80s shortened and save it to your GarageBand Songs folder.
| 9. | Press C to turn on the cycle region.
| 10. | Press Ctrlright arrow to zoom in to the Timeline several levels.
| 11. | Click-drag the right edge of the cycle region to extend it to the beginning of the 33rd measure (slightly longer than the last control point on the Sound Effect track).
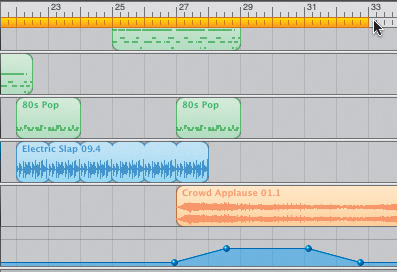 The left edge of the cycle region (yellow bar) should start at the beginning of the song.
| 12. | Press Cmd-S to save the new version of the song.
| 13. | Choose File > Export to iTunes to export the extended song.
| 14. | Click the iTunes icon in the Dock to see the updated playlist (if it doesn't open automatically).
Notice that the length of the shortened version is 1:04 (1 minute, 4 seconds long) and the original Techno80s is 1:24 (20 seconds longer).
 | 15. | Listen to each version of the song in iTunes to hear the difference.
|
To listen to the song, double-click the song in the playlist, or select the song in the playlist and click the Play button at the top of the window. Project Tasks Now that you understand the different ways to export a song from GarageBand to iTunes, it's your turn to finish the playlist. There are three songs left to export: IvoryGroove, Homecoming, and SciFiShow. Open each song, check the output levels, and export the entire song to iTunes. Be sure to save each song before you move on to the next one. 1. | Open IvoryGroove from the Lesson_08 folder.
| 2. | Listen to the song, watching the output levels and paying special attention to the ending.
Notice that I used control points to fade in and out the Hollywood Strings track. You'll work more with control points in the next lesson.
| 3. | Export the song to iTunes.
| 4. | Open Homecoming, listen to the song, and check the levels and the ending. Make any necessary adjustments to the output levels.
| 5. | Export the song to iTunes.
| 6. | Open the song SciFiShow.
If you've added effects to your song that sustain the music beyond the end of the last region in the Timeline, GarageBand 2 will include the sustained sound in the exported file. That way your music won't cut off abruptly when the playhead reaches the end of the last region. This comes in handy for the end of a song like SciFiShow.
| 7. | Play the song, watching the output levels and paying special attention to the ending.
| 8. | Export the song to iTunes.
| 9. | Click the iTunes icon and check each of the new songs to make sure they were exported properly.
 |
Note If you saved your GarageBand projects with the Hide Extension box unchecked, you will see a .band extension after the song name in iTunes.
Now that you've created your Lesson08 playlist, let's see how to use it with the other iLife applications. |