| Many keyboards include controls for pitch bend and modulation as well as a port to connect a sustain pedal. The Pitch Bend and Modulation controls are usually wheels that are placed on the far left of the keyboard controls. These controls are used to add expression and character to your music, and you can view and edit the movements of these controls in the Track Editor. The editing controller information in the Track Editor looks like a series of lines with control points. You can click-drag control points up or down to change their value, or move them left and right to change when they occur. To add a new control point, click the line, or Cmd-click an empty area to draw a new line. To delete a point, click the control point to select it, and then press the Delete key. In the next two exercises, you'll look at the advanced editing controller information for sustain and pitch bend in the Track Editor. Viewing Sustain in the Track Editor A sustain pedal has only two options: it's either on (pressed) or off (not pressed). When you play a note and press the pedal, the note will sustain after you stop pressing the note. If you press a note when the sustain pedal is not pressed, the note will end when you release the note on the keyboard. You can play more than one note while holding the sustain pedal. Let's take a look at the sustain that was recorded with the strings track in the song Highway Bound. 1. | Choose File > Open and select 9-4 Sustain from the Lesson_09 folder.
The song 9-4 Sustain is a variation of the song Highway Bound.
| 2. | Double-click the Hollywood Strings region in the top track to open that region in the Track Editor.
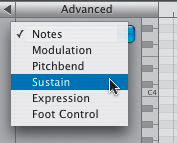 | 3. | Locate the Display pop-up menu in the Advanced section of the Track Editor.
| 4. | Click the Display pop-up menu and choose Sustain to view the Sustain controller movement in the Track Editor.
| 5. | Click-drag the Track Editor's Zoom slider to the far left to zoom all the way out in the Track Editor.
| 6. | Press S to solo the selected track.
| 7. | Play the track and watch the playhead move in the Track Editor across the Sustain controls.
The Sustain controls in the Track Editor look like a series of dots and lines. These dots and lines form blocks that represent the sustain used as the song was recorded.
 If you look at the Sustain controller information, you will see a line near the bottom that is marked 0 and another line near the top that is marked 1. The lower line (0) represents the pedal in the off position, and the upper line (1) represents the pedal in the on position. If the pedal is held down for most of the song, as it was in this recording, you will see a series of blocks that represent a note or group of notes that are played and sustain until they end. When a new note or group of notes is played while the pedal is held down (on position), a new block forms. If the pedal is released, you will see a space between the blocks with a straight horizontal line at the off (0) position line.
|
Editing Sustain Controller Movement Now that you've seen the Sustain controller movement, you can actually edit it to make a note sustain longer or shorter. Your goal in this exercise is to extend the sustain for the last note in the first half of the song. 1. | Move the scroller at the bottom of the Track Editor to view the song from the 16th to the 21st measures.
| 2. | Click the Beat Ruler in the Track Editor at the beginning of the 16th measure.
| 3. | Play the Timeline from the 16th to the 20th measure.
As you listen, pay close attention the last two notes around the 18th measure. See if you can detect when the sustain ends for those notes.
The sustain ends at the 19th measure. From the 19th measure to the 2nd beat of the 20th measure, the sustain block in the Track Editor is actually a block without any notes played. Then there's a blank space to show that the sustain pedal was released (not pressed).
Let's shorten the silent area, where the sustain was released, and extend the section with the notes to sustain their sound a little longer.
| 4. | Click the upper-right control point on the sustain blockthe one that ends at the 19th measureand drag it to the 3rd beat of the 19th measure (halfway between the 19th and 20th measures).
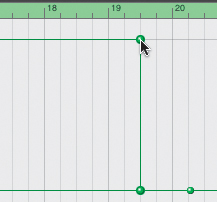 The sustain block to the right of the 19th measure disappears to make room for the extended sustain.
Note The Cmd key changes the pointer to a pencil. However, both the pointer and the pencil do the same thing in this example. You can use either one. | 5. | Play the section of the song again from the 16th to the 20th measures and listen to the new extended sustain on the last notes.
The notes now sustain until the 3rd beat of the 19th measure, exactly where you set the Sustain controls.
| 6. | Press Cmd-S to save your project.
|
Viewing Pitch Bend Controls Now let's take a look at the Pitch Bend controls. The Pitch Bend controller on a keyboard allows you to bend a note up one step or down one step from the original note. You can see an example of the Pitch Bend controls in the project 9-5 Pitch Bend. 1. | Choose File > Open and select 9-5 Pitch Bend from the Lesson_09 folder.
This project contains two Fretless Bass Software Instrument recordings. Both were recorded from the same keyboard. In the first track, I played each note separately. In the second track, I used the Pitch Bend controller on the keyboard to bend the notes in order to emulate the sound of a fretless bass.
The Track Editor should be open so you can view the Pitch Bend controller movement. If the Track Editor is not open, press Cmd-E to open the Track Editor and choose Pitchbend from the Display pop-up menu.
| 2. | Click the Solo button on the top track (if it is not already soloed) to isolate this track.
| 3. | Play the track to hear the bass recording without pitch bend.
Notice the Track Editor shows no movement or changes for pitch.
| 4. | Press S to unsolo the top track.
| 5. | Press the down arrow to select the lower track.
| 6. | Press S to solo the lower track.
Notice that the lower track shows a series of control points and lines indicating the change in pitch.
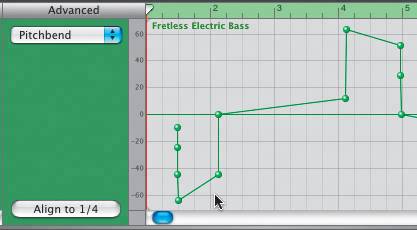 The center line is the actual note that is played. The section above the center line illustrates that the pitch of the original note was bent one step (one note) higher. The section below the center line illustrates that the pitch of the original note was bent one step (one note) lower.
| 7. | Play the entire region on the second track and watch the Pitch Bend display in the Track Editor.
The diagonal lines that move from the center line to the note above or below the line indicate the actual movement of the Pitch Bend control on the keyboard.
You can click-drag the control points in the Pitch Bend display to change the timing of when a pitch change occurs and to change the bend in the pitch. The best way to get a feeling for pitch bending is to actually get in there and try it and hear the results.
| 8. | Click-drag one of the control points around the beginning of the 4th measure downward toward the center line to hear the pitch of the note bend lower.
| 9. | Experiment with bending the sound of the notes either one full note higher or lower.
| 10. | Press Cmd-S to save your project.
|
The next time you record a Software Instrument region and use Pitch Bend or Sustain controls in your recording, you will know how to use these controls in the Track Editor. |