Working with the Track Mixer
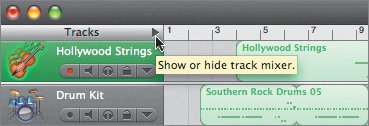
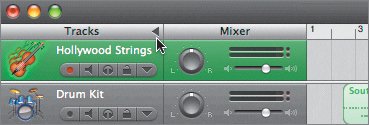
| The first step to mixing a song in GarageBand is a basic understanding of the Track Mixer. The Track Mixer is located between the track header and the Timeline. You can hide or show the Track Mixer by clicking the disclosure triangle next to the word "Tracks" at the top of the window.
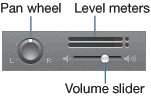
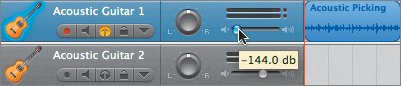
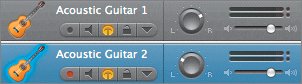
Adjusting Levels with the Volume SliderYou can adjust the volume levels for an individual track with the Volume slider. The overall goal is to blend the different levels of all the tracks so that all the instruments can be heard, but the right tracks are emphasized. By default, the Volume slider is set to 0 dB (decibels) for all tracks. 0 dB doesn't mean the volume of the track is 0 decibels. It actually means that there has been no change applied to the track's volume level. This applies whether the track contains recorded regions or loops. To change the track's volume level, you can drag the slider to the right to raise the volume level and to the left to lower the volume level. You can adjust the volume for an individual track while the playhead is static or while you are playing the song. There are 11 different trackswhich levels should you adjust first? Great question. Generally, you prioritize your tracks and start with the lead vocals or lead instruments. Since this song doesn't contain vocals, the two acoustic guitar tracks containing the melody are the lead instruments, and therefore they take priority. Once the levels of the lead tracks are good, you then move on to the rhythm tracks. Let's start by adjusting the volume level on the Acoustic Guitar 1 track (near the middle of the track list). Before you adjust the volume, you'll need to solo the track so you can hear the level change without the other tracks.
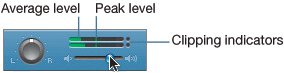
How do you know if your volume level is good? You can look at the Level meters. Reading the Level MetersThe Level meters use colored bars to visually represent the volume level for the track. The lower the volume, the shorter the solid colored bars. If the color is green, the level is within a safe range and isn't too loud. If the color turns from green to yellow, that means cautionyour sound is bordering on being too loud. If it turns red, you need to stop and turn the volume down immediately. The two circles at the end of the Level meters are the clipping indicators. Clipping means your music is not only too loud, but it could be distorted. The Level meters in GarageBand are "sticky," which means a single line of the colored bar will stick to the highest position on the meter while the average levels continue to change. The average volume level is marked by the solid colored bar, and the peaks are marked with the vertical line. Let's create a cycle region and take a look at the Level meters in action.
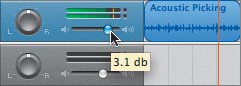
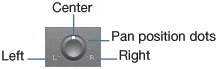
Project TasksNow that you've set the volume level of the Acoustic Guitar 1 track, let's take a moment to find a good level for the Acoustic Guitar 2 track. You'll start by unsoloing the Acoustic Guitar 1 track, soloing the Acoustic Guitar 2 track, and finding a good level. Then solo the Acoustic Guitar 1 track again so you can hear both guitar tracks and make sure the combined levels are good. Instead of using the cycle region, play the entire song with the guitar tracks soloed, and watch their Level meters. I used a volume level of 3.1 dB on both acoustic guitar tracks. Using the Pan WheelThe Pan wheel controls the left-to-right placement of a track within the stereo field. The "Pan" in Pan wheel stands for "panoramic." A panoramic photograph is an image that includes your full visual spectrum from the far left to the far right. In other words, it's everything you can see without turning your head. A stereo field is everything you can hear from the far left to the far right, without turning your head. Imagine a panoramic photograph of the Rocky Mountains with a train cutting through the far-left side of the image. Visually, you place the train on the left side of your field of view. You would also place the sound of the train on the far-left side of the stereo field. By default, all of the tracks in GarageBand start with the pan position set to the center. With center pan position, the sound is heard equally out of both speakersit sounds like it is directly in front of you in the center of the audio space. To adjust the pan position of a track, click the small white dots around the Pan wheel. Let's adjust the pan position of the selected track. This exercise works best if you are listening through headphones, so take a minute and put on your headset before you start. Make sure your headphones have the right speaker (R) on the right ear and the left speaker (L) on the left ear.
Now that you have a better understanding of the Track Mixer and how to use it, let's start mixing the song. |
EAN: 2147483647
Pages: 134