| GarageBand allows you to record up to eight Real Instrument tracks and one Software Instrument track at the same time. This lets you record instruments and vocals together, as well as additional backing tracks in any combination you choose. To record multiple tracks simultaneously, you will need to use an audio interface with at least two input channels for recording. I'm currently using the Edirol FA-101, which connects to the computer through FireWire and has up to 10 inputs and 10 outputs. Although my interface can handle up to 10 different channels at a time, GarageBand is still limited to 9 (8 Real Instrument tracks and 1 Software Instrument track). In the next lesson, you'll work with a podcast interview of the Seminole, Florida, band Speakeasy, featuring Jimmy Kaufholz (vocals and guitar), Kyle Chason (lead and rhythm guitar), and Amy Harwood (vocals). The multitrack project you'll open for this exercise includes the first two minutes of their song "Take a Bow." 1. | Open the project 6-4 Multitrack from the Lesson_06 folder.
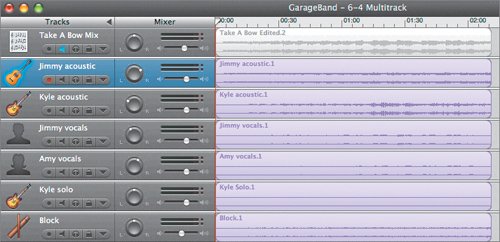 The project opens with six Real Instrument recorded tracks and a Real Instrument mixed version of the song in the top track. The mixed version has been muted so you can focus on the other tracks. As you can see, these are long recorded regions that were done in one take. (Actually, the entire song was laid down in one takethis is just the first two minutes.) The project opens with six Real Instrument recorded tracks and a Real Instrument mixed version of the song in the top track. The mixed version has been muted so you can focus on the other tracks. As you can see, these are long recorded regions that were done in one take. (Actually, the entire song was laid down in one takethis is just the first two minutes.)
| | | 2. | Play the first part of the project to get a feel for the song.
This song could have been recorded one track at a time or in a group of tracks at the same time. The method you use really depends on the band and the limitations of the musicians. If a musician plays more than one instrument and sings, you won't be able to record all of his or her parts at once. However, you could record his or her vocals and one instrument at the same time.
Since this is a folk band, and they are used to playing and singing at the same time, it's a good idea to try recording the vocals and their acoustic instruments at the same time to capture the feel of their music. You can always punch in to repair problems, or you could rerecord the instrument or vocal parts later if needed. For this example, I would record the two acoustic guitar leads plus the vocals at the same time. Then, I'd go back and record the solo guitar part (which doesn't come in until the middle of the song). Finally, I'd record the Block (percussion) track because it can easily be played last to fit the groove of the other acoustic instruments, instead of the other way around.
| 3. | Mute the Kyle solo and Block tracks, then play the project from the beginning to hear the first four tracks, which were recorded simultaneously.
The Kyle Solo region does not include a waveform because the actual solo part occurs later in the song.
| 4. | Unmute the lower two tracks.
|
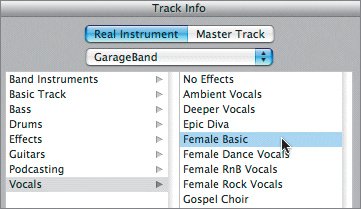
To record multiple tracks simultaneously, you must first create the tracks, assign the input channels, and turn on the Record Enable button for each track. If you enable more than eight Real Instrument tracks or one Software Instrument track, the first track you enabled will be disabled for recording just to prevent you from exceeding the maximum number of recording tracks. If you need to record more than eight Real Instrument tracks, you can always record the first group of tracks, then enable a new set of tracks and record them as a second recording session. Working with Vocal Effect Presets The vocals in this song were recorded dry (without effects). However, just like other Real Instrument recordings, you can add vocal preset effects. In fact, GarageBand includes a wide variety of vocal preset effects you can use to enhance, distort, or modify the sound of recorded vocals. You'll work more with the vocal effects in the next lesson when you create a podcast. For now, let's just experiment with a few to see how they enhance the vocals. 1. | Double-click the Amy vocals track header to select the track and open the Track Info pane. Click the Solo button to isolate the sound of her vocal track.
| 2. | Move the playhead to the 14th measure and start playback.
| 3. | In the Track Info pane, select Female Basic as the preset vocal effect. Listen to the subtle change in Amy's vocals.
 | 4. | Select the Helium Breath vocal preset to hear what she might sound like singing after inhaling a dose of helium.
When you stop laughing, use the up and down arrow keys to try different vocal effects. The Male and Female presets are designed to accentuate those respective voices, but they will not make a female vocalist sound like a male, or vice versa.
| | | 5. | Select Female Basic as the preset vocal effect, and unsolo the track to hear her enhanced vocal with the other tracks.
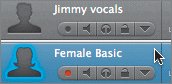 The name of the track changes to reflect the applied preset, but the region within the track maintains its original name.
Tip You can only use one preset on a track at a time. If you like more than one preset on your vocals, double the track, or split the region and place the parts on separate tracks, and add different effects presets. |
Project Tasks Take a moment and add a vocal preset to the Jimmy vocals track. The Male Basic preset will work fine, but feel free to try others. When you're finished, save your changes to the project. Tips for Recording Multiple Tracks Practice, practice, practice. I don't mean to sound like your music teacher here, but if you're recording five musicians plus a vocalist at the same time and somebody hasn't done their homework, it's going to be a very long day. If you're used to playing a song along with the other musicians, it will be more comfortable for you to record multiple tracks at once. If you are a vocalist who also plays guitar, piano, or some other instrument, this is a terrific way to record your song demos. It's much easier for many artists to get into the groove if they can play their instruments while singing, or vice versa. Don't rush it, and don't try to record the entire song at once if you're not ready. You can always edit the parts together later. Record the difficult parts separately. If your song contains a tricky section, record it separately so you can focus on that section, rather than try to perfect it along with the rest of the song. Also, if you have one musician who is having trouble keeping up or is continually making mistakes, have him sit this one out while you record the other parts. Then create a practice CD the musician can use for homework (see Lesson 10). The musician can come back in and record his part solo when he's ready. Don't forget to tune your instruments before you record. It's much easier to record in tune than try to fix it later. Record your tracks, especially vocals, cleanthat is, without too many effects from external devices. You can always add effects, like the guitar amplifier simulators or vocal effects presets that come with GarageBand, after you record the track. If you record a vocal instrument with too many external effects, you won't be able to change your mind lateror remove the effects. Have fun, learn from your mistakes, and remember you can always undo, try again, record a punch-in, or fix mistakes in the editor. Tip When you're recording long takes, consider creating edit-friendly moments within the take by inserting a brief pause and releasing the sustain pedal. This will produce a clean break in the waveform, and you will be able to try different takes and build a better song. (Obviously, you wouldn't do this in a live performance, or if the song requires a solid single take.)
|