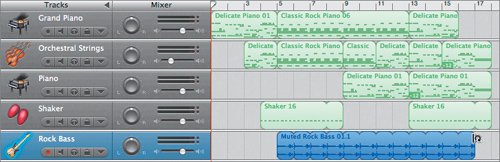
| Now that you've finished the melody, it's time to add the Rhythm tracks. Not only will you start building the Rhythm tracks, but you'll also work with some Real Instrument loops. To continue the jam session theme, the shakers, drums, and bass will join the song. You'll start by adding the Shaker 16 loop to bar 4. 1. | Open the Loop Browser, and drag the Shaker 16 loop from the favorites list to the empty space below the Piano track.
The Shaker 16 region appears in a new Software Instrument track.
| 2. | Move the shaker region to the beginning of bar 4 on the Shaker track.
 | 3. | Extend the loop (upper-right corner) by one measure so it loops to bar 9. Then Option-drag the region and place the duplicate at bar 13.
 |
Converting Software Instrument Loops to Real Instruments The melody sections of the song required more intricate editing at the note level, so keeping them all Software Instrument loops was important. The rhythm tracks, on the other hand, don't really need to be Software Instrument regions. In fact, the demands on the processor will be much less if you play them as Real Instruments. All Apple Loops that are Software Instruments can be converted to Real Instruments. You can convert them by dragging them into a Real Instrument track or by changing a setting in the Preferences window. You'll try both methods as you step through the next exercise. Let's start with the bass track. In the Loop Browser, the Muted Rock Bass 01 loop you marked as a favorite is currently a Software Instrument loop. 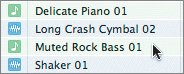 1. | Click the New Track button or choose Track > New Track.
| 2. | In the New Track window, select Real Instrument as the type of track, then click Create.
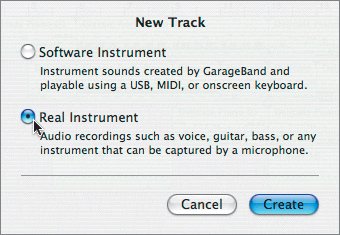 A new real instrument track appears in the Timeline, and the Track Info pane opens.
| | | 3. | In the Track Info pane, select Bass as the track instrument and Rock Bass as the type of bass.
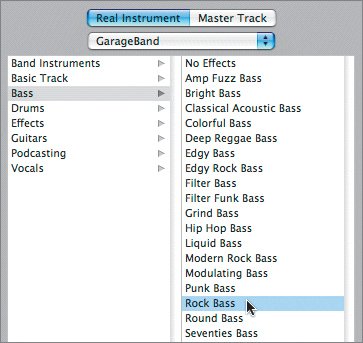 Note GarageBand includes 25 different bass sound presets from which to choose to enhance your bass Real Instrument tracks. These effects are customizable, which you'll learn about in Lesson 7. The Real Instrument track name changes to Rock Bass in the Timeline.
| 4. | Press Cmd-L to open the Loop Browser.
Opening the Loop Browser will automatically hide the Track Info pane because you can view only one at a time.
| 5. | Drag the Muted Rock Bass 01 loop from the Browser to bar 5 in the Rock Bass track.
| | | 6. | Extend the region in the Rock Bass track so that it loops continuously until bar 17.
 You successfully converted the Software Instrument loop into a Real Instrument loop and extended it in the Timeline. You successfully converted the Software Instrument loop into a Real Instrument loop and extended it in the Timeline.
|
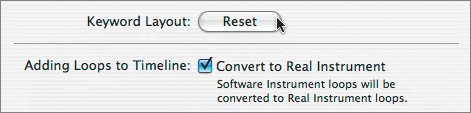
Next you'll change the project Preferences so that every loop you add to the project is automatically converted to a Real Instrument loop. | | 1. | Choose GarageBand > Preferences to open the Preferences window. Then click the Loops button to view the Loops Preferences.
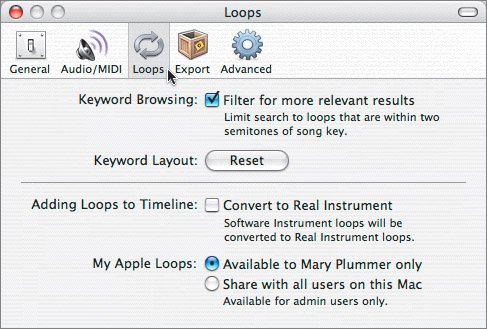 In the middle of the Loops Preferences, you'll see an option for "Adding Loops to Timeline: Convert to Real Instrument." If the check box is deselected, the loops will maintain their original format unless added to an existing Real Instrument track. If the box is selected, Software Instrument loops will be converted to Real Instrument loops.
| 2. | Select the box to "Convert to Real Instrument." Then close the Preferences window.
Now when you add Software Instrument loops to the Timeline, they will automatically create Real Instrument tracks.
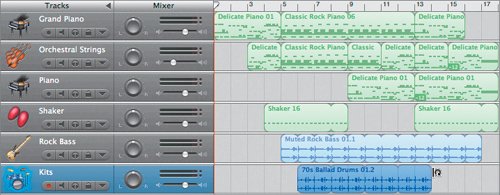
| 3. | Drag the 70s Ballad Drums 01 loop from the browser to the empty space below the Rock Bass track and release it at bar 6.
 | 4. | Extend the Real Instrument drum loop so that it repeats four full looped segments and ends at bar 14.
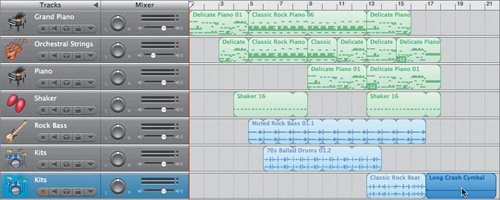
 | 5. | Drag the Classic Rock Beat 01 loop from the browser and release it at bar 13 below the Kits track.
The last loop you'll add is the Long Cymbal Crash 02, which is natively a Real Instrument loop, and place it after the Classic Rock Beat 01 loop in the lower Kits track.
| | | 6. | Drag the Long Crash Cymbal 02 loop from the browser to the lower Kits track and release it at bar 17, right after the Classic Rock Beat loop.
 | 7. | Play the project to see how it sounds with the rhythm tracks.
It's coming together. Some of the volume levels are off, but you'll learn to mix those in Lesson 7. The bass track feels very loopy and repetitive. You'll fix that in the next lesson. Also, the shaker seems to go on a few shakes too many at the end, as if the musician with the shaker isn't paying attention.
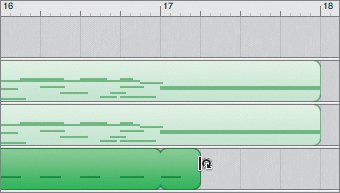
Tip It's very cool to lead off the percussion section with a shaker because it feels like a count in, or pre-percussion before the real thing. On the other hand, having the shaker or other hand percussion extend too long at the end of a song usually sounds like a mistake. Endings should be definitive and solid. | 8. | Resize the Shaker 16 region so it ends on the 2nd beat of the 17th measure (only one shake in the 17th measure).
 | | | 9. | Play the ending again.
What a difference it makes to trim off the excess shaker.
| 10. | Choose File > Save As, and save this version of the project as IvoryDreams Draft in your My GarageBand Projects folder. Press Cmd-S to save the finished song.
|
Now that you've finished the draft version of the song, you can reset the Loop Browser and Loops Preferences. Resetting the Keywords in the Loop Browser In the GarageBand Preferences window, you can reset the Loop Browser keyword buttons by clicking the Reset button. While you're there, you can also deselect the "Convert to Real Instrument" setting. 1. | Choose GarageBand > Preferences to open the Preferences window.
The Preferences window should show the Loops Preferences because that was the last pane you worked with in the Preferences window.
 | 2. | Click the Reset button to reset the Loop Browser keyword buttons back to the GarageBand default settings.
A dialog box will ask you if you are sure you want to reset the keyword buttons to the default settings.
| | | 3. | Click Yes to reset the keyword layout.
The Reset button in the Loop Browser will clear any selected buttons and clear the results list. The Reset button in the General Preferences window resets all of the keyword buttons to their original names and locations in the Loop Browser. However, this does not reset favorites, so your favorite loops will still be marked accordingly.
| 4. | Deselect the "Convert to Real Instrument" box.
| 5. | Close the General Preferences window.
|
Evaluating the Finished Song One last thing before you wrap up this lesson. Now that you've finished a draft of the song, I'd like to point out a few tricks that were added to the finished version that you didn't get to in this lesson. At the end of the lesson, feel free to complete the song before moving on to Lesson 6. 1. | Choose File > Open Recent > 5-5 IvoryDreams final.
The Open Recent menu is a convenient way to access recent projects.
Most of the changes to the project are additional percussion tracks, plus the Arena Crowd Cheer at the end. However, there are a few tricks I'd like to draw your attention to.
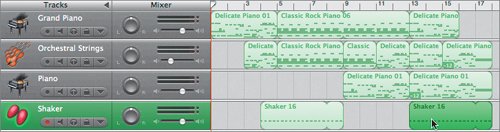
| | | 2. | Notice the Big Electric Lead guitar track below the Piano track in the Timeline.
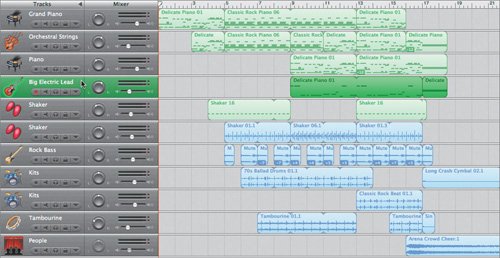 If you look carefully, you'll see that the region within the guitar track is called Delicate Piano 01, but it looks pretty different from the tracks above. What's up with that? Simple. Instead of adding notes to the loop like you did at the end of the song, I deleted most of the notes from the loop so that only some of the melody notes would be played by the guitar. This is just another example of what you can do with Software Instrument loops. This type of note editing wouldn't be possible in a Real Instrument loop. If you look carefully, you'll see that the region within the guitar track is called Delicate Piano 01, but it looks pretty different from the tracks above. What's up with that? Simple. Instead of adding notes to the loop like you did at the end of the song, I deleted most of the notes from the loop so that only some of the melody notes would be played by the guitar. This is just another example of what you can do with Software Instrument loops. This type of note editing wouldn't be possible in a Real Instrument loop.
| 3. | Play the song to hear the addition of the Guitar Lead part. Keep in mind the entire melody was created using two piano loops.
Did you notice the changes in the bass part? Instead of one bass riff that repeats over and over throughout, it was actually edited and transposed. That's right. You can split and transpose Real Instrument regions much the same way you transpose (change pitch) in Software Instrument parts.
| 4. | Play the project one more time focusing this time on the bass part.
Can you hear the changes to the bass riff?
|
To edit the bass track yourself, and get an introduction to Real Instruments, try the exercise "Editing Real Instrument Loops" (Bonus Exercises > Edit_Real_Instrument_Loops.pdf) on the accompanying DVD. Meanwhile, congratulate yourself on learning some new tricks and techniques for working with Apple Loops, including customizing the Loop Browser, editing, and converting loops. Tip You can add loops to GarageBand 3, even create your own from recordings. Find out how in "Adding Loops to GarageBand" (Bonus Exercises > Add_Loops.pdf) on the accompanying DVD.
|