Flylib.com

Books Software


Increasing the Speed of the Background Clip


Increasing the Speed of the Background Clip

In this task, we will "super speed" the clip of the crowd in the background to achieve the effect of time rushing past. The foreground clip, which shows the actor walking across the screen at normal speed, is about 8 seconds long. The background clipwhich shows the world rushing (or until we increase the speed, meandering) byis roughly 3 minutes long. To make the two clips work better together in terms of duration, and to speed up the background clip, we'll use the Time Stretch function in Premiere Elements to speed up the crowd and condense three minutes of meandering into ten seconds of purposeful action.

Change the Speed of the manypeople.avi Clip

Press the backslash (\) key on your keyboard to view all of the clips on the Timeline.

On the Timeline, right-click the manypeople.avi clip in the Video 1 track.

From the contextual menu, select Time Stretch .

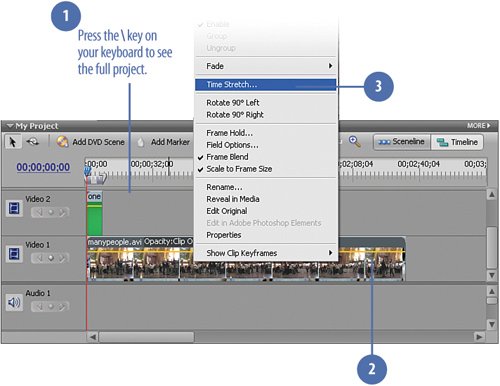
On the Time Stretch dialog box, set the Speed to 1700% .

Click OK .

Did You Know?

Increasing a clip's speed shortens its duration (and vice versa). You can use the Time Stretch dialog box to change the speed of a clip, which simultaneously affects its duration (how long the clip plays). Making the clip play faster decreases its duration (by playing faster, it finishes sooner). The inverse is true, as well. Making a clip slower increases its duration (it plays slower, so it takes longer to finish). In other words, as nonintuitive though it may seem at first, when adjusting a clip's speed, up is down and down is up. For example, increasing the Speed of a clip to 200% will slow the clip to half its normal speed, and decreasing the Speed to 50% will increase the clip to twice its normal speed.
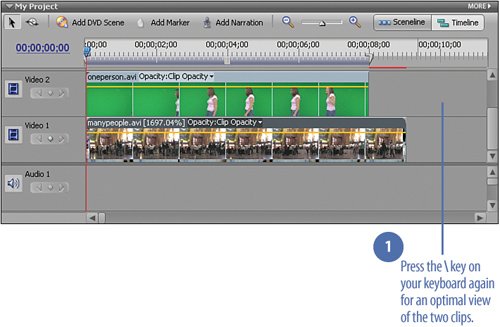

Add a Fade Out and Adjust the Timing

Press the backslash (\) key on your keyboard again to zoom in on the clips on the Timeline.

With the manypeople.avi clip selected, go to the Properties panel for the clip and, if necessary, click the triangle next to Opacity to reveal the effect's controls.

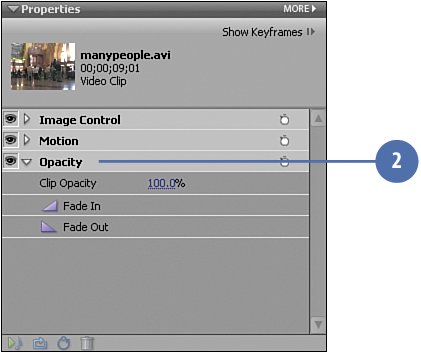
Click the Fade Out button to add a fade to black at the en of this clip.

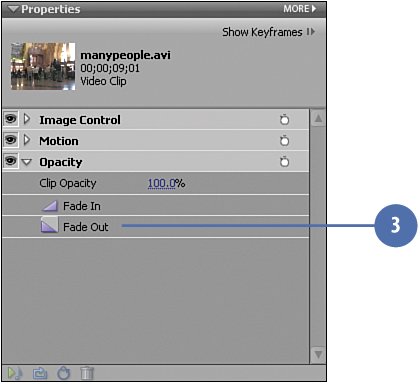
Adjust the fade (because this clip is accelerated) by dragging the first keyframe of the fade out back so that it lines up with the tail (end) of the oneperson.avi clip in the Video 2 track (see the illustration), at 00;00;08;00 .

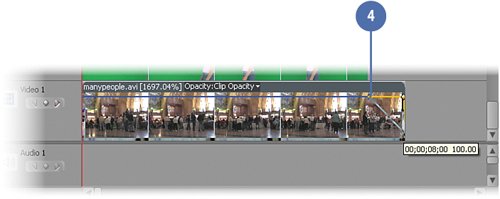
Tip

The yellow popup box will show you the timecode as you move the keyframe. Just watch as the number decreases and approaches 00;00;08;00 , and stop when it reaches that number.


Applying the Green Screen Key to the Foreground Clip

The foreground clip, oneperson.avi , was filmed against a greenscreen. In order for the background clip of the fast-moving crowd to appear behind the actor is this project, we need to removeor "key out"the green background behind her. We'll do that using the Green Screen Key .

Apply the Green Screen Key

Click the Effects and Transitions button on the Media panel to switch to the Effects and Transitions view.

In the Effects and Transitions view, type green in the text field.

Drag the Green Screen Key from the Keying effects in the Video Effects list and and drop it onto the oneperson.avi clip on the Video 2 track.

In the Properties panel, click the triangle next to the Green Screen Key to view the effect's controls.

Tip

If the oneperson.avi clip is not currently displayed in the Monitor window, move the CTI along the Timeline until it does.

On the Properties panel, set the following Green Screen Key properties:

  • Threshold :

33.0%

  • Cutoff :

33.0%


From the Smoothing drop down menu, select High .

Note

Leave the Mask Only check box unchecked. However, if you want to see a silhouette of the actor in white against the background clip, check this box temporarily to see how your Green Screen Key is working.

Did You Know?

If the background in your clip is not one solid green color , use the Chroma Key instead. The Green Screen Key, like the Blue Screen Key, in Adobe Premiere Elements works for one particular color only. If the green in your background is not the exact shade of green that the Green Screen Key expects to find (or if, due to light and shadows, there are multiple shades of green), you may not achieve the results you want, in terms of the background being removed. In that case, use the Chroma Key instead. If your greenscreen material was crease -free and lit correctly, the Chroma Key has a "Similarity" control that enables you to tweak the key giving you a better chance of success. For touchy keying problems, use the Chroma Key!


How Two Controls Help the Green Screen Key Filter Out the Green

Working with the Green Screen Key

When you first apply the Green Screen Key to a clip, you rarely get a perfect result. What you typically see is the first "layer" of green removed from the background of the greenscreen clip, revealing the hazy background behind the clip. The background itself is revealed as if behind a curtain. As you tweak the two key settings for the Green Screen Key Threshold and Cutoff you'll gradually see the background emerge and the foreground become brighter and more pronounced. Tweaking too far causes the figure in the foreground to deteriorate, allowing some of the background to bleed through. Typically, the Threshold and Cutoff settings are the same and when you find the right settings for the clip, the scene looks natural, with little, if any, evidence that a greenscreen was used. For more on greenscreens, the Green Screen Key, the Non-Red Key, and the Chroma Key, refer to Chapter 16: The Enchanted Elf Effect in the section, "Troubleshooting a Greenscreen Project."

The original clip, prior to applying the Green Screen Key.

The original clip, with the Green Screen Key applied. Here, the Threshold is at its default 100% setting and the Cutoff is at 0%. Notice how the background appears to be hidden behind a sheer, gray curtain.

The clip, with the Green Screen Key applied, and the Threshold at 50% and the Cutoff is still at 0%. The background image is showing through much better as more of the green is removed, but the actor's image is too faded.

The clip, with the Green Screen Key applied, and the Threshold at 25% and Cutoff at 25%. Notice the degradation that has begun.