| Like most Web applications, the Web store requires a page that allows visitors to register as new users and, ultimately based on certain permissions, be able to navigate the site, view items, and purchase items within the site based on those permissions or credentials. Although security is beyond the scope of this chapter, it is something to consider. It will become increasingly obvious that multiple users would end up sharing the same shopping cart unless they're distinguished by a unique identifier. Security will be covered with greater detail in Chapter 32, "Security and User Authentication." A quick overview of the Web Store database reveals that you need to collect personal information and credit card information to process a visitor as a new user. Recall that the tables that make up customers' information lie within the customers and creditcards tables, as shown in Figure 29.1. Figure 29.1. The customers and creditcards tables contain all the information for new users.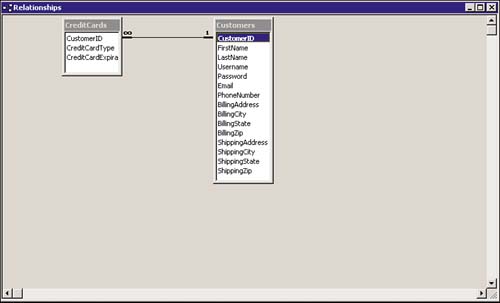
Upon further inspection of those tables, you'll notice that the following fields are necessary for new users to be created within the customers table: | Field Name | Date Type | | CustomerID | AutoNumber | | FirstName | Text | | LastName | Text | | Username | Text | | Password | Text | | Email | Text | | PhoneNumber | Number | | BillingAddress | Text | | BillingCity | Text | | BillingState | Text | | BillingZip | Text | | ShippingAddress | Text | | ShippingCity | Text | | ShippingState | Text | | ShippingZip | Text | The following information also needs to be collected within the creditcards table to associate a credit card with a particular customer. | Field Name | Date Type | | CustomerID | Number | | CreditCardType | Text | | CreditCardExpiration | Text | Knowing the data that needs to reside within the database, you can now begin creating the New User Registration form to accommodate the data that will eventually be inserted. Creating the New User Registration Form Most applications, if not all, simulate the fields within a database with HTML form objects. Because form objects allow the user interaction with the Web application, they are the perfect channel for collecting information and subsequently inserting that information into the database. Before you can begin creating the New User Registration form, however, you must first create a table that will serve as the primary means for structuring the form objects in a cohesive and usable fashion. Begin creating the table by following the steps outlined next: -
Begin creating the New User Registration form by creating a new page from a template. Select New from the File menu, navigate to the Templates tab, and select the WebStore template as shown in Figure 29.2. Figure 29.2. Create a new page from the WebStore template.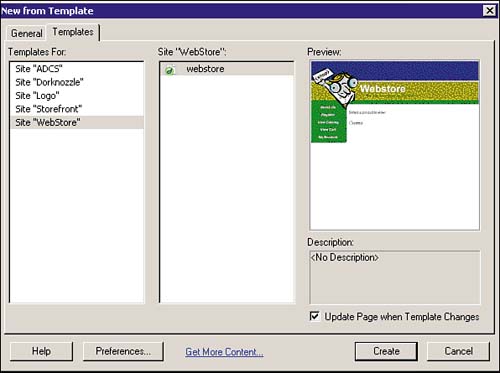
CAUTION If you have not obtained the chapter files from www.dreamweavermxunleashed.com, you will not have the template available. -
Decide how many rows your table will contain. A quick count of all the necessary fields within the customers and creditcards tables reveals that you need about 16 rows. You may want to include a few to account for headers, dividers, and button elements. A safer number would be 26. -
Place your cursor in the editable region, insert a new form by selecting it from the Insert menu. Now select Table from the Insert menu. Figure 29.3 shows the Insert Table dialog box with the appropriate data. Figure 29.3. Create a new table by defining the rows, size, and so on.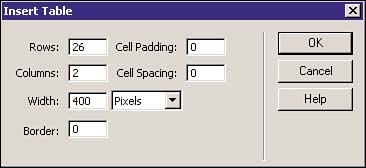
-
Add all appropriate content for personal information, billing information, and shipping information. You can merge cells along the way to create the headers. The result is shown in Figure 29.4. Figure 29.4. Add all appropriate content to the new table.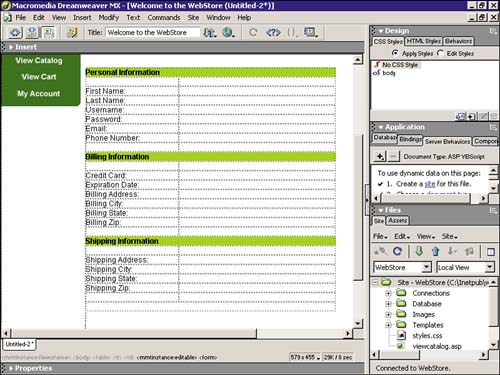
TIP You can apply the "body" class from the Styles panel to make your text a bit more attractive. -
You are now ready to begin adding all the form objects for the New User Registration form. The matrix below shows the fields, the appropriate form objects that should be inserted, and the names that should be given to each of the form objects. | Field Name | Form Object | Name | | First Name | Text Field | fname | | Last Name | Text Field | lname | | Username | Text Field | username | | Password | Text Field | password | | Email | Text Field | email | | Phone Number | Text Field | phonenumber | | Billing Address | Text Field | billingaddress | | Billing City | Text Field | billingcity | | Billing State | Text Field | billingstate | | Billing Zip | Text Field | billingzip | | Shipping Address | Text Field | shippingaddress | | Shipping City | Text Field | shippingcity | | Shipping State | Text Field | shippingstate | | Shipping Zip | Text Field | shippingzip | | Credit Card Type | Menu | cctype | | Credit Card Expiration | Menu | ccexpiration | | | Submit Button | btnSubmit | | | Reset Button | btnReset | The result of inserting all the form objects is shown in Figure 29.5. Figure 29.5. Insert all the form objects for the New User Registration.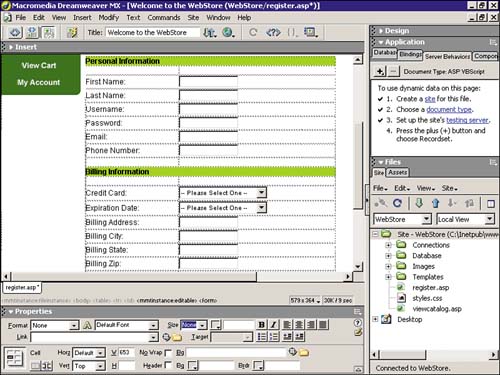
TIP Ideally you would want the credit card types to come from a separate table within the database called creditcardtypes and dynamically set the drop-down list based on the values within that table. For the sake of simplicity, you can hard-code the values in for the credit card type and expiration date.
-
Save the page as "register.asp" and run it within the browser. The result will look similar to Figure 29.6. Figure 29.6. The New User Registration page allows the user to register for the Web store.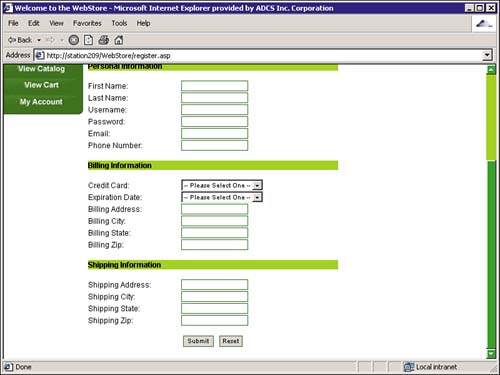
Inserting Records Now that you have the New User Registration form created, you are ready to connect it to the database for insertion. Before you can begin adding any behaviors, you will want to create a new recordset for the customers and creditcards table. Remember, both the customers and creditcards tables exist as separate tables, so you will need to create a recordset that joins the two tables together. To create the recordset, follow the steps outlined next: -
Open Access and create a New Query in design view. -
Add the customers and creditcards tables as shown in Figure 29.7. Figure 29.7. Add the customers and creditcards tables to the query designer.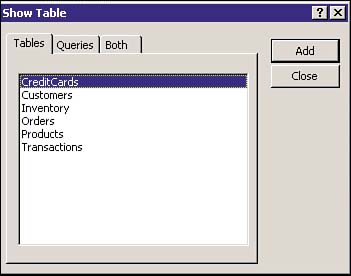
-
With the two tables added to the designer, select the fields that you want to include in the query. Figure 29.8 shows that you should include all the records for both the customers and creditcards tables. Remember, the "*" represents all fields. Figure 29.8. Select all the records for both tables.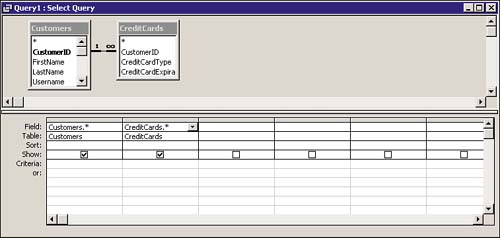
-
To obtain the SQL code from the query that you have created, select SQL View from the View menu. Figure 29.9 shows the code that you can now copy. Figure 29.9. Copy the SQL code from the SQL View.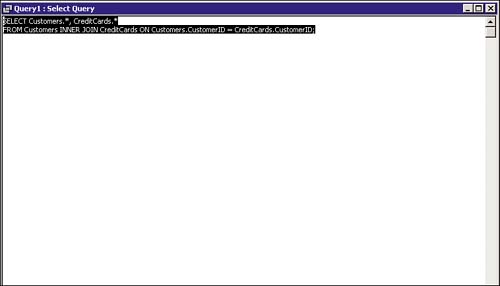
-
Save your query and close Access. -
Return to the register.asp page and select Recordset from the Bindings panel. The Recordset dialog box appears. -
Select the Advanced button and paste the code into the SQL box, as shown in Figure 29.10. Figure 29.10. Paste the SQL code into the SQL box of the Advanced Recordset dialog box.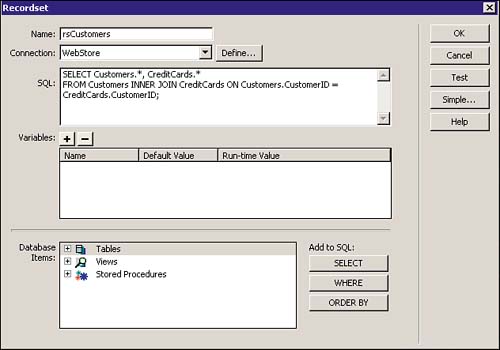
-
Select OK. The Bindings panel will now show the fields contained within the joined tables, as shown in Figure 29.11. Figure 29.11. The recordset shows the fields from the joined tables.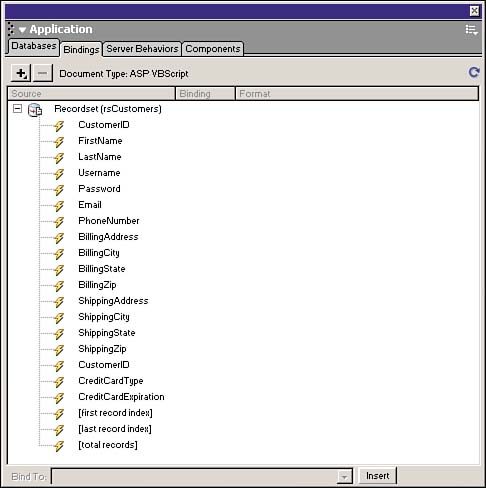
Validating the Form Now that you have the recordset created, you are ready to begin inserting the data into the database. But before you begin, make sure that you have valid data going in. The Validate Form behavior can be used to trap any errors on the client before a request is sent to the ASP application. For instance, because the PhoneNumber field within the customers table accepts only numeric values, you would not want to allow a user to insert anything but numbers into the Phone Number text field. The Validate Form behavior could allow you to check for invalid data and return an error message before the data is actually sent. To insert the behavior, follow the steps outlined next: -
Select the Submit button and choose Validate Form from the Behaviors panel, as shown in Figure 29.12. Figure 29.12. Insert the Validate Form behavior.
-
The Validate Form dialog box will appear. Choose Required for all the fields, Numbers for the Phone Number field, and E-mail Address for the E-mail field. The result is shown in Figure 29.13. Figure 29.13. Select the appropriate options from the Validate Form dialog box.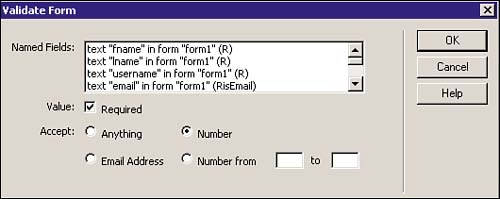
-
Select OK. -
Save your work and run it in the browser. Typing in incorrect data or forgetting to type in data in all fields results in an error message. Inserting a New User into the Customers Table Now that you can verify that the data being sent to the database is in fact legitimate, you can build the functionality for adding the data. Dreamweaver MX provides a server behavior in the Insert Record that allows for quick and intuitive insertions into the database. To insert the users record into the database, follow these steps: -
Select Insert Record from the Server Behaviors panel, as shown in Figure 29.14. Figure 29.14. Select the Insert Record server behavior.
-
The Insert Record dialog box appears. The Insert Record dialog box enables you to select a connection, a table to insert the data into, a page to redirect to after the data has been sent, the form to retrieve the values from, and a form elements selection box. The form elements selection box allows you to match up a form object with the corresponding field in the database. For the most part, Dreamweaver MX will find the match unless they are named differently, as is the case with fname and lname. If some do not match, select the appropriate match from the column drop-down list, as shown in Figure 29.15. Figure 29.15. Match up the appropriate form object with its corresponding field in the database.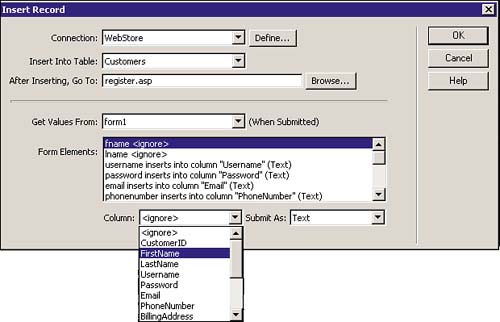
TIP You may be wondering why the ccType and ccExpirationDate are ignored. These items were added to the new user registration form for demonstration purposes only. The database holds all the possible values for credit card and allows the user to choose which credit card they want to use upon checkout. TIP Confused about the difference between a form object and a form element? They're the same thing; they're just called form objects in the Insert menu and form elements in the Insert Record dialog box. -
Select OK. -
Save your work and run it in the browser. After you enter information into the fields and click Submit, it should redirect back to the same page. TIP You might want to create another page called confirm_newuser.asp. This page would alert users that their information has been successfully added. After you do that, you can change the redirect value within the Insert Record dialog box to that page. -
Look at the customers tables within the database. Your values should appear as they do in Figure 29.16. Figure 29.16. The values from the form should go directly into the database.
The Insert Record dialog box allows you to insert data into only one table. In the next section, you will modify the code to be able to insert data into both tables. Modifying the Code to Insert Data into Both Tables Although Dreamweaver MX has many great features, it does not currently have the capability of inserting data into two tables at the same time. Although Macromedia does have a workaround for the problem, it does not currently have a solution that is usable within its framework. NOTE More information can be found about this problem from Macromedia's Web site at http://www.macromedia.com/support/ultradev/ts/documents/insert_mult_tables.htm.
Currently the three choices for implementing multiple table insertions are as follows: Because of the simplistic nature of the problem, we will code the functionality by hand. You can do this by rewriting the code that Dreamweaver MX creates for the recordset and subsequently adding your own Insert command to handle the insert to both tables. -
Begin the process by removing the attached Insert Record server behavior. -
Next switch to code view and scroll to the top of the page. You should see the same code as shown in Figure 29.17. Figure 29.17. The recordset code can be modified to suit your needs.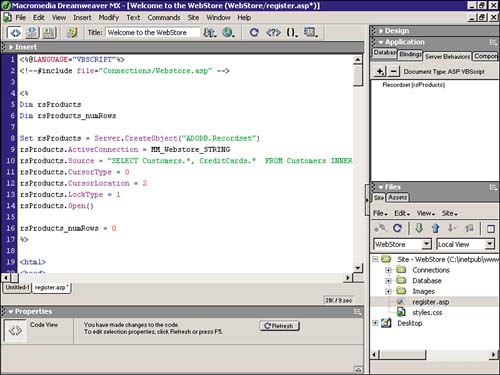
-
The code that you will be seeing creates and opens the recordset object. You can modify this code slightly to accommodate the multiple table insert. Replace the code you see with the following code: Dim rsCustomers, objConn, cmdSQL Set objConn = Server.CreateObject("ADODB.Connection") Set rsCustomers = Server.CreateObject("ADODB.Recordset") objConn = MM_Webstore_STRING cmdSQL = "SELECT Customers.*, CreditCards.* FROM Customers INNER JOIN CreditCards ON Customers.CustomerID=CreditCards.CustomerID;" rsCustomers.Open cmdSQL, objConn, 3, 3 If (Request.Form("btnSubmit") <> "") Then rsCustomers.AddNew rsCustomers ("FirstName") = Request.Form("fname") rsCustomers ("LastName") = Request.Form("lname") rsCustomers ("Username") = Request.Form("username") rsCustomers ("Password") = Request.Form("password") rsCustomers ("Email") = Request.Form("email") rsCustomers ("PhoneNumber") = Request.Form("phonenumber") rsCustomers ("BillingAddress") = Request.Form("billingaddress") rsCustomers ("BillingCity") = Request.Form("billingcity") rsCustomers ("BillingState") = Request.Form("billingstate") rsCustomers ("BillingZip") = Request.Form("billingzip") rsCustomers ("ShippingAddress") = Request.Form("shippingaddress") rsCustomers ("ShippingCity") = Request.Form("shippingcity") rsCustomers ("ShippingState") = Request.Form("shippingstate") rsCustomers ("ShippingZip") = Request.Form("shippingzip") rsCustomers ("CreditCardType") = Request.Form("cctype") rsCustomers ("CreditCardExpiration") = Request.Form("ccexpiration") rsCustomers.Update End If -
Save your work and test it in the browser. Add the same information to all the form objects and click Submit. This time, rather than only the customers table receiving data, the creditcards table should receive data as well. Figure 29.18 shows the creditcards table with data in it. Figure 29.18. The result of the new code allows for data to be inserted into the creditcards table as well.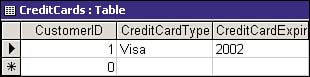
If you compare the original code to the code you just inserted, you can see that the only real differences lie in how the recordset was constructed, opened, and ultimately how the information was inserted. |

