| To send or retrieve data from a data source, you must open a connection with that data source through Dreamweaver. The first type of connection you'll be connecting to is called a Data Source Name, or DSN. Data sources come in different formats, such as graphics files. A database created by Access is a different type of file than a database created by Oracle or FileMaker Pro. To offer a variety of applications to access different data sources, the Open Database Connectivity standard was developed. Open Database Connectivity, commonly referred to as ODBC, is a universal language that all databases speak. With the appropriate drivers installed for the particular database, the application has the capability to read and write information to and from the database. Windows systems already have the appropriate drivers installed for Access, SQL Server, dBase, Oracle, FoxPro, Excel, and Paradox. If you're developing with a Macintosh, you will normally connect to the ODBC driver that resides on the testing server. One of the great things about ODBC is that it simplifies the process of moving the database from the testing server to the actual application/Web server. Just as a domain name is an alias for an IP address for example, www.trainsimple.com is an alias for 206.234.12.23 the DSN is an alias or nickname for the actual location of the data source. A negative to using a DSN is that they're generally less efficient than other standards when connecting to data sources. However, they are probably more than adequate for low-to-moderate production servers. If you're developing a more robust application, you may want to consider some of the other methods discussed later in this chapter. If you plan to develop a Web application with ASP.NET or PHP, they will not support DSNs and you must use an alternative connection standard. DSNs, however, are great to use especially in the development phase of the application. On a Windows machine, DSNs are managed though the ODBC Data Source Administrator. Remotely, DSNs are managed and configured by the systems administrator. To configure a DSN on a Windows 2000 or a Windows XP system, follow these steps: -
From the Start menu choose Control Panel. This opens the Control Panel folder. -
Inside the Control Panel folder, double-click the Administrative Tools folder to open it. -
Inside the Administrative Tools folder, double-click the Data Sources (ODBC) icon. This launches the ODBC Data Source Administrator dialog box as shown in Figure 18.1. Figure 18.1. The ODBC Data Source Administrator dialog box offers options for managing and configuring data sources.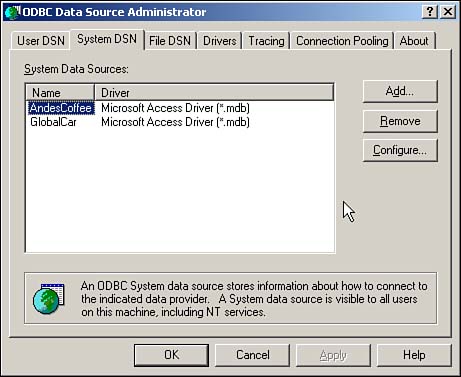
-
In the ODBC Data Source Administrator, click the System tab. The System tab lists all DSNs previously configured on your system. -
Click the Add button under the System DSN tab to open the New Data Source dialog box, as shown in Figure 18.2. Figure 18.2. The New Data Source dialog box provides the options for choosing the appropriate driver for the database that the data source will point to.
-
In the New Data Source dialog box, choose from the list of drivers that match the database that you are working with. If the driver for your database is not found in this dialog box, visit the manufacturer's Web site to download the appropriate driver. When you find the driver, select it and click the Finish button to exit the New Data Source dialog box and launch the ODBC Setup dialog box, as shown in Figure 18.3. Figure 18.3. In the ODBC setup dialog box, you have the option to provide a name and description for the data source.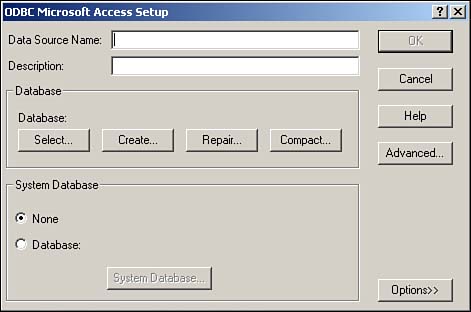
-
Specify a name for the data source. Avoid spacing and special characters in your naming conventions. -
Provide the appropriate path of the data source; each database has slightly different requirements: For an Access database, click the Select button to open a dialog box that enables you to search your hard drive for the database. It's very important that the database is located in the hard drive directory. When you find the database in the hard drive, it will automatically appear on the left side. All databases found within that directory will appear; choose the one you want the data source to use and click Select. If you need to provide a username and password to access the database, click the Advanced tab to provide that information. For an Excel spreadsheet, the process is the same; however, you must select the appropriate Excel workbook. Select options to limit the numbers of rows and columns accessed. With SQL Server, select the name from the server drop-down list. If your computer is acting as the server, choose Local and click Finish. For a MySQL database, enter the MySQL hostname or IP address and the entire path to the MySQL database. You can also enter a username and password in the same screen, if necessary. The MySQL ODBC driver also offers a host of features that you can enable or disable. Figure 18.4. In the Select Database dialog box, select the database you want to use for the data source.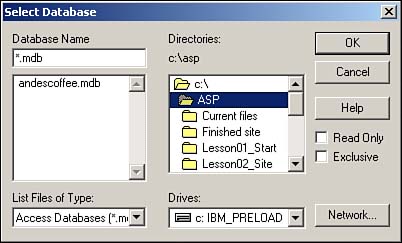
-
When you've finished the ODBC setup, you can click OK in the remaining dialog box to exit the setup. After you've set up a DSN, you're ready to connect with it through Dreamweaver. After you've established a connection with your DSN through ODBC, you can start the Web application development process. Connections for ASP We'll first review how to establish a connection with an ODBC DSN in Dreamweaver MX for ASP. When teaching Web application development, I often tell my students that ASP is one of the most convenient middlewares to develop with if you're developing on the Windows platform. Although the procedures are similar for the different server models that you may choose to use, it is beneficial to look at them step-by-step because the variations between the server models warrants that we do so. To establish a connection with the DSN, follow these steps: -
Be sure to have the Application panel open. If the Database tab is not visible, choose Window, Databases. This will open the Applications panel as shown in Figure 18.5. Figure 18.5. The Database panel enables you to configure the connection between Dreamweaver and the DSN.
-
In the Database panel, click the Add button (+) to access the drop-down menu. In the drop-down menu, choose Data Source Name (DSN) to launch the Data Source Name dialog box as shown in Figure 18.6. Figure 18.6. The Data Source Name dialog box offers the option to configure the data source connection.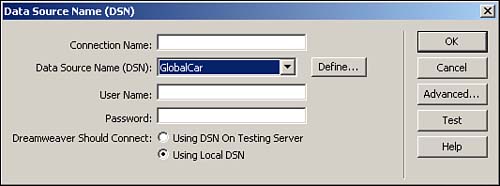
-
The first option is to determine whether you're using the DSN on the testing server or on your local machine. If you're using the DSN on the testing server, choose the Dreamweaver Should Connect Using DSN On Testing Server option; otherwise, you should choose Using Local DSN. If you're developing on a Macintosh, you will have to use the DSN on the testing server. -
Enter a name for the connection. It's good to add the prefix conn and avoid spacing in your naming conventions. For example, a name could look something like this: connGlobal. The reason for this is that it will stand out in the code, making it easier to debug. -
If you're defining a local DSN, choose the name or option from the Data Source Name (DSN) drop-down menu. If you're defining a DSN on the remote server, enter the name of the DSN. -
If required, enter a username and password into the appropriate fields. -
Some databases allow you to limit the number of database items available in a single connection. To limit the available tables, click the Advanced button. Here you can enter the desired Schema or Catalog. -
To make sure your connection is established properly, click the Test button. This launches an alert message specifying that the connection was made successfully. If the connection was not made successfully, double-check the naming convention of the DSN and be sure that the database file wasn't moved to a different directory. -
After you've made a successful connection, click the OK button. Notice that the new connection is available through the Connections dialog box. -
Click the Done button to exit the Connections dialog box. As you can see, establishing communication between the DSN and Dreamweaver is pretty straightforward; however, it is a crucial component of authoring Web applications. As I mentioned earlier, the process can vary slightly, depending on which type of middleware you plan to use. Therefore, in the next sections, we'll review the same process for ColdFusion and JSP. Connections for ColdFusion The ColdFusion Administrator integrates with the ODBC Data Source Administrator to use the DSNs already configured on the system that you are working with. You also have the option of creating new DSNs right within the ColdFusion Administrator. After establishing a new DSN in either the ODBC Data Source Administrator, as reviewed earlier, or through the ColdFusion Administrator, follow these steps to create a connection between Dreamweaver MX and the DSN: -
Open the Database panel by choosing Window, Database. In the Database panel, click the Modify Data Source button, as shown in Figure 18.7. Figure 18.7. Choose Modify Data Source from the Database panel to open the ColdFusion Administration page.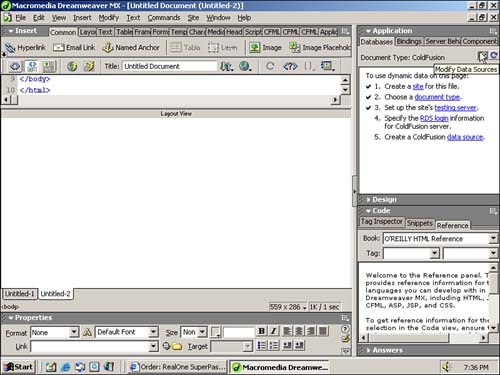
-
After you choose Modify Data Source, the ColdFusion Administration page will open. -
On the ColdFusion Administrator home page, choose ODBC from the Data Sources category. -
On the ODBC data sources page, choose the appropriate driver for the database you are using from the drop-down menu. Click the Add button when finished. -
Enter the name of the DSN in the data source field. Enter the path to the database in the Database File field, or click the Browse button to search for the database on the hard drive. If required, enter a username and password. -
When you're happy with your settings, click the Create button. ColdFusion will create and verify the DSN, making it a visible option in the ODBC Data Source page. As you can see, the process for setting up a DSN connection for ColdFusion varies slightly from its ASP counterpart; however, the process is just as easy, but ultimately a bit more reliable. Connections for JSP As you might assume, JSP uses the JDBC (Java Database Connectivity), in contrast to ODBC. Therefore, the process for establishing a connection between Dreamweaver and the Data Source is a bit different. Dreamweaver MX offers six JDBC drivers, plus an additional option for installing additional or custom drivers. The six drivers included with Dreamweaver MX are the following: The list that follows provides examples of what the syntax might look like for the three most popular drivers. You should be aware that many more drivers for different databases are available at Sun Microsystem's Web site, located at http://java.sun.com/products/jdbc/drivers. Sun JDBC-ODBC Bridge Supports Any ODBC-compliant driver. Driver Field Parameters sun.jdbc.odbc.JdbcOdbcDriver. URL Field Parameters jdbc:odbc:DSN_Name (substitute the DSN_Name with actual name of DSN). Oracle Thin JDBC Driver Supports Oracle databases. Driver Field Parameters oracle.jdbc.driver.OrcaleDriver. URL Field Parameters jdbc:oracle:thin:@server_name:database_port:SID (replace @server_name with actual server and switch the database_port with actual port number). I-net JDBC Driver Supports SQL Server databases. Driver Field Parameters com.inet.tds.TdsDriver. URL Field Parameters jdbc:inetdae:server_name:database_port?database=database_name (replace server_name with actual server name, replace database_port with actual port number, and replace the last data_base name with the actual name of the database). When downloading additional drivers, be aware of the robustness of the different types of drivers. There are Type 1 drivers, which are the earliest implementations of the standard and the least robust. The types of drivers work their way up to Type 4; Type 4 drivers are native Java applications and are the most robust. Whenever possible, try to download Type 4 drivers. To establish a connection in Dreamweaver MX with JSP, follow these steps: -
Make sure the Database panel is visible. Choose Window, Database to open the panel. -
Click the Add (+) button to access the drop-down menu. In the drop-down menu, select the driver of your choice to launch a dialog box. In Figure 18.8, for example, the Oracle Thin JDBC driver has been chosen. Figure 18.8. Each JSP driver offers options in brackets indicating data you need to specify.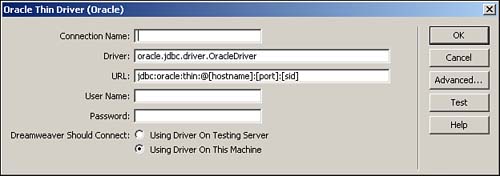
-
If you're creating a connection on a testing server, choose Using Driver on Test Server Options; otherwise choose the Using Driver on This Machine. -
If you're creating a custom connection, be sure to enter the driver name in the driver field, as specified by the manufacturer of the driver. -
Give the connection a name. Remember, it's good to use the conn prefix for the name and avoid spacing in your naming conventions. -
If you're using one of the standard drivers, replace the information in the brackets with the proper information about your hostname and database name. -
If required, enter a username and password into their respective fields. -
If you want to limit the available tables, click the Advanced button. Here, if the database supports it, you can specify the desired Schema or Catalog. -
With all those settings in place click the Test button to make sure the connection was made successfully. -
After the connection has been verified, click the OK button to return to the Connections dialog box. -
In the Connections dialog box, notice that the new JSP connection you just established is available. Click Done to exit the Connections dialog box. We will review connections settings for the other two server models that Dreamweaver offers development with ASP.NET and PHP. However, it's important to note that ASP.NET does not support DSNs, and PHP's server model in Dreamweaver MX offers support only for MySQL connections through its own ODBC drivers. |

