Choosing Font
| | ||
| | ||
| | ||
Now, consider how to display text information with different types of fonts. The CreateFontIndirect function is the most convenient for specifying the font format. This function accepts the pointer to the LOGFONT structure as the parameter. Although the function name starts from create , in this case, I am referring to modifying the existing font according to the specified parameters rather than to creating a new one. There is another function called CreateFont that, in my opinion, is less convenient for using in Assembly language programming. If you'd like, you could experiment with this function on your own. The selection of the required font is carried out using the Selectobject function.
For now, start with a detailed description of the fields of the LOGFONT structure:
LOGFONT STRUC LfHeight DWORD ? LfWidth DWORD ? LfEscapement DWORD ? LfOrientation DWORD ? LfWeight DWORD ? LfItalic DB ? LfUnderline DB ? LfStrikeOut DB ? LfCharSet DB ? LfOutPrecision DB ? LfClipPrecision DB ? LfQuality DB ? LfPitchAndFamily DB ? LfFaceName DB 32 DUP (0) LOGFONT ENDS
Here:
-
LfHeight Defines the font height in logical units; if this value is set to 0, then the height value is taken by default.
-
Lfwidth Defines the font width in logical units; if this value is set to 0, then the font width value is taken by default.
-
LfEscapement Angle of the text inclination in relation to the horizontal axis (counterclockwise) in tenths of a degree.
-
LfOrientation Same as the previous parameter but in relation to an individual symbol (ignored in Windows 9 x ).
-
LfWeight Specifies the font weight (0-900).
-
LfItalic In italics, if set to 1.
-
LfUnderline If 1, characters are underlined .
-
LfStrikeOut If 1, a line is drawn through the characters.
-
LfCharSet Specifies the set of font characters, usually defined by the ANSI_CHARSET (=0) constant.
-
LfOutPrecision The flag of the font precision; it specifies the precision of correspondence between the newly-created font and its predefined parameters. Possible values are as follows :
-
OUT_DEFAULT_PRECIS
-
OUT_STRING_PRECIS
-
OUT_CHARACTER_PRECIS
-
OUT_STROKE_PRECIS
-
OUT_TT_PRECIS
-
OUT_DEVICE_PRECIS
-
OUT_RASTER_PRECIS
-
OUT_TT_ONLY_PRECIS
-
OUT_OUTLINE_PRECIS
-
OUT_SCREEN_OUTLINE_PRECIS
= 0
= 1
= 2
= 3
= 4
= 5
= 6
= 7
= 8
= 9
-
-
LfclipPrecision The flag of font-clipping precision; defines how to clip font parts that do not fit within the visible area. Possible values are as follows:
-
CLIP_DEFAULT_PRECIS
-
CLIP_CHARACTER_PRECIS
-
CLIP_STROKE_PRECIS
-
CLIP_MASK
-
CLIP_LH_ANGLES
-
CLIP_TT_ALWAYS
-
CLIP_EMBEDDED
= 0
= 1
= 2
= 0fH
= (1 SHL 4)
= (2 SHL 4)
= (8 SHL 4)
-
-
LfQuality The font quality flag; it defines the correspondence between the logical font and the font allowed for this device. Possible values are as follows:
-
DEFAULT_QUALITY
-
DRAFT_QUALITY
-
PROOF_QUALITY
= 0
= 1
= 2
-
-
LfPitchAndFamily Defines the font type and family. Possible values are defined by the or combination of the two groups of constants as follows:
-
DEFAULT_PITCH
-
FIXED_PITCH
-
VARIABLE_PITCH
= 0
= 1
= 2
and
-
FF_DONTCARE
-
FF_ROMAN
-
FF_SWISS
-
FF_MODERN
-
FF_SCRIPT
-
FF_DECORATIVE
= 0
= (1 SHL 4)
= (2 SHL 4)
= (3 SHL 4)
= (4 SHL 4)
= (5 SHL 4)
-
-
LfFaceName Contains the font name. The length of the name cannot exceed 32 characters.
Consider the example illustrating how to specify a custom font. The result of executing this program is shown in Fig. 7.1. However, since the main part of this listing is the same as similar parts of all previous programs, I provide here only the required fragments . First, consider the fragment that executes when the WM_PAINT message arrives (Listing 7.3).
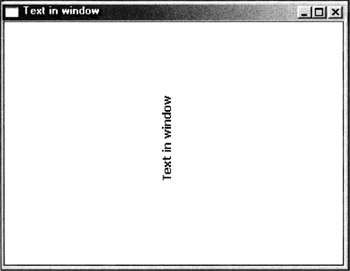
Figure 7.1: Text output at a 90-degree angle
| |
WMPAINT: ;------- Define the context PUSH OFFSET PNT PUSH DWORD PTR [EBP+08H] CALL BeginPaint@8 MOV CONT, EAX ; Save the context (descriptor) ;------- Background color = window color PUSH RGBW PUSH EAX CALL SetBkColor@8 ;-------Text color (red) PUSH RGBT PUSH CONT CALL SetTextColor@8 ;------ Coordinates are defined here MOV XT, 120 MOV YT, 140 ;------Specify (create) font MOV lg.IfHeight, 12 ; Font height MOV lg.IfWidth, 9 ; Font width MOV lg.IfEscapement, 900 ; Orientation MOV lg.IfOrientation, 0 ; Vertical MOV lg.IfWeight, 400 ; Font line weight MOV lg.IfItalic, 0 ; Italic MOV lg.IfUnderline, 0 ; Underline MOV lg.IfStrikeOut, 0 ; Strikethrough MOV lg.IfCharSet, 0 ; Font set MOV lg.IfOutPrecision, 0 MOV lg.IfClipPrecision, 0 MOV lg.IfQuality, 2 MOV lg.IfPitchAndFamily, 0 PUSH OFFSET lg ; Specify the font name PUSH OFFSET NFONT PUSH OFFSET lg.LfFaceName CALL COPYSTR CALL CreateFontIndirectA@4 ;------ Select the newly created object PUSH EAX PUSH CONT CALL SelectObject@8 PUSH EAX ;------ Compute the text length in pixels PUSH OFFSET TEXT CALL LENSTR ;-------------Text output---------------- PUSH EBX PUSH OFFSET TEXT PUSH YT PUSH XT PUSH CONT CALL TextOutA@20 ; Delete the "FONT" object ; Identifier is in the stack already CALL DeleteObject@4 ;---------------- Close the context PUSH OFFSET PNT PUSH DWORD PTR [EBP+08H] CALL EndPaint@8 MOV EAX, 0 JMP FINISH
| |
As can be seen in this fragment, the font is created according to the following scheme: First, it is necessary to create the font using the createFontIndirect function. Then, you must select the font using the Selectobject function, display the text using the specified font, and delete the object (font) created earlier. The LfFaceName field of the LOGFONT structure must contain the font name. If there is no such font, then the default font will be used. The font name is specified in the NFONT string, and you copy it into the LfFaceName field using the COPYSTR function whose source code is provided in Listing 7.4.
| |
; The procedure of copying one string into another ; The target string [EBP+08H] ; The source string [EBP+0CH] COPYSTR PROC PUSH EBP MOV EBP, ESP MOV ESI, DWORD PTR [EBP+0CH] MOV EDI, DWORD PTR [EBP+08H] L1: MOV AL, BYTE PTR [ESI] MOV BYTE PTR [EDI], AL CMP AL, 0 JE L2 INC ESI INC EDI JMP L1 L2: POP EBP RET 8 COPYSTR ENDP
| |
This procedure doesn't account for the length of the target string. The best approach is to account for the length by including another parameterthe maximum number of characters that can be copied . I recommend that you do this on your own.
To conclude this section, consider one important topic. When considering all previous examples, this question was unlikely to arise. The reason for this is straightforward: All output took place only when receiving the WM_PAINT message. In real-world programs, information output into the window can take place as a result of different events and various procedures. Furthermore, if the window contains lots of information, then direct output of this information using the TextOut function will be slow. To display the window contents, it is necessary to store it somewhere. Thus, the problem of temporary storage of window information (not only text) arises.
Those who have some experience with MS-DOS programming will recall that MS-DOS had a similar problem. This problem was solved by outputting all information into the background video page. After that, the background page was copied into the visible page. This produced an impression of instantaneous display of the information. Both RAM and video memory can be used as a background page.
Similar to this approach, a virtual window can be created under the Windows operating system, and all information can be output is into this window. Then, after the arrival of the WM_PAINT message, the contents of the virtual window are copied into the real one.
Generally, the procedure is as follows:
-
When a window is created, the following occurs:
-
A compatible device context is created. For this purpose, the CreateCompatibleDC function is used. The obtained context must be saved.
-
The bit map compatible with this context is created. This is achieved using the CreateCompatibleBitmap function.
-
The brush of the color matching the color of the main window is created.
-
The bit template is created through the bitmap operation using the chosen brush. This is achieved using the PatBlt function.
-
-
All information is output into the virtual window; then, the command to redraw a window is issued. These operations are carried out by the Invalidaterect function.
-
When the WM_PAINT message is received, the contents of the virtual window is copied into the real window using the BitBlt function.
The practical application of this theory will be considered in the next section.
| | ||
| | ||
| | ||
EAN: 2147483647
Pages: 140