Graphical Images
| | ||
| | ||
| | ||
This section is dedicated to graphics. Because the basics of Windows graphics are easily understood , I'll offer one simple example illustrating the output of graphical images. However, it is first necessary to explain several basic concepts:
-
The coordinate system for the output of graphic images is the same as for text output. Coordinates are measured in logical units that, by default, coincide with pixels. If desired, this proportion can be changed.
-
Drawing color can be created using three methods . When the SetPixel function is used, the color of a given point is specified. For lines, it is necessary to specify the pen color. To specify the color of graphic objects, it is necessary to specify the brush color.
-
The pen is created using the CreatePen function, and the brush is created using the CreateSolidBrush function, which you have used already: To create a colored picture, it is possible to create several pens and brushes beforehand and then choose the required ones when necessary using the Selectobject function, which you have also used already.
-
The following API functions can be used for drawing:
-
setPixel Set the specified pixel color.
-
LineTo Draw a line from the current point to the point having the specified coordinates. This point, in its turn , becomes the current point.
-
MoveToEx Change the current point.
-
Arc Draw an arc.
-
Rectangle Draw a rectangle.
-
RoundRect Draw a rectangle with rounded corners.
-
Ellipse, Pie Draw ellipses and elliptical sectors.
-
-
If a brush color set when drawing a closed figure was different from the background color, the closed figure will be filled with this color.
-
To set the proportion between logical units and pixels, the SetMapMode function is used.
-
To specify the input area, it is possible to use the SetViewportExtEx function.
The SetviewportOrgEx function can be used to specify the starting point of the input area.
After providing this introductory information, it is time to demonstrate the program. It is simple but still implements the basic principles of working with graphics.
After you click the left mouse button for the first time, the horizontal line will be drawn. When you click the mouse button a second time, an inclined line will be drawn; the third click draws a colored rectangle. The source code of this program is provided in Listing 7.5, and the result of its execution is shown in Fig. 7.2.
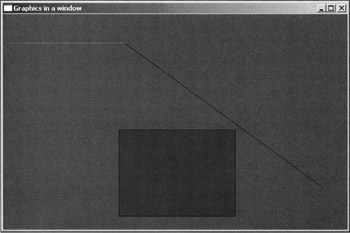
Figure 7.2: The result of executing the program in Listing 7.5
| |
; The GRAPH1.INC file ; Constants ; The message arrives when the window is closed WM_DESTROY equ 2 ; The message arrives when the window is created WM_CREATE equ 1 ; The message arrives when you click the left mouse button in the window area WM_LBUTTONDOWN equ 201h ; The message arrives when the window is redrawn WM_PAINT equ 0Fh ; Window properties CS_VREDRAW equ 1h CS_HREDRAW equ 2h CS_GLOBALCLASS equ 4000h WS_OVERLAPPEDWINDOW equ 000CF0000H stylcl equ CS_HREDRAW+CS_VREDRAW+CS_GLOBALCLASS DX0 equ 600 DY0 equ 400 ; Color components RGBW equ (50 or (50 shl 8)) or (255 shl 16) ; Window color RGBR equ 150 ; Region color RGBL equ 0 ; Line color RGBP equ 255 or (100 shl 8) ; Point color ; Identifier of the standard icon IDI_APPLICATION equ 32512 ; Cursor identifier IDC_CROSS equ 32515 ; Window display mode SW_SHOWNORMAL equ 1 ; Prototypes of external procedures EXTERN CreateWindowExA@48:NEAR EXTERN DefWindowProcA@16:NEAR EXTERN DispatchMessageA@4:NEAR EXTERN ExitProcess@4:NEAR EXTERN GetMessageA@16:NEAR EXTERN GetModuleHandleA@4:NEAR EXTERN LoadCursorA@8:NEAR EXTERN LoadIconA@ 8:NEAR EXTERN PostQuitMessage@4:NEAR EXTERN RegisterClassA@4:NEAR EXTERN ShowWindow@8:NEAR EXTERN TranslateMessage@4:NEAR EXTERN UpdateWindow@4:NEAR EXTERN BeginPaint@8:NEAR EXTERN EndPaint@8:NEAR EXTERN GetStockObject@4:NEAR EXTERN CreateSolidBrush@4:NEAR EXTERN GetSystemMetrics@4:NEAR EXTERN GetDC@4:NEAR EXTERN CreateCompatibleDC@4:NEAR EXTERN SelectObject@8:NEAR EXTERN CreateCompatibleBitmap@12@:NEAR EXTERN PatBlt24:NEAR EXTERN BitBlt@36:NEAR EXTERN ReleaseDC@8:NEAR EXTERN DeleteObject@4:NEAR EXTERN InvalidateRect@12:NEAR EXTERN GetStockObject@4:NEAR EXTERN DeleteDC@4:NEAR EXTERN CreatePen@12:NEAR EXTERN SetPixel@16:NEAR EXTERN LineTo@12:NEAR EXTERN MoveToEx@16:NEAR EXTERN Rectangle@20:NEAR ; Structures ; Message structure MSGSTRUCT STRUC MSHWND DD ? ; Identifier of the window ; that receives the message MSMESSAGE DD ? ; Message identifier MSWPARAM DD ? ; Additional information about the message MSLPARAM DD ? ; Additional information about the message MSTIME DD ? ; Message sending time MSPT DD ? ; Cursor position when the message was sent MSGSTRUCT ENDS ;---------------------- WNDCLASS STRUC CLSSTYLE DD ? ; Window style CLSLPFNWNDPROC DD ? ; Pointer to the window procedure CLSCBCLSEXTRA DD ? ; Information about additional bytes ; for this structure CLSCBWNDEXTRA DD ? ; Information about additional bytes ; for the window CLSHINSTANCE DD ? ; Application descriptor CLSHICON DD ? ; Window icon identifier CLSHCURSOR DD ? ; Window cursor identifier CLSHBRBACKGROUND DD ? ; Window brush identifier MENNAME DD ? ; Menu name identifier CLSNAME DD ? ; Specifies the window class name WNDCLASS ENDS ;--- PAINTSTR STRUC hdc DD 0 fErase DD 0 left DD 0 top DD 0 right DD 0 bottom DD 0 fRes DD 0 fIncUp DD 0 Reserv DB 32 dup(0) PAINTSTR ENDS ;-------------- RECT STRUC L DD ? ; X Top left corner T DD ? ; Y Top left corner R DD ? ; X Bottom right corner B DD ? ; Y Bottom right corner RECT ENDS ; The GRAPH.ASM file .586P ; Flat memory model .MODEL FLAT, stdcall ;---------------------------------------- include graph1.inc ; Include libraries includelib c:\masm32\lib\user32.lib includelib c:\masm32\lib\kernel32.lib includelib c:\masm32\lib\gdi32.lib ;---------------------------------------- ; Data segment _DATA SEGMENT NEWHWND DWORD 0 MSG MSGSTRUCT <?> WC WNDCLASS <?> PNT PAINTSTR <?> HINST DWORD 0 TITLENAME BYTE 'Graphics in a window', 0 NAM BYTE 'CLASS32', 0 XT DWORD 30 YT DWORD 30 XM DWORD ? YM DWORD ? HDC DWORD ? MEMDC DWORD ? HPEN DWORD ? HBRUSH DWORD ? P DWORD 0 ; Output indicator XP DWORD ? YP DWORD ? _DATA ENDS ; Code segment _TEXT SEGMENT START: ; Get application descriptor PUSH 0 CALL GetModuleHandleA@4 MOV [HINST], EAX REG_CLASS: ; Fill window structure ; Style MOV [WC.CLSSTYLE], stylcl ; Message-handling procedure MOV [WC.CLSLPFNWNDPROC], OFFSET WNDPROC MOV [WC.CLSCBCLSEXTRA], 0 MOV [WC.CLSCBWNDEXTRA], 0 MOV EAX,[HINST] MOV [WC.CLSHINSTANCE], EAX ;----------Window icon PUSH IDI_APPLICATION PUSH 0 CALL LoadIconA@8 MOV [WC.CLSHICON], EAX ;---------- Window cursor PUSH IDC_CROSS PUSH 0 CALL LoadCursorA@8 MOV [WC.CLSHCURSOR], EAX ;---------- PUSH RGBW ; Brush color CALL CreateSolidBrush@4 ; Create a brush MOV [WC.CLSHBRBACKGROUND], EAX MOV DWORD PTR [WC.MENNAME], 0 MOV DWORD PTR [WC.CLSNAME], OFFSET NAM PUSH OFFSET WC CALL RegisterClassA@4 ; Create a window of the registered class PUSH 0 PUSH [HINST] PUSH 0 PUSH 0 PUSH DY0 ; DY0 Window height PUSH DX0 ; DX0 Window width PUSH 100 ; The Y coordinate PUSH 100 ; The X coordinate PUSH WS_OVERLAPPEDWINDOW PUSH OFFSET TITLENAME ; Window name PUSH OFFSET NAM ; Class name PUSH 0 CALL CreateWindowExA@48 ; Check for error CMP EAX, 0 JZ _ERR MOV [NEWHWND], EAX ; Window descriptor ;--------------------------------- PUSH SW_SHOWNORMAL PUSH [NEWHWND] CALL ShowWindow@8 ; Show the newly created window ;--------------------------------- PUSH [NEWHWND] CALL UpdateWindow@4 ; Redraw the visible part of a window ; Message-handling loop MSG_LOOP: PUSH 0 PUSH 0 PUSH 0 PUSH OFFSET MSG CALL GetMessageA@16 CMP AX, 0 JE END_LOOP PUSH OFFSET MSG CALL TranslateMessage@4 PUSH OFFSET MSG CALL DispatchMessageA@4 JMP MSG_LOOP END_LOOP: ; Exit the program (close the process) PUSH [MSG.MSWPARAM] CALL ExitProcess@4 _ERR: JMP END LOOP ;----------------------------------------------------- ; Window procedure ; Placement of parameters in the stack ; [EBP+014H] ; LPARAM ; [EBP+10H] ; WAPARAM ; [EBP+0CH] ; MES ; [EBP+8] ; HWND WNDPROC PROC PUSH EBP MOV EBP, ESP PUSH EBX PUSH ESI PUSH EDI CMP DWORD PTR [EBP+0CH], WM_DESTROY JE WMDESTROY CMP DWORD PTR [EBP+0CH], WM_CREATE JE WMCREATE CMP DWORD PTR [EBP+0CH], WM_PAINT JE WMPAINT CMP DWORD PTR [EBP+0CH], WM_LBUTTONDOWN JE LBUTTON JMP DEFWNDPROC LBUTTON: CMP P, 0 JNE F1 ; Line (horizontal) MOV YP, 50 ; Y MOV XP, 10 ; X MOV ECX, 200 LL: PUSH ECX PUSH RGBP PUSH YP PUSH XP PUSH MEMDC CALL SetPixel@16 INC XP POP ECX LOOP LL INC P JMP F3 F1: CMP P, 1 JNE F2 ; Set the current coordinates to the end of the previous line PUSH 0 PUSH YP PUSH XP PUSH MEMDC CALL MoveToEx@16 ; Line drawn by a pen PUSH 300 PUSH 550 PUSH MEMDC CALL LineTo@12 INC P JMP F3 F2: CMP P, 2 JNE FIN ; Closed rectangle ; Select a brush for filling the closed area PUSH HBRUSH PUSH MEMDC CALL SelectObject@8 ; Draw a filled rectangle ; If you do not choose a brush, ; the rectangle will not be filled PUSH 350 PUSH 400 PUSH 200 PUSH 200 PUSH MEMDC CALL Rectangle@20 INC P F3: ; Issue a command to redraw the window PUSH 0 PUSH OFFSET RECT PUSH DWORD PTR [EBP+08H] CALL InvalidateRect@12 FIN: MOV EAX, 0 JMP FINISH WMPAINT: PUSH OFFSET PNT PUSH DWORD PTR [EBP+08H] CALL BeginPaint@8 MOV HDC, EAX ; Save the context (descriptor) ; Copy the virtual window to the real one PUSH 0CC0020h ; SRCCOPY = display the image as is PUSH 0 ; YCoordinate of the source PUSH 0 ; X Coordinate of the source PUSH MEMDC ; Source context PUSH YM ; Height PUSH XM ; Width PUSH 0 ; Y Where PUSH 0 ; X Where PUSH HDC ; Context Where CALL BitBlt@36 ;----------------Close the window context PUSH OFFSET PNT PUSH DWORD PTR [EBP+08H] CALL EndPaint@8 MOV EAX, 0 JMP FINISH WMCREATE: ; Screen size PUSH 0 ; X CALL GetSystemMetrics@4 MOV XM, EAX PUSH 1 ; Y CALL GetSystemMetrics@4 MOV YM, EAX ; Open the window context PUSH DWORD PTR [EBP+08H] CALL GetDC@4 MOV HDC, EAX ; Create the device context compatible with this window PUSH EAX CALL CreateCompatibleDC@4 MOV MEMDC, EAX ; Create a bitmap compatible to the hdc context in memory PUSH YM PUSH XM PUSH HDC CALL CreateCompatibleBitmap@12 ; Choose the bitmap in this context PUSH EAX PUSH MEMDC CALL SelectObject@8 ; Brush color PUSH RGBW CALL CreateSolidBrush@4 ; Create a brush ; Choose the brush in the given context PUSH EAX PUSH MEMDC CALL SelectObject@8 ; Fill the rectangular area PUSH 0F00021h ; PATCOPY = Fill with the specified color PUSH YM PUSH XM PUSH 0 PUSH 0 PUSH MEMDC CALL PatBlt@24 ; Create a pen and a brush for drawing PUSH RGBR CALL CreateSolidBrush@4 ; Create a brush MOV HBRUSH, EAX ; Specify the pen PUSH RGBR ; Color PUSH 0 ; Thickness = 1 PUSH 0 ; Solid line CALL CreatePen@12 MOV HPEN, EAX ; Delete the context PUSH HDC PUSH DWORD PTR [EBP+08H] CALL ReleaseDC@8 MOV EAX, 0 JMP FINISH DEFWNDPROC: PUSH DWORD PTR [EBP+14H] PUSH DWORD PTR [EBP+10H] PUSH DWORD PTR [EBP+0CH] PUSH DWORD PTR [EBP+08H] CALL DefWindowProcA@16 JMP FINISH WMDESTROY: ; Delete the pen PUSH HPEN CALL DeleteDC@4 ; Delete the brush PUSH HBRUSH CALL DeleteDC@4 ; Delete the virtual window PUSH MEMDC CALL DeleteDC@4 ; Exit PUSH 0 CALL PostQuitMessage@4 ; WM_QUIT MOV EAX, 0 FINISH: POP EDI POP ESI POP EBX POP EBP RET 16 WNDPROC ENDP _TEXT ENDS END START
| |
My explanation of graphical output would be incomplete without considering the topic of manipulating bitmap images. Consider the sequence of actions that need to be carried out for output of a bitmap image. Practical examples of graphics output will be provided in later chapters.
-
Load the bitmap image and store its descriptor.
-
Get the device handle for the memory area, in which the image will be stored.
-
Select the image in the given context.
-
Copy the image to the screen using the BitBlt function.
Using resources is a convenient way of working with bitmap images. Resources can be generated directly within the program or loaded from a file.
These topics will be covered later.
| Note | To a professional in the field of Windows programming, it might seem strange that I write custom string functions instead of using the available API functions. Yes, such functions exist. And the reason I neglect them is straightforward. First, my book is intended not only for advanced programmers but also for beginners that are just starting to master programming in the Assembly language. Second, as I mentioned in the Introduction, this book is an attempt to create some symbiosis of Assembly language and Windows programming. By following this principle, you will not always solve problems using only API functions. However, because I understand the importance of string API functions, I'll provide examples of their use in due time. |
| | ||
| | ||
| | ||
EAN: 2147483647
Pages: 140