A Generic Record Lookup Grid with Column Sorting in Visual FoxPro
| < Day Day Up > |
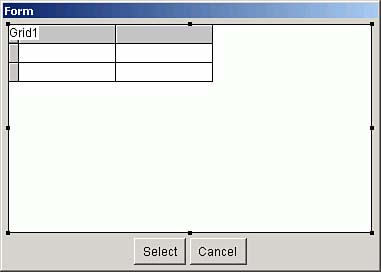
| As you run the Visual Basic .NET version of this form, you might have noticed that clicking on the column heading not only sorts the grid's contents by the selected column, but toggles between ascending and descending order. This is as good a place as any to show how to do the same thing in FoxPro. We'll also extend the concepts in the simple grid shown earlier in this chapter to make it generic, requiring only the setting of a few properties to handle any table and list of fields. Programming grids poses a problem in FoxPro. The problem is that the grid adds columns as needed when you assign the RecordSource property. The grid adds as many columns as needed to display the columns in the cursor. But the columns it adds are from the FoxPro Column base class, which has no default behavior to create an index on the selected column. But if you create your own column and add Click event code, you can add your subclassed column to a grid instead. The unexpected wrinkle was that I couldn't add a class based on either the column class or the header class into a VCX file. It wasn't something I had run into before. But it's a small thing, and easily solved , as you'll see in the following description of creating the form. I started by creating a form class called SearchForm , with four properties set: CREATE CLASS SearchForm OF Pinter AS FORM Height = 250 Width = 375 AutoCenter = .T. ControlBox = .F. I added form properties named ReturnValue , TableName , FieldList , and KeyField . I then added a grid and two buttons ( cmdSelect and cmdCancel ), and a Shape to create a wireframe around the buttons. The code for the two buttons was just this: cmdSelect::Click WITH THISFORM .ReturnValue = TRANSFORM(EVALUATE(.KeyField)) .Hide .Release ENDWITH cmdCancel::Click WITH THISFORM .ReturnValue = [] .Hide .Release ENDWITH The grid has a few settings, mostly for esthetic purposes: Height = 200 Left = 10 Width = 355 Name = Grid1 ScrollBars = 2-Vertical DeleteMark = .F. I want users to be able to resize this form. Resizing code is easy for a simple form like this: WITH THISFORM .LockScreen = .T. WITH .Grid1 .Width = THIS.Width - 20 .Height = THIS.Height - 50 ENDWITH .cmdSelect.Left = .Width/2 - .cmdSelect.Width/2 .cmdSelect.Top = .Height - 32 .cmdCancel.Left = .Width/2 + .cmdCancel.Width/2 .cmdCancel.Top = .Height - 32 .Shape1.Left = .Width/2 - .Shape1.Width /2 + 30 .Shape1.Top = .Height - 37 .LockScreen = .F. ENDWITH So far the form looks like Figure 9.4. Figure 9.4. The grid in Design mode. The interesting code in this application involves adding columns to the grid corresponding to the fields in the FieldList property. (Note: As an exercise, you might want to allow "*" or a blank FieldList to expand into a list of all the fields in the table.) Because the Init code in the class references GRIDLIB.PRG , which contains the column and header classes, I'll list it first (see Listing 9.2). Listing 9.2. GRIDLIB.PRGDEFINE CLASS MyCol as Column BackColor = RGB(255, 255, 128) FontName = "Courier New" FontSize = 11 Width = 150 Visible = .T. Sparse = .F. HeaderClass = "MyHeader" HeaderClassLibrary = "GridLib.prg" ENDDEFINE DEFINE CLASS MyHeader as Header Caption = "MyHeader" ForeColor = RGB(0, 0, 255) FontName = "Courier New" FontSize = 11 PROCEDURE Click WAIT WINDOW [Setting index tag to ] + THIS.Caption NOWAIT SET ORDER TO TAG ( THIS.Caption ) GO TOP THIS.Parent.Parent.Refresh ENDPROC ENDDEFINE This is where the new column and header classes change the rules: I've embedded code in the Click event of the column header to set the index tag of the active table to the name used in the caption of each column. This assumes that each column actually corresponds to an index tag; so providing for that tag will be one of the tasks we accomplish in the form's Init method code. So here we go (see Listing 9.3). Listing 9.3. Form Init Code to Add a Column for Each Field in the Cursor FieldList* PROCEDURE Init ErrorStatus = [] WITH THISFORM TRY * Make sure that the AddObject method knows where the classes are SET PROCEDURE TO GRIDLIB.PRG ADDITIVE * Don't try to continue if the properties aren't filled in: IF EMPTY ( .TableName ) MESSAGEBOX( "TableName property is empty", 16, "Programmer error", 1000 ) ErrorStatus = [Empty fieldlist] ENDIF IF EMPTY ( .FieldList ) MESSAGEBOX( "FieldList property is empty", 16, "Programmer error", 1000 ) ErrorStatus = [Empty fieldlist] ENDIF * We only proceed if there were not any errors: IF EMPTY ( ErrorStatus ) IF NOT USED ( .TableName ) USE ( .TableName ) IN 0 ENDIF SELECT ( .TableName ) * If they didn't fill in a key field name, assume it's the first column in * the FieldList: IF EMPTY ( .KeyField ) .KeyField = GETWORDNUM(.FieldList,1,",") ENDIF * Later on we'll add the tags that don't exist. * To avoid an error message, create a little array entry ATAGINFO( laTags ) IF TYPE ( [laTags(1)] ) > [C] DIMENSION laTags(1) laTags = "" ENDIF WITH .Grid1 .RecordSource = THISFORM.TableName .ColumnCount = 0 .Visible = .T. FieldCount = GETWORDCOUNT( THISFORM.FieldList, "," ) TotalWidth = 0 FOR I = 1 TO FieldCount cName = "Mycol" + TRANSFORM(I) .AddObject ( (cName), "MyCol" ) cField = ALLTRIM( UPPER( GETWORDNUM( THISFORM.FieldList, I, "," ) ) ) .&cName..ControlSource = THISFORM.TableName + "." + cField .&cName..MyHeader1.Caption = cField IF ASCAN(laTags,cField) = 0 WAIT WINDOW [Creating index tag ] + cField NOWAIT INDEX ON &cField. TAG &cField. WAIT CLEAR ENDIF ENDFOR * Let FoxPro calculate the column widths: .AutoFit() * Add the column widths to resize the grid and the form: FOR EACH Col IN .Columns TotalWidth = TotalWidth + Col.Width ENDFOR .Width = TotalWidth + 25 ENDWITH THISFORM.Width = .Grid1.Width + 20 .Refresh() * Call the resize code to reposition all form elements: .Resize() ENDIF && End of the "Don't instantiate the form if there were errors" code CATCH TO oEX * If there was an error, display it and get the heck out of Dodge: MESSAGEBOX( [Error:] + CHR(13) + oEx.Message, 16, ; [Initialization error - aborting], 5000 ) IF USED ( .TableName ) USE IN ( .TableName ) ENDIF ErrorStatus = oEx.Message ENDTRY ENDWITH * We couldn't RETURN in the TRY..CATCH block, so do it now. IF NOT EMPTY ( ErrorStatus ) RETURN .F. ENDIF * Finally, since the form size probably changed, recenter it now: THISFORM.AutoCenter = .T. The result of this little bit of code is shown in Figure 9.5, where I created an instance of the class, filled in three properties, and ran the form using DO FORM CustSrch TO KeyValue Figure 9.5. The sortable grid in action.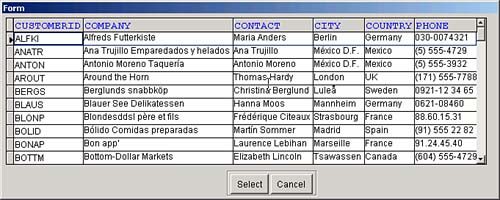 You can make several useful modifications to this code. For one, you might want to issue the command USE AGAIN so that if the calling form already has the table open , you don't move the record pointer to the consternation of the user . You might also want to use INDEX TO ( colname ) COMPACT and SET INDEX TO ( colname ) so that you don't arbitrarily add index tags to the table. And you can include code to check for the tag first, so that you only create it once. Of course, you mustn't use this technique if adding index tags would greatly slow down the program. But for a few thousand records, it's pretty cool. |
| < Day Day Up > |
EAN: 2147483647
Pages: 130