The Form Template
| < Day Day Up > |
| The basic form template for this application is a flat file form. Most, if not all, applications have one or more of these, and some apps have dozens. So it's immediately useful, while still possessing sufficient simplicity to make the code easy to understand. When you catch on to the principles, more complex templates and data access methods should be easy to build. What's a little tricky is understanding how form templates and the data tier interact. During the Depression, my father said that a humorous way of dismissing the difficult situation at hand was to say "If we had some ham we could have ham and eggs. If we had some eggs. " The form template and the data tier are each written with the other's function in mind. The reusable components go in the data tier, and the calls to use these components go in the template. For example, Listing 3.5 shows the class code for my FlatFileForm template. I'll comment it as we go. Listing 3.5. The FlatFileForm ClassMainTable = .F. && Name of the main table for the form KeyField = .F. && Name of the Primary Key for the Main Table KeyValue = .F. && Value in the KeyField of the current record Beforeadd = .F. && Record number before adding (used when Add is canceled) SearchForm = .F. && Name of a "pick one" form called by the Find button Adding = .F. && True at "Save" time if "Add" button was clicked Inputfields = "MYTEXT,MYCHECK,MYEDIT,MYCOMBO,MYSPIN,MYDATE" * Classes to enable/disable Beforeadd = 0 && Record pointer value before an add or edit begins PROCEDURE Buttons && Turns form buttons on or off as needed LPARAMETERS OnOff WITH THISFORM .cmdAdd.Enabled = OnOff .cmdFind.Enabled = OnOff .cmdClose.Enabled = OnOff .cmdEdit.Enabled = OnOff AND RECCOUNT() > 0 .cmdDelete.Enabled = OnOff AND RECCOUNT() > 0 .cmdSave.Enabled = NOT OnOff .cmdCancel.Enabled = NOT OnOff .cmdClose.Cancel = OnOff .cmdCancel.Cancel = NOT OnOff ENDWITH ENDPROC PROCEDURE Inputs && Enables/Disables form controls LPARAMETERS OnOff WITH THISFORM FOR EACH Ctrl IN .Controls IF UPPER ( Ctrl.Class ) $ UPPER ( .InputFields ) Ctrl.Enabled = OnOff ENDIF ENDFOR .Buttons ( NOT OnOff ) ENDWITH ENDPROC PROCEDURE Load * Runs when an instance of this form class is instantiated WITH THISFORM IF EMPTY ( .MainTable ) MESSAGEBOX( [No main table specified], 16, [Programmer error], 2000 ) RETURN .F. ENDIF oDataTier.CreateCursor ( .MainTable, .Keyfield ) ENDWITH ENDPROC PROCEDURE Init && Runs after buttons have been instantiated THISFORM.Buttons ( .T. ) ENDPROC PROCEDURE Unload && Closes table or cursor opened by this form WITH THISFORM IF USED ( .MainTable ) USE IN ( .MainTable ) ENDIF ENDWITH ENDPROC PROCEDURE cmdAdd.Click && Adds a new record, autopopulating the key field WITH THISFORM cNextKey = oDataTier.GetNextKeyValue ( .MainTable ) SELECT ( .MainTable ) .BeforeAdd = RECNO() CURSORSETPROP( [Buffering], 3 ) APPEND BLANK IF TYPE ( .KeyField ) <> [C] cNextKey = VAL ( cNextKey ) ENDIF REPLACE ( .Keyfield ) WITH cNextKey .Refresh .Inputs ( .T. ) .Adding = .T. ENDWITH ENDPROC PROCEDURE cmdEdit.Click && Initiates an edit of the current record WITH THISFORM SELECT ( .MainTable ) .BeforeAdd = RECNO() CURSORSETPROP( [Buffering], 3 ) .Inputs ( .T. ) .Adding = .F. ENDWITH ENDPROC PROCEDURE cmdDelete.Click && Deletes the current record WITH THISFORM IF MESSAGEBOX( [Delete this record?], 292, _VFP.Caption ) = 6 oDataTier.DeleteRecord ( .MainTable, .KeyField ) DELETE NEXT 1 GO TOP .Refresh ENDIF ENDWITH ENDPROC PROCEDURE cmdSave.Click * Saves data in local cursor and then remotely (if not DBF) WITH THISFORM SELECT ( .MainTable ) TABLEUPDATE(.T.) CURSORSETPROP( [Buffering], 1 ) .Inputs ( .F. ) oDataTier.SaveRecord( .MainTable, .KeyField, .Adding ) ENDWITH ENDPROC PROCEDURE cmdCancel.Click && Cancels an Edit or Add WITH THISFORM SELECT ( .MainTable ) TABLEREVERT(.T.) CURSORSETPROP( [Buffering], 1 ) .Inputs ( .F. ) IF BETWEEN ( .BeforeAdd, 1, RECCOUNT() ) GO ( .BeforeAdd ) ENDIF .Refresh ENDWITH ENDPROC PROCEDURE cmdFind.Click * If they're using DBF and no search form is defined, use BROWSE WITH THISFORM IF EMPTY ( .SearchForm ) AND oDataTier,AccessMethod = [DBF] SELECT ( .MainTable ) .BeforeAdd = RECNO() ON KEY LABEL ENTER KEYBOARD CHR(23) ON KEY LABEL RIGHTCLICK KEYBOARD CHR(23) BROWSE NOAPPEND NOEDIT NODELETE ON KEY LABEL ENTER ON KEY LABEL RIGHTCLICK IF LASTKEY() = 27 IF BETWEEN ( .BeforeAdd, 1, RECCOUNT() ) GO ( .Beforeadd ) ENDIF ENDIF ELSE DO FORM ( .SearchForm ) TO RetVal IF NOT EMPTY ( RetVal ) oDataTier.GetOneRecord ( .MainTable, .KeyField, RetVal ) .Refresh .Buttons ( .T. ) ENDIF ENDIF ENDWITH ENDPROC PROCEDURE cmdClose.Click && Da Svidaniya THISFORM.Release ENDPROC How to Use the FlatFileForm TemplateTo use this template, you do the following eight steps:
I've followed my instructions and built the little Customer form shown in Figure 3.2 in about 90 seconds. Figure 3.2. A sample customer form based on the FlatFileForm class.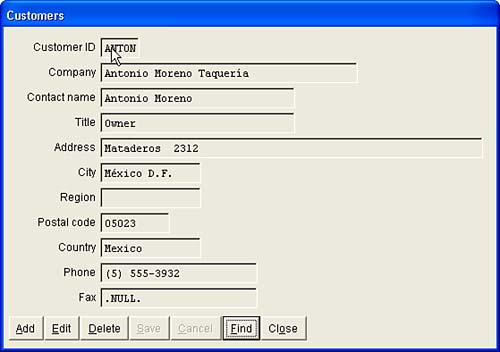 That's a pretty simple form template, and you might wonder if it really does everything you need. It does if you include the data tier and the search form. |
| < Day Day Up > |
EAN: 2147483647
Pages: 130