Working as a Team with Office OneNote 2007
As a tool for group work, Office OneNote 2007 offers several approaches, some more dynamic than others. You can distribute notebook pages to other people through e-mail, for example, which gets the information into circulation but doesn’t provide a vehicle for collecting the opinions and expertise of a team in a single location and doesn’t enable more than one team member to work with a notebook at the same time. A shared notebook provides more opportunities for a team to brainstorm together in meetings and provides a tool in which each member of a workgroup can view, add, and edit information.
Working with a Shared Notebook
A OneNote notebook can be shared simply by storing it in a location at which others can also open it, such as a folder share on your own computer, a file server, or a Windows SharePoint Services site (using Windows SharePoint Services 2.0 or later). OneNote guides you through setting up a shared location when you use the Create Shared Notebook command on the Share menu or the shared notebook option in the New Notebook Wizard.
A shared notebook is available for multiple users to work on at the same time or at different times. A workgroup or project team could use a shared notebook to gather and manage information such as the following:
-
Meeting or project notes
-
Links to department and project budgets
-
Brainstorming ideas
-
Lists of action items
-
Drafts of project reports that team members can annotate
-
Project plans
OneNote maintains a copy of a shared notebook on the local computers of the users who work with it. People using the notebook can add and update information while working on their computers, even when they are not connected to the site or server. When a user connects to the network the next time, OneNote reconciles the local copies of the notebook with the version saved on the server, merging changes into each copy of the shared notebook. This ensures that every member of the team has a current copy of the notebook. If two people make a change to the same note at the same time (not a very likely situation), OneNote displays an alert that its effort to merge changes didn’t succeed and shows both versions for users to review.
When you select the option to create a shared notebook, shown in Figure 5–25, you need to specify whether you want to locate the notebook on a server or on a shared folder on your computer. As with a notebook that you set up to use yourself on more than one computer, you should locate a notebook that you’ll share with others in a location such as the following:
-
A folder or public file share on a network
-
A shared folder on a computer on which you have Administrator permissions
-
A document library on a Windows SharePoint Services Web site
-
A high-storage-capacity USB drive
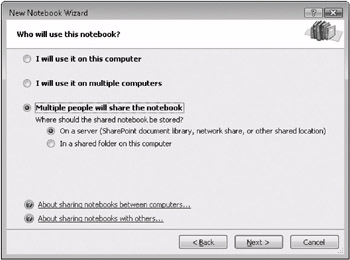
Figure 5–25: You can create a shared notebook from the Share menu or by using the New Notebook Wizard.
You also have the option when creating a shared notebook to invite other people to join you in using it. OneNote can create an e-mail message that you send to participants. By clicking the link in the body of the e-mail message, people you invite are directed to the location where you stored the shared notebook.
| Note | To send a link to the shared notebook after it has been created, on the Share menu, click Send Shared Notebook Link To Others. |
Protecting a Shared Section
You can choose which notebooks you share and which you keep to yourself. You can also control who has access to specific sections of a shared notebook by assigning a password to a section that you want to protect. A user who wants to work with a notebook section that is protected must enter the password to see the contents of the section’s pages.
To assign a password to a notebook section, right-click the section tab, and then click Password Protect This Section. You’ll see the Password Protection task pane, shown in Figure 5–26.
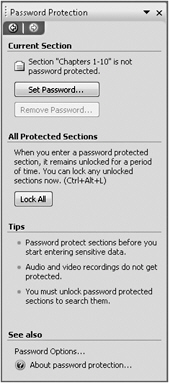
Figure 5–26: Setting up a password lets you control who can see the sections of a shared notebook.
When you click Set Password, you’ll be prompted to enter a password and then confirm the password you entered. Passwords you use in OneNote are case-sensitive, so be sure that the Caps Lock key is turned off when you enter a password the first time. You cannot recover a password that you forget, which OneNote reminds you of. Be sure that you have a safe record of the password in the event you forget it.
Office OneNote 2007 saves a password in memory so that you do not have to enter it every time you go back to the section. If you don’t work in OneNote for more than a specified period of time (the default period is 10 minutes), OneNote locks protected sections again, and you’ll need to enter your password to open the sections. You can change the default time period, which ranges from one minute to one day (and a couple of other options for passwords), by using the Passwords page in the Options dialog box, shown in Figure 5–27.
-
To lock notebook sections after a specified amount of time, select Lock Password-Protected Sections After I Have Not Worked In Them For The Following Amount Of Time, and then select the amount of time that you want.
-
To lock notebook sections immediately after you’ve finished working in them, select Lock Password-Protected Sections As Soon As I Navigate Away From Them.
-
To make notes in password-protected sections temporarily available to other applications, select Enable Add-In Programs To Access Password-Protected Sections When They Are Unlocked.
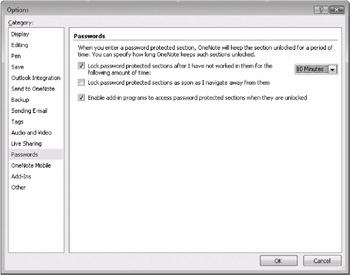
Figure 5–27: Use this page in the Options dialog box to manage how you use passwords in OneNote.
Password-protected sections are not included in notebook searches. To include a protected section in a notebook search, you must unlock the section before you begin to search your notes. Note tags used on the pages within protected sections are not included in the note tag summary unless the sections are first unlocked. Audio and video recordings are stored as separate files in your notebook, and you cannot apply passwords to them.
For more information about using note tags, see “Tagging Types of Notes” on page 103.
Sharing an Existing Notebook
If you have already created a OneNote notebook on your computer and want to give others permission to view and edit it, do the following:
-
In OneNote, close the notebook that you want to share.
-
On the File menu, click Exit to close OneNote.
-
From the Windows Start menu, open Windows Explorer.
-
In your My Documents folder, double-click OneNote Notebooks.
-
Right-click the notebook folder that you want to share, and then click Cut.
-
Using Windows Explorer, open the location where you’ll share the notebook with others, and then paste the notebook in that location.
-
Start OneNote again.
-
On the File menu in OneNote, point to Open, and then click Notebook.
-
In the Open Notebook dialog box, browse to the location to which you moved your notebook, click to select the notebook folder, and then click Open.
You can send an e-mail message to other users to let them know where they can find the shared notebook. To send the message, on the Share menu, click Send Shared Notebook Link To Others.
As you’ve read in this chapter, a OneNote notebook can act as a repository for a wide range of information-both formal records, such as meeting transcripts, and brainstorming efforts of individuals and groups. Sharing a OneNote notebook on a SharePoint site provides a way to make this information part of a company’s content repository. For example, when a notebook is stored on a SharePoint site, it is protected under the security policy for the site. The content of the notebook also becomes searchable as part of the content repository, making content such as images and audio and video recordings available to an organization.
Sharing a Notebook in a Live Session
Another sharing option in OneNote 2007 is a live sharing session, which enables you to share notebook pages with other users in real time. You can also use OneNote to broadcast note sessions to other OneNote users so that you can share your notes without giving others the ability to edit your notes. At the end of a shared session, each user retains a copy of the shared notes as part of his or her notebook, so there is no need to keep a record of what was discussed.
| Note | Password-protected sections cannot be accessed by others during a live sharing session, even if the section is unlocked during the session. To include a protected section in a live sharing session, you must first remove the section’s password protection and then start or join the live sharing session. |
A live sharing session makes use of peer-to-peer connections-no server infrastructure is required. These sessions are also easy to set up, requiring only a few steps. Here are the steps to follow to initiate a live sharing session:
-
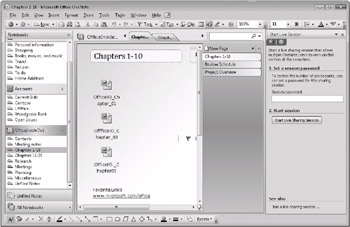
On the Share menu, point to Live Sharing Session, and then click Start Sharing Current Session. You’ll see the Start Live Session task pane, which is shown here:
-
In the task pane, enter a password if you want to control which people can share the session with you.
-
Click Start Live Sharing Session.
-
Click OK in the message box that appears, confirming that you want to go ahead and start a shared session. As OneNote initiates the session, you’ll see the Current Live Session task pane, shown next.
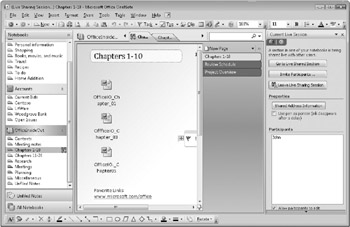
-
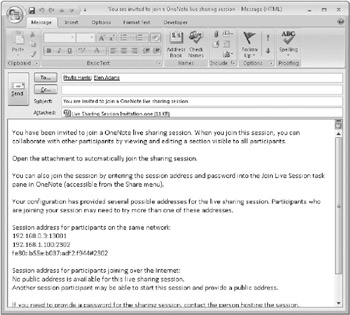
To invite other users to join the session, click Invite Participants. In the e-mail message that appears, add the addresses for the people you want to invite, and then send the message. The body of the message will contain the session address, which will appear something like the one shown here. You can also view the session address by clicking Shared Address Information in the task pane.
-
When you want to close the shared session, click Leave Live Sharing Session.
To join a live sharing session, you need to know the session address, which you’ll receive from the session’s originator through e-mail or otherwise. Once you know the address, you can join a session by pointing to Live Sharing Session on the Share menu and then clicking Join Existing Session. In the Join Live Session task pane, enter the shared session address and a password, if one is required, and then click join Session.
Sharing Notes Using E-Mail
OneNote also lets you share information through e-mail, provided that you are using Outlook 2003 or later. To share information you’ve collected in OneNote in an e-mail message, click the E-Mail button on the toolbar or use the E-Mail command on the File menu. OneNote creates a file that includes copies of the note pages that you select and attaches the file to the message. The information on the page (including graphics) is formatted in HTML and placed in the body of the e-mail message. Recipients of the message are not required to have OneNote installed to read the information.
If a page has linked audio or video files, OneNote also attaches a copy of these to the message, provided you have selected this option. People receiving the e-mail message who have OneNote installed on their computers can double-click the attachment and add that page to their own notebooks in a special section called Recent Opened Sections.
If you are using an older version of Outlook or are using other e-mail programs, you can still send OneNote notes to others by manually attaching the file containing the selected pages to the message. Neither older versions of Outlook nor other e-mail programs convert the notes to HTML for inclusion in the body of the message, but you can still copy and paste your notes into your e-mail program.
| Note | By using the Publish Pages command on the File menu in OneNote, you can create a copy of your OneNote page in a variety of formats, including a single-file Web page, a separate OneNote section, or a Word document. You can post the published file on a file share, Web site, or SharePoint site to share the information with others. |
EAN: 2147483647
Pages: 299