Defining Relationships
After you have defined two or more related tables, you should tell Access 2007 how the tables are related. You do this so that Access 2007 will be able to link all your tables when you need to use them in queries, forms, or reports.
Thus far in this chapter, you have seen how to build the main subject tables of the Contact Tracking database-Companies, Contacts, and Products. Before we define the relationships in this sample database, you need to create a couple of linking tables that define the many-to-many relationships between the Companies and Contacts tables and between the Products and Contacts tables. Table 27–9 shows you the fields you need for the Company Contacts table that forms the “glue” between the Companies and Contacts tables.
| Field Name | Data Type | Description | Field Size |
|---|---|---|---|
| CompanyID | Number | Company/organization | Long Integer |
| ContactID | Number | Person within company | Long Integer |
| Position | Text | Person’s position within the company | 50 |
| DefaultForContact | Yes/No | Is this the default company for this contact? |
Define the combination of CompanyID and ContactID as the primary key for this table by clicking the selection button next to CompanyID and then holding down the Ctrl key and clicking the button next to ContactID. Click the Primary Key button in the Tools group of the Design tab on the Ribbon to define the key and then save the table as CompanyContacts. Table 27–10 shows you the fields you need to define the Contact Products table that creates the link between the Contacts and Products tables.
| Field Name | Data Type | Description | Field Size |
|---|---|---|---|
| CompanyID | Number | Company/organization | Long Integer |
| ContactID | Number | Related contact | Long Integer |
| ProductID | Number | Related product | Long Integer |
| DateSold | Date/Time | Date product sold | |
| SoldPrice | Currency | Price paid |
The primary key of the Contact Products table is the combination of CompanyID, ContactID, and ProductID. You can click on CompanyID to select it and then hold down the Shift key while you click on ProductID (if you defined the fields in sequence) to select all three fields. Click the Primary Key button in the Tools group of the Design tab on the Ribbon to define the key, and then save the table as ContactProducts.
You need one last table, the Contact Events Table, to define all the major tables you’ll need for Contact Tracking. Table 27–11 shows the fields you need. The primary key for this table is the combination of ContactID and ContactDateTime. Note that we took advantage of the fact that a Date/Time data type in Access 2007 can store both a date and a time, so we don’t need the two separate date and time fields. Save this last table as ContactEvents.
| Field Name | Data Type | Description | Field Size |
|---|---|---|---|
| ContactID | Number | Related contact | Long Integer |
| ContactDateTime | Date/Time | Date and time of the contact | |
| ContactNotes | Memo | Description of the contact | |
| ContactFollowUpDate | Date/Time | Follow-up date |
Now you’re ready to start defining relationships. To define relationships, first close any Table windows that are open and then click the Relationships command in the Show/ Hide group of the Database Tools tab on the Ribbon to open the Relationships window. If this is the first time you have defined relationships in this database, Access 2007 opens a blank Relationships window and opens the Show Table dialog box, shown in Figure 27–25.
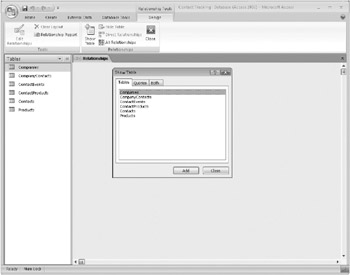
Figure 27–25: Access displays the Show Table dialog box when you open the Relationships window for the first time.
In the Show Table dialog box, select each table and click the Add button in turn. Click Close to dismiss the Show Table dialog box.
Defining Your First Relationship
A company can have several contacts, and any contact can belong to several companies or organizations. This means that companies have a many-to-many relationship with contacts. Defining a many-to-many relationship between two tables requires a linking table. Let’s link the Companies and Contacts tables by defining the first half of the relationship-the one between Companies and the linking table, CompanyContacts. You can see that for the CompanyID primary key in the Companies table, there is a matching CompanyID foreign key in the CompanyContacts table. To create the relationship you need, click in the CompanyID field in the Companies table and drag it to the CompanyID field in the CompanyContacts table, as shown in Figure 27–26.
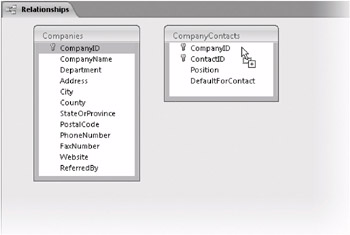
Figure 27–26: Drag the linking field from the “one” table (Companies) to the “many” table (CompanyContacts) to define the relationship between the tables.
You can read about determining the type of relationship between two tables in Article 1 on the companion CD.
When you release the mouse button, Access opens the Edit Relationships dialog box, shown in Figure 27–27.
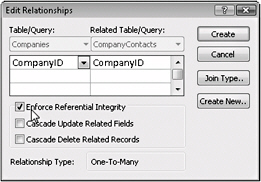
Figure 27–27: The Edit Relationships dialog box lets you specify the linking fields in two tables.
| Inside Out-Creating Relationships from Scratch | You can also click the Edit Relationships command in the Tools group of the Design contextual tab on the Ribbon to create a new relationship, but you have to fill in the table and field names yourself. Dragging and dropping does some of this work for you. |
You’ll notice that Access 2007 has filled in the field names for you. If you need to define a multiple-field relationship between two tables, use the additional blank lines to define those fields. (We’ll do that in just a second.) Because you probably don’t want any rows created in CompanyContacts for a nonexistent company, select the Enforce Referential Integrity check box. When you do this, Access 2007 ensures that you can’t add a row in the CompanyContacts table containing an invalid CompanyID. Also, Access won’t let you delete any records from the Companies table if they have contacts still defined.
Note that after you select the Enforce Referential Integrity check box, Access 2007 makes two additional check boxes available: Cascade Update Related Fields and Cascade Delete Related Records. If you select the Cascade Delete Related Records check box, Access 2007 deletes child rows (the related rows in the many table of a one-to-many relationship) when you delete a parent row (the related row in the one table of a one-to-many relationship). For example, if you removed a company from the table Access 2007 would remove the related company contact rows. In this database design, the CompanyID field has the AutoNumber data type, so it cannot be changed once it is set. However, if you build a table with a primary key that is Text or Number (perhaps a ProductID field that could change at some point in the future), it might be a good idea to select the Cascade Update Related Fields check box. This option requests that Access automatically update any foreign key values in the child table (the many table in a one-to-many relationship) if you change a primary key value in a parent table (the one table in a one-to-many relationship).
You might have noticed that the Show Table dialog box, shown earlier in Figure 27–25, gives you the option to include queries as well as tables. Sometimes you might want to define relationships between tables and queries or between queries so that Access 2007 knows how to join them properly. You can also define what’s known as an outer join by clicking the Join Type button in the Edit Relationships dialog box and selecting an option in the Join Properties dialog box. With an outer join, you can find out, for example, which companies have no contacts or which products haven’t been sold.
| Inside Out-Avoid Defining a Relationship with an Outer Join | We recommend that you do not define an outer join relationship between two tables. Access 2007 automatically links two tables you include in a query design using the relationships you have defined. In the vast majority of cases, you will want to include only the matching rows from both tables. If you define the relationship as an outer join, you will have to change the link between the two tables every time you include them in a query. We also do not recommend that you define relationships between queries or between a table and a query. If you have done a good job of naming your fields in your tables, the query designer will recognize the natural links and define the joins for you automatically. Defining extra relationships adds unnecessary overhead in your database application. |
![]() Click the Create button to finish your relationship definition. Access draws a line between the two tables to indicate the relationship. Notice that when you ask Access to enforce referential integrity, Access displays a 1 at the end of the relationship line, next to the one table, and an infinity symbol next to the many table. If you want to delete the relationship, click the line and press the Delete key.
Click the Create button to finish your relationship definition. Access draws a line between the two tables to indicate the relationship. Notice that when you ask Access to enforce referential integrity, Access displays a 1 at the end of the relationship line, next to the one table, and an infinity symbol next to the many table. If you want to delete the relationship, click the line and press the Delete key.
You now know enough to define the additional one-to-many simple relationships that you need. Go ahead and define a relationship on ContactID between the Contacts and CompanyContacts tables to complete the other side of the many-to-many relationship between companies and contacts, a relationship on ContactID between the Contacts and ContactEvents tables, and a relationship on ProductID between the Products and ContactProducts tables. For each relationship, be sure to select the Enforce Referential Integrity check box.
Creating a Relationship on Multiple Fields
There’s one last relationship you need to define in the Contact Tracking database between the CompanyContacts and ContactProducts tables. The relationship between these two tables requires multiple fields from each table. You can start by dragging the CompanyID field from the CompanyContacts table to the ContactProducts table. Access 2007 opens the Edit Relationships dialog box, shown in Figure 27–28.
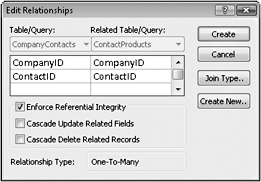
Figure 27–28: Select multiple fields in the Edit Relationships dialog box to define a relationship between two tables using more than one field.
When you first see the Edit Relationships dialog box for the relationship you are defining between CompanyContacts and ContactProducts, Access 2007 shows you only the CompanyID field in the two lists. To complete the relationship definition on the combination of CompanyID and ContactID, you must click in the second line under both tables and select ContactID as the second field for both tables, as shown in Figure 27–28. Select the Enforce Referential Integrity check box as shown and click Create to define the compound relationship.
Figure 27–29 shows the Relationships window for all the main tables in your Contact Tracking database. Notice that there are two linking lines that define the relationship between CompanyContacts and ContactProducts.
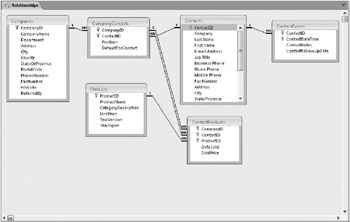
Figure 27–29: The Relationships window shows a graphical representation of all the main tables in your Contact Tracking database.
If you want to edit or change any relationship, double-click the line to open the Edit Relationships dialog box again. If you want to remove a relationship definition, click on the line linking two tables to select the relationship (the line appears highlighted) and press the Delete key. Access 2007 presents a warning dialog box in case you are asking it to delete a relationship in error.
Note that once you define a relationship, you can delete the table or query field lists from the Relationships window without affecting the relationships. To do this, click the table or query list header and press the Delete key. This can be particularly advantageous in large databases that have dozens of tables. You can also display only those tables that you’re working with at the moment. To see the relationships defined for any particular table or query, include it in the Relationships window by using the Show Table dialog box, and then click the Direct Relationships button in the Relationships group of the Design contextual tab on the Ribbon. To redisplay all relationships, click the All Relationships button in the Relationships group.
When you close the Relationships window, Access 2007 asks whether you want to save your layout changes. Click Yes to save the relationships you’ve defined. That’s all there is to it. Later, when you use multiple tables in a query in Chapter 28, “Creating and Working with Simple Queries,” you’ll see that Access 2007 builds the links between tables based on these relationships.
| Inside Out-Additional Features in the Relationships Window | You can right-click any table in the Relationships window and then choose Table Design from the shortcut menu to open that table in Design view. You can also click Relationship Report in the Tools group of the Design contextual tab on the Ribbon to create a report that prints what you laid out in the window. |
EAN: 2147483647
Pages: 299