A Quick Tour and Comparison
Before you learn in more detail about the main elements of the 2007 Microsoft Office system user interface, in this section you’re provided with an orientation to the elements’ names, appearance, and general functions. Figure 2–1 shows the application window for Word 2007, with several of the major elements labeled:
-
For the most part, menus and toolbars have been replaced by the Ribbon, the strip across the top of the user interface that displays commands. In Figure 2–1, notice that more of the commands are labeled, which helps avoid having to move from control to control scanning ScreenTips to find the command you’re looking for.
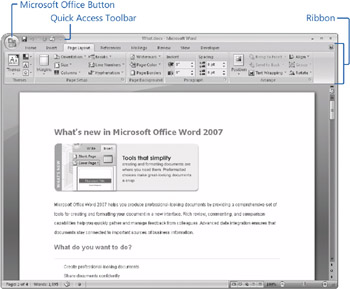
Figure 2–1: Command tabs, the Ribbon, the Quick Access Toolbar, and the Microsoft Office Button are among the new and updated elements of the 2007 Office release user interface. -
The Ribbon is made up of a series of tabs that contain commands, buttons, and galleries. (You’ll learn more about galleries shortly.) When you click a tab, the commands shown on the Ribbon change, with each tab representing a functional area of an application. Figure 2–1, for example, shows the Insert tab in Word 2007. You can use this tab to insert pictures, charts, headers and footers, and the like. Figure 2–2 shows the Slide Show tab in PowerPoint 2007.
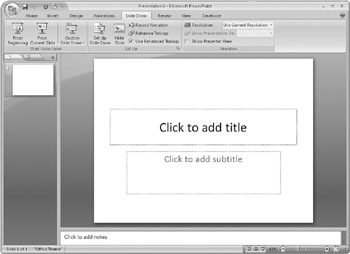
Figure 2–2: Commands on tabs are organized to reflect the main functional areas of a program. -
The Quick Access Toolbar sits in the upper-left corner of the window (you can opt to show it below the Ribbon as well) and displays a set of frequently used commands, such as Save, Undo, and Redo. The commands vary from program to program. Later in the chapter, you’ll learn how to customize the Quick Access Toolbar to include the set of commands of your choice.
-
The Microsoft Office Button reveals a menu that contains the commands you use to work with a document as a whole. It’s essentially the old File menu. In many cases, the menu displays a brief description about menu items when you point to a command. Figure 2–3 shows the Microsoft Office Button menu in Excel 2007.
Note If you find yourself temporarily at sea using the tabs on the Ribbon, the Office online Help includes tables that cross-reference the commands on each tab to the menus on which the commands appeared in previous versions of Microsoft Office. For example, the Options command appeared on the Tools menu in Microsoft Office 2003, but it is now a command on the Office menu.
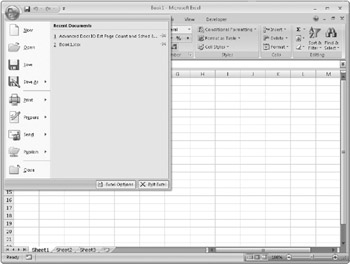
Figure 2–3: The Microsoft Office Button opens a menu of commands that you use to work with a document and its properties.
When you are composing a letter in Word or preparing a presentation in PowerPoint, you’ll most often work with the standard tabs and commands on the Ribbon. You’ll also use contextual tabs in addition to galleries and Live Preview. Examples of these elements are shown in Figure 2–4.
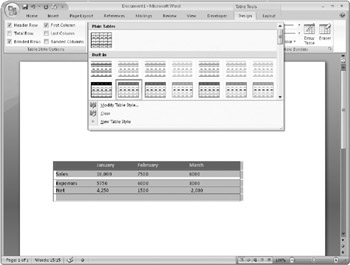
Figure 2–4: Tabs like the Table Tools tab in Word appear in context when you select an object. Many tabs provide galleries of formatting options that you can preview in your document.
-
Contextual tabs appear on the Ribbon when you select an object such as a chart, an image, or a table. These tabs contain commands that relate specifically to the type of object.
-
Galleries are sets of thumbnail graphics that represent a set of formatting options. You’ll see galleries of table styles, backgrounds, and slide layouts, for example.
-
Live Preview (which isn’t easy to show in a static illustration) is a feature that works together with the styles in a gallery to let you preview the results of formatting choices. To acquaint yourself with Live Preview (and see an example of a gallery as well), create a simple worksheet in Excel. Click the Page Layout tab on the Ribbon, and then click Themes. Move your mouse over the items in the gallery, and watch how the formatting is dynamically updated in the worksheet.
The Ribbon, galleries, and Live Preview introduce fairly dramatic changes, not only with respect to the appearance of the Microsoft Office system user interface, but also in the ways people work with the programs. You’ll see a few examples of this later in this chapter and many more examples throughout the rest of this book.
Two elements of the Microsoft Office user interface that many users are familiar with- the status bar and ScreenTips-have been updated as well, with the goals of providing better access to information and assistance with, and more control over, how you view the file you’re working with.
-
The status bar includes more controls and information, including a Zoom slider that you can use to adjust the magnification of a document. The change in magnification occurs as you move the slider, so you can pick the level you need to view the entire document or just an important section. The status bar also includes buttons for changing how you view your document-from Print Layout to Draft in Word, for example, or from Normal to Slide Show in PowerPoint. These controls appear at the right end of the status bar.
You can right-click the status bar to reveal the Customize Status Bar menu that lists all the items of information that you can check on the status bar. In Excel 2007, for example, you can select options to show the sum, average, and count of the cells you’ve selected on a worksheet. You can remove the Zoom slider and the view shortcuts, and you can also see information such as whether a document’s permissions have been restricted or whether the Caps Lock key is on.
-
ScreenTips still appear when you move the pointer over a command; however, they now provide not only the name of the command, but also a brief description of the command’s function. Many also contain a link to topics about the command in the Office online Help. Figure 2–5 shows an example of a new and improved ScreenTip.
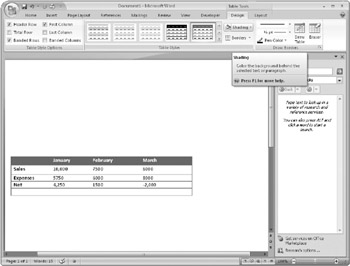
Figure 2–5: ScreenTips provide more details about what a command can do. You can press F1 when you’re viewing a ScreenTip to open a Help topic about the command.
To reinforce what’s new in the 2007 Office system user interface, Table 2–1 summarizes the elements introduced in this section (as well as a few more) and compares them to the corresponding features in Microsoft Office 2003.
| User Interface Elements in the 2007 Office Release | Corresponding Office 2003 User Interface Element |
|---|---|
| The Ribbon replaces menus and toolbars. The Ribbon is organized into tabs that represent the main functional areas of a program. When you select an object, such as a table or chart, contextual tabs appear on the Ribbon and provide commands relevant for the object. | Menus and toolbars |
| Most of the task panes you worked with in Office 2003 are replaced by groups of controls in the Ribbon. The few task panes that remain provide additional content to users. In the 2007 Office release, each task pane is its own separate pane. You can display multiple task panes, and you can arrange the position of each independently. | Task panes |
| Dialog boxes occur in the 2007 Office release, but they are not the main way of working with a program. The settings that users selected in dialog boxes, in many cases, are now assembled in gallery items so that users can see these options and choose the results they want. Dialog boxes can be opened from galleries or from the Ribbon for users who want to use them or when more advanced options are required. | Dialog boxes |
| Context (or shortcut) menus are still available in the 2007 Office release. Shortcut menus can, like the Ribbon, display galleries to make formatting more efficient. | Context menus |
| There is no change to keyboard shortcuts that use the Ctrl key in combination with another key, such as Ctrl+S for Save and Ctrl+B for Bold, or a single function key, such as F12 for Save As. The same shortcuts exist and continue to work as they did in Office 2003. | Office 2003 keyboard shortcuts |
| The 2007 Office release also includes a keyboard shortcut system for the Ribbon using the Alt key. Shortcut keys are displayed on Ribbon controls and tabs. You can also use the Alt key sequences from Office 2003. These work only for features that were in Office 2003; features of the 2007 Office release use only the new keyboard shortcuts. | Office 2003 keyboard shortcuts |
| In addition to displaying the task status, the status bar in the 2007 Office release displays information such as security warnings. Users can customize the status bar to show additional information about their document. | Status bar |
Let’s start looking in more detail at the underlying concepts and how you can use and customize the 2007 Office release user interface. We’ll start with the Ribbon and command tabs.
| Note | Despite the changes in the appearance and organization of the Microsoft Office user interface, the mechanics of working with your computer are largely unchanged. You still use the mouse, the keyboard, a pen, or some other input device to perform the actions you need to take. |
EAN: 2147483647
Pages: 299