| Text-to-speech builds on Director's keyboard navigation capability to make your Director movies accessible to people with visual impairments. Each time the user presses the Tab key to highlight an object on the Stage, Director uses a synthesized voice to speak the text associated with that object. The text may be anything from a short label to a long description. While keyboard navigation by itself is generally used only for sprites that the user would ordinarily need to click onthat is, buttons or editable text fieldskeyboard navigation in conjunction with text-to-speech can be used to present the entire contents of a movie aurally. Therefore, when using text-to-speech, you may want to implement keyboard navigation for sprites that the user wouldn't ordinarily click onsuch as pictures and noneditable text sprites so that the user can navigate to each item in turn and hear a spoken description ( Figure 20.18 ). Figure 20.18. Since a visually impaired user can't see the title or the picture in this scene, you might want to make these elements navigable from the keyboard so that the user can hear a spoken description of each. 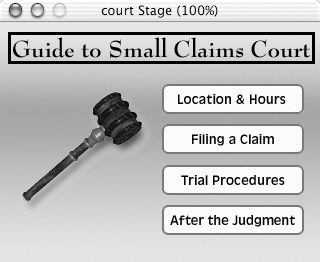 Director uses the Speech Xtra to implement text-to-speech. (For information on Xtras, see Chapter 19, "Using Xtras.") This Xtra isn't installed with the Shockwave Player, but the player automatically downloads the Xtra from Macromedia's server the first time it plays a movie that includes text-to-speech behaviors. If you distribute a movie as a projector file, you must manually add the Speech Xtra to the movie before you create the projector. To do so, see "To add the Speech Xtra to a movie," later in this section. Unlike Flash MXwhich requires a third-party, Windows-only screen-reading program to implement its text-to-speech featureDirector MX has no requirements for text-to-speech other than that the speech component of the operating system be properly installed. Every Mac operating system since OS 7 includes speech capability. Windows 2000 and Windows XP also come with built-in speech capability. Users with earlier versions of Windows must manually install the speech component, which can be downloaded from the Microsoft Agents page of Microsoft's Web site at www.microsoft.com/msagent/ . (If your movie depends on text-to-speech, it's a good idea to include a Lingo script that tests for the presence of the necessary operating-system software. See "To test for text-to-speech system support," below.) To test for text-to-speech system support: -
Include a Lingo script that uses the voiceInitialize() function. This function returns 1 if the computer is equipped for text-to-speech and if it isn't. For example, you might write a movie script that includes the following handler. (For information on movie scripts, see "To write a movie script" in Chapter 15.) on startMovie if voiceInitialize() = 0 then go to frame X end if end (The X in frame X should be replaced by the frame number of your choice.) This handler checks for the necessary text-to-speech system software when the movie starts. If the software is not present, the playhead jumps to another section of the Scoreperhaps containing an alternate version of the movie that doesn't use text-to-speech, or perhaps containing a sound file advising the user to download the software. If the text-to-speech software is present, the handler does nothing, and the movie plays normally from frame 1. To give a movie text-to-speech capability: -
Open a movie in which keyboard navigation has been implemented. (See "About Keyboard Navigation," earlier in this chapter.) -
If necessary, follow steps 21 through 29 of "To add keyboard navigation to a Director movie" to make additional spritessuch as images, text, or Flash moviesaccessible from the keyboard. -
Choose Window > Library Palette to open the Library palette. -
Choose Accessibility from the Library List pop-up menu. The list of accessibility behaviors appears. -
Drag the Accessibility Speak behavior from the Library palette to the Stage, and drop it on a sprite that requires only a few words or less of spoken text. (Sprites that require larger amounts of text will be dealt with later.) The sprite must already have the Accessibility Item behavior and the Accessibility Group Order behavior applied to it (from when you added keyboard navigation). When you drop the behavior on the sprite, a Parameters dialog box appears ( Figure 20.19 ). Figure 20.19. Parameters for the Accessibility Speak behavior, which is used to implement spoken text of a few words or less. (Director automatically inserts "Hello!" as the default text.)  -
From the "Which Accessibility Group does this belong to?" pop-up menu, choose the name of the sprite's accessibility group. (In most cases, there will be only one name on the menu.) -
In the "Text to speak?" field, type the text that you want to be spoken when the sprite is highlighted ( Figure 20.20 ). Figure 20.20. Enter a few words of text that you want Director to speak.  -
Click OK to close the dialog box. -
Repeat steps 5 through 8 for each sprite that requires only a small amount of spoken text. -
If the movie contains a sprite that requires more than a few words of spoken text, do the following: -
Choose Window > Text to open the Text window. -
Click the New Cast Member button in the Text window. -
Type the text that you want to be spoken when the sprite is highlighted ( Figure 20.21 ). (The font, size , and other attributes don't matter.) Figure 20.21. When you create a spoken-text cast member, you can include as much text as you like. 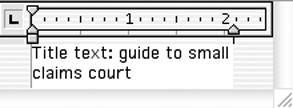 -
(optional) Select the newly created text cast member in the Cast window and give it a name. (See "To name a cast member" in Chapter 2.) -
Drag the Accessibility Speak Member Text behavior from the Library palette to the Stage, and drop it on the sprite for which you prepared the text in step 10. The sprite must already have the Accessibility Item behavior and the Accessibility Group Order behavior applied to it (from when you added keyboard navigation). When you drop the behavior on the sprite, a Parameters dialog box appears ( Figure 20.22 ). Figure 20.22. Parameters for the Accessibility Speak Member Text behavior, which allows you to associate a spoken-text cast member with a keyboard-navigable sprite. 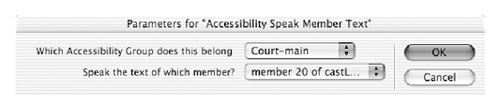 -
From the "Which Accessibility Group does this belong to?" pop-up menu, choose the name of the sprite's accessibility group. (In most cases, there will be only one name on the menu.) -
From the "Speak the text of which member?" pop-up menu, choose the name or number of the text cast member you created in step 10 ( Figure 20.23 ). Figure 20.23. The pop-up menu lists all text cast members that are in the movie's Cast. Choose the one that you want Director to speak. 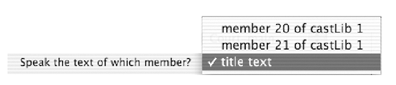 -
Click OK to close the dialog box. -
Repeat steps 10 through 14 for each sprite that requires more than a few words of spoken text. -
Click on the Stage to make it the active window. -
Test the movie. As you press the Tab key to move from sprite to sprite, the computer speaks the text associated with each sprite.  Tip Tip
To create an on/off switch for text-to-speech: -
Create a cast member (bitmapped, vector, Flash, or whatever you like) that will be used as a button to turn text-to-speech on and off. or Create two cast membersone to serve as a Speech On button and the other to serve as a Speech Off button. -
In an empty channel of the Score, click the frame where you want the button(s) to appear ( Figure 20.24 ). Figure 20.24. Click the frame where you want the on/off switch to make its first appearance on the Stage. 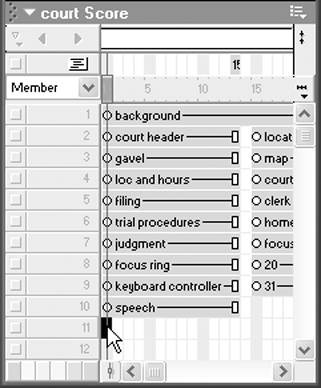 -
Drag the cast member(s) to the Stage to create a sprite or sprites ( Figure 20.25 ). Figure 20.25. This bitmapped sprite will be used as an on/off switch for text-to-speech. 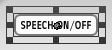 -
In the Score, drag the endpoint(s) of the sprite(s) to the frame where you want the button(s) to disappear. -
Choose Window > Library Palette to open the Library palette. -
Choose Accessibility from the Library List pop-up menu. The list of accessibility behaviors appears. -
Follow steps 21 through 29 of "To add keyboard navigation to a Director movie" to implement keyboard navigation for the new sprite(s). Add them to the same accessibility group that the other buttons on the Stage belong to. -
Follow steps 5 through 9 of "To give a movie text-to-speech capability" to add spoken text to the sprite(s). -
Drag the Accessibility Speak Enable Disable behavior from the Library palette to the Stage, and drop it on the sprite (or on the first of the two sprites). A Parameters dialog box appears ( Figure 20.26 ). Figure 20.26. Parameters for the Accessibility Speak Enable Disable behavior, which allows you to create an on/off switch for text-to-speech. 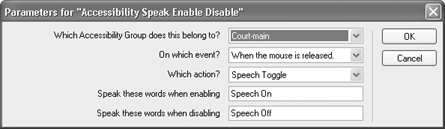 -
From the "Which Accessibility Group does this belong to?" pop-up menu, choose the name of the sprite's accessibility group. (In most cases, there will be only one name on the menu.) -
From the "On which event?" pop-up menu, choose the event that you want to trigger the enabling or disabling of text-to-speech ( Figure 20.27 ). Figure 20.27. The "When the mouse is released" event is most appropriate for use with an on/off switch. 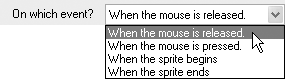 Choose "When the mouse is released" if you want to follow standard user-interface conventions. -
From the "Which action?" pop-up menu, choose the action that you want the button to accomplish ( Figure 20.28 ). Figure 20.28. Choose an event from the "Which action?" menu to determine what the button does when it's clicked. 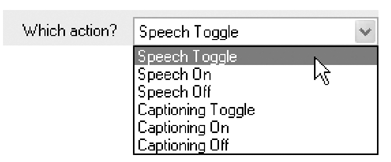 If you're using only one sprite for the switch, choose Speech Toggle. If you're using two sprites, choose Speech On. -
In the "Speak these words when enabling" and "Speak these words when disabling" fields, type the words that you want spoken to let the user know that text-to-speech is being turned on or off. If you don't want any words to be spoken, delete the default "Speech On" and "Speech Off" ( Figure 20.29 ). Figure 20.29. By default, Director inserts the words "Speech On" and "Speech Off" in these fields. 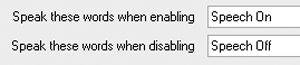 -
Click OK to close the dialog box. -
If you're using two sprites for the switch, repeat steps 9 through 14 for the second sprite, but choose Speech Off in step 12. -
Test the movie. To add the Speech Xtra to a movie: -
Open a movie that uses text-to-speech. -
Choose Modify > Movie > Xtras. The Movie Xtras dialog box opens ( Figure 20.30 ). Figure 20.30. The Movie Xtras dialog box lists the Xtras that are currently included in a movie. 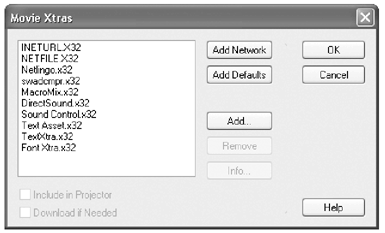 -
Click Add. The Add Xtras dialog box opens ( Figure 20.31 ). Figure 20.31. The Xtras on this list are available for inclusion in a movie. Select the Speech Xtra. 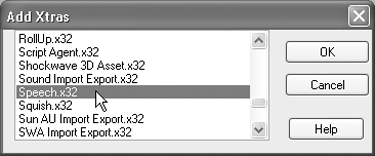 -
Select Speech.x32 (Windows) or Speech (Mac). -
Click OK to close the Add Xtras dialog box. -
Click OK to close the Movie Xtras dialog box. If you make a projector file from this movie, the Speech Xtra will now be included in the file. (For more information, see Chapter 16, "Creating a Projector.") |