| Lingo scripts are written in Script windows . Unfortunatelythe Script window being one of the less intuitive aspects of Director how you open the Script window makes a difference. For example, if you double-click a frame in the script channel of the Score, you'll get a window that allows you to write a behavior script; but if instead you choose Window > Script, you'll get a window that allows you to write a movie script! Be sure to check the title bar of each Script window you open ; it will tell you which type of script you're creating ( Figure 15.8 ). Figure 15.8. The title bar of a Script window indicates the type of script that the window will create. 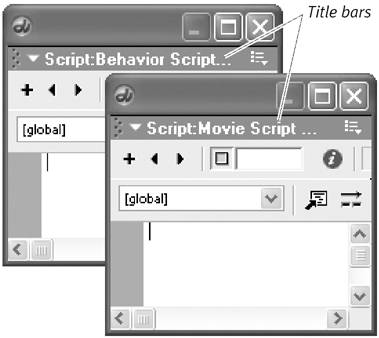 As you write a script, Director "looks over your shoulder" to make sure it understands what you're writing. Each time you start a new line, Director parses and color -codes the previous line. (For example, keywords such as on and end appear in blue; names of events appear in green.) Director also indents commands within handlers (and certain other lines as well) for readability. If these features bother you, you can turn them off by choosing Edit > Preferences > Script (Windows) or Director > Preferences > Script (Mac) and deselecting Auto Coloring and Auto Format. It's a good idea to leave them on, however, because they provide useful feedback: If Director fails to color-code your script properly, or if all the lines of the script appear flush against the left margin, you know you've made a scripting error ( Figure 15.9 ). Figure 15.9. If all the lines of your script appear flush against the left margin, you know you've made an error. (In this case, the word on is missing from the first line).  Lingo isn't case-sensitive, so you don't necessarily have to adhere to the conventions you'll see in the sample scripts (for example, marking conjoined words by means of capital letters , as with the uppercase U in the middle of mouseUp ). But if you plan to exchange your Director files with other developers, you should get accustomed to using this style of capitalization so your scripts will be easily understood . When you finish writing a script, you must close the Script window. Doing so allows Director to compile the scriptthat is, to convert it into a format that it can use internally. If Director encounters an error when it tries to compile the script, it informs you of the error in an alert box ( Figure 15.10 ). Click the Script button to reopen the Script window and correct the error. Figure 15.10. If Director finds an error in your script, it displays an alert box like this one when you close the Script window.  To write a behavior script attached to a frame: -
In the script channel of the Score, select the frame to which you want to attach a script ( Figure 15.11 ). Figure 15.11. In the script channel of the Score, select the frame to which you want to attach a script. (In this example, frame 5 is selected.)  -
Open a Script window by doing one of the following: -
Double-click the selected frame. or -
On the Sprite toolbar, choose New Behavior from the Behaviors pop-up menu ( Figure 15.12 ). Figure 15.12. Choose New Behavior from the Behaviors pop-up menu on the Sprite toolbar.  (If the Sprite toolbar isn't visible, you can open it by choosing View > Sprite Toolbar while the Score is the active window.) A Script window opens, displaying the first and last lines of a handler ( Figure 15.13 ). Figure 15.13. When you open the Script window for a behavior script attached to a frame, these two lines appear by default.  -
(optional) If you want to change the first line of the handler from on exitFrame (which Director inserted automatically) to something else (such as on enterFrame ), do so. The word me at the end of the first line is required only by certain handlers that use an advanced form of scripting. In most cases, you can leave it or delete it without making any difference in the way the script will execute. -
Type one or more Lingo commands to form the body of the handler ( Figure 15.14 ). Figure 15.14. Type the body of the handler. (In this example, the go to command is used to make the playhead jump back to frame 1. You'll learn more about this command in the next section.)  Make sure that end (which Director inserted automatically) remains the last line. -
Close the Script window. The finished, compiled script is now attached to the selected frame. (It's also available in the Cast window to be dragged to other frames if you wish.) -
Rewind and test the movie. When the playhead reaches the frame to which the script is attached, Director executes the script. To write a behavior script attached to a sprite: -
Select a sprite in the Score or on the Stage ( Figure 15.15 ). Figure 15.15. Select the sprite to which you want to attach a script.  -
Choose New Behavior from the Behaviors pop-up menu on the Sprite toolbar. (If the Sprite toolbar isn't visible, you can open it by choosing View > Sprite Toolbar while the Score is the active window.) A Script window opens, displaying the first and last lines of a handler ( Figure 15.16 ). Figure 15.16. When you open the Script window for a behavior script you're attaching to a sprite, these two lines appear by default.  -
(optional) If you want to change the first line of the script from on mouseUp (which Director inserted automatically) to something else (such as on mouseDown ), do so. The word me at the end of the first line is required only by certain handlers that use an advanced form of scripting. In most cases, you can leave it or delete it without making any difference in the way the script will execute. -
Type one or more Lingo commands to form the body of the handler ( Figure 15.17 ). Figure 15.17. Type the body of the handler. (In this example, the locH property is used to make the sprite move to the right. For more about sprite properties, see "Understanding Lingo Elements," later in this chapter.)  Make sure that end (which Director inserted automatically) remains the last line. -
Close the Script window. The finished, compiled script is now attached to the selected sprite. (It's also available in the Cast window to be dragged to other sprites if you wish.) -
Rewind and test the movie ( Figure 15.18 ). Figure 15.18. Each time you click this sprite, it moves 10 pixels to the right, thanks to the attached Lingo script.  To write a behavior script that you can later attach to a sprite or frame: -
Choose Window > Behavior Inspector to open the Behavior Inspector. -
In the Behavior Inspector, choose New Behavior from the Behavior Popup menu ( Figure 15.19 ). Figure 15.19. Choose New Behavior from the Behavior pop-up menu in the Behavior Inspector.  The Name Behavior dialog box opens. -
Type a name for the behavior and click OK. The dialog box closes . The name of the new behavior is displayed in the upper pane of the Behavior Inspector. -
Click the Script Window button in the Behavior Inspector ( Figure 15.20 ). Figure 15.20. Click the Script Window button to open a behavior Script window.  An empty Script window opens. (Since Director doesn't know whether this script will be attached to a frame or a sprite, it doesn't provide the first and last lines of a handler). -
Type a script consisting of one or more handlers ( Figure 15.21 ). Figure 15.21. Type a script. (In this example, attaching this script to a sprite will cause an alert box saying "uh-oh!" to appear when the sprite is clicked.)  -
Close the Script window. The finished, compiled script is now available in the Cast window to be dragged to a frame or a sprite.  Tips Tips -
Another way to attach a behavior to a sprite is to select the sprite in the Score and choose the desired behavior from the Behaviors pop-up menu in the Sprite toolbar ( Figure 15.22 ). You can repeat this procedure as often as you wish in order to attach multiple behaviors. Figure 15.22. You can attach a behavior to a sprite by selecting the sprite and then choosing the behavior from the Behaviors pop-up menu in the Sprite toolbar.  -
To remove all behaviors attached to a sprite or frame, change the order of behaviors attached to a sprite, or do other sorts of "behavior housekeeping," see the tasks under "Modifying Assigned Behaviors" in Chapter 14.
To write a cast-member script: -
Select a cast member in the Cast window. -
Click the Cast Member Script button ( Figure 15.23 ). Figure 15.23. Select the cast member to which you want to attach a script (in this case, the musical notes), then click the Cast Member Script button.  A Script window opens, displaying the first and last lines of a handler (identical to those for a sprite behavior script). -
(optional) If you want to change the first line of the script from on mouseUp (which Director inserted automatically) to something else (such as on mouseDown ), do so. -
Type one or more Lingo commands to form the body of the handler ( Figure 15.24 ). Figure 15.24. Type the body of the handler. (The script in this example will cause all sprites based on this cast member to beep when they're clicked.)  -
Close the Script window. The compiled script is attached to the cast member, but does not become a cast member itself. -
Create a sprite by dragging the cast member to the Stage or Score. -
Rewind and test the movie. To write a movie script: -
Select an empty position in the Cast window. -
Choose Window > Script. An empty Script window opens. -
Type a script consisting of one or more handlers ( Figure 15.25 ). Figure 15.25. Type a script in the Movie Script window. (The script in this example will set the background color of the Stage to black when the movie begins to play.)  -
Close the Script window. The finished, compiled script becomes a cast member. -
Rewind and test the movie. To change a behavior script to a movie script (or vice versa): -
In the Cast window, select the script whose type you want to change. -
Click the Script tab in the Property Inspector. -
From the Type pop-up menu in the Property Inspector, choose the type of script you want ( Figure 15.26 ). Figure 15.26. Choose a script type from the Type menu on the Script tab of the Property Inspector.  The script's icon changes in the Cast window. Tip -
This technique is useful if you create the wrong type of script by mistake; but remember that certain handlers only work in certain types of scripts. For example, if a movie script starts with on startMovie , it won't work if you change it to a behavior script.
To edit an existing script: -
In the Cast window, select the script you want to edit. or If the script you want to edit is a cast-member script, select the cast member to which it's attached. -
Click the Cast Member Script button in the Cast window. The script opens in a Script window appropriate to the type of script. -
Edit the script. -
Close the Script window. Tips -
Double-clicking a movie-script cast member opens the script in a Script window, as you would expect. But double-clicking a behavior script opens it in the Behavior Inspector. From there, you can access the script by clicking the Script Window button. -
Editing a behavior script affects the behavior of all sprites and frames to which it is attached.
Understanding Lingo Elements Now that you have a basic idea of how Lingo scripts are structured, you're probably curious about the Lingo language itself. Like any other language, Lingo is made up of words and symbols that play certain roles. These words and symbols are known as the elements of Lingo. All Lingo elements are defined and explained in Director's Lingo Dictionary, which you can open by choosing Help > Lingo Dictionary. To get you started, here is a list of the types of elements you'll find in Lingo: -
Commands instruct your movie to do something. Here are some examples: beep produces a beep, go to moves the playback head to a specified frame, and updateStage makes Director redraw the Stage immediately instead of waiting for a new frame. -
Functions return a value. The time function, for example, tells you the current time that's set in the computer. -
Keywords are ordinary English words that have a special meaning in Lingo. Examples include on and the . Keywords are "reserved," meaning that they can't be used for other purposes (such as handler names or variable names). -
Constants are elements whose values never change. TRUE and FALSE are constants that always have the values 1 and , respectively. -
Operators are terms that compare, combine, or change values. Examples include + , > , and - . -
Properties are the attributes of an object. locH , for example, is a property of a sprite, indicating its horizontal position on the Stage. You can refer to a property in either of two ways: using dot syntax, as in sprite(1).locH ; or using verbose syntax, as in the locH of sprite 1 . (For more information about these two syntaxes, see the sidebar, "Flash Talk: Lingo vs. ActionScript.") -
Variables are storage containers to which you assign a name and a value. Typing a = 0 in your script, for example, creates a variable named a and assigns the value to it. -
Expressions are parts of Lingo statements that generate values, such as (3 * 5) + 10 . To insert Lingo elements into a script without having to type them: -
Open a Script window. -
Click the script at the place where you want to insert a Lingo element. -
Click one of the Lingo pop-up menus at the top of the Script window ( Figure 15.27 ). The available menus are: Figure 15.27. These Lingo menus are on the toolbar at the top of the Script window.  -
Alphabetical Lingo , which lists Lingo elements (other than those pertaining to 3D) alphabetically . -
Categorized Lingo , which lists Lingo elements (other than those pertaining to 3D) by the type of task they are used to accomplish. -
Alphabetical 3D Lingo , which lists 3D Lingo elements alphabetically. -
Categorized 3D Lingo , which lists 3D Lingo elements by task. -
Scripting Xtras , which lists elements that are not part of standard Lingo but have been added to Lingo by means of specialized plug-ins. (See Chapter 19, "Using Xtras," for more information.) -
Navigate to the desired submenu and choose the Lingo element you want ( Figure 15.28 ). Figure 15.28. Navigate to the desired submenu and choose the Lingo element you want. (The menu shown here is Alphabetical Lingo.) 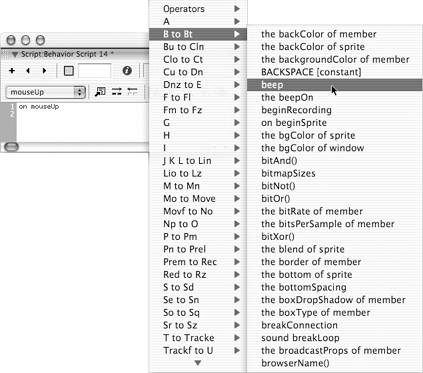 The selected element appears at the insertion point in the script. Flash Talk: Lingo vs. ActionScript When Lingo was first developed, it was meant to be as easy as possible for beginners to learn. Therefore, it closely resembled other beginners ' programming languages that were in use at the time, such as BASIC and HyperTalk. It consisted of a series of statements written in a simplified version of plain English, with each new statement beginning on a new line. Now, a dozen or so years later, the environment has changed. BASIC is rarely used, and hardly anyone has even heard of HyperTalk. Most people's initial experiences with scripting come from adding JavaScript to their Web pages. Not surprisingly, then, when Macromedia developed the ActionScript language for Flash, the company modeled it closely on JavaScript. For people accustomed to JavaScript and ActionScript, the plain-English syntax of Lingo (which was supposed to be friendly and familiar) may seem hard to grasp. Macromedia has developed an alternative syntax for Lingo based on the syntax used for JavaScript and ActionScript. The newer syntax is called dot syntax; the older is called verbose syntax. As an example of how they compare, here's a command that turns on the highlight (the check, X , or dot) in the middle of a check box or radio button: Verbose syntax set the hilite of member "myButton" to TRUE Dot syntax member("myButton").hilite = TRUE Both syntaxes continue to work in Lingo; you can choose the one you feel more comfortable with (or even mix and match them in a single script). If you choose to use the ActionScript-style dot syntax, you must still remember that the structure of the two languages is fundamentally different. In Lingo, line breaks are important: Director executes scripts line by line. In ActionScript, line breaks don't matter at all: The ends of commands are indicated by semicolons, and within those commands, the priority of tasks is indicated by the depth to which they're nested in a series of curly braces ( Figure 15.29 ). An entire ActionScript script could theoretically be written on a single line; this is emphatically not true of Lingo. Figure 15.29. The same script as it would be written in Lingo (left) and in ActionScript (right).  | |