| In addition to using AutoFill to quickly enter the month and weekday names and abbreviations, Excel can fill in any list of values. You can create a new, customized list with values that you often use. For example, you can create a custom list for the employees in your department or for products you sell. After you have shown Excel the new list, any time you type the first value and drag that cell 's fill handle in any direction, Excel fills the remaining cells with your list. To Do: Create a Custom List To add your own custom list to Excel's repertoire of lists, perform these steps: -
Select Tools, Options. -
Click the Custom Lists tab to display the current AutoFill lists in effect. -
Click the Add button. -
Type the list of values for AutoFill. Excel, in effect, learns your fill values. If you have nine departments, you might enter something similar to Dept 1, Dept 2, Dept 3, Dept 4, Dept 5, Dept 6, Dept 7, Dept 8, and Dept 9. Press Enter after each value. Your screen should resemble Figure 8.6. Figure 8.6. Teach Excel new Custom list entries. 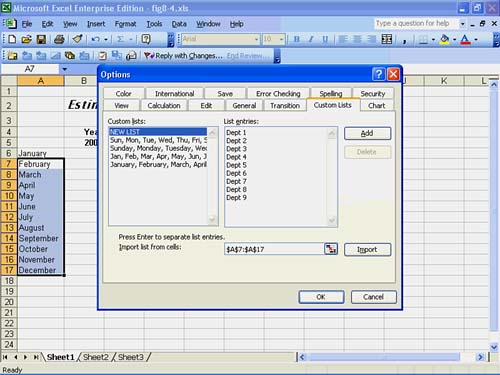 -
Click OK to add your list to AutoFill's current list. The next time you type the label Dept 1 in a cell and drag the fill handle to the right or down the worksheet, Excel fills in the remaining departments. If you fill only four cells, Excel uses the first four values. If you fill nine or more cells, Excel fills all nine departments and starts repeating the department names for any number over nine. If you enter a series in a worksheet and then decide that the series would make a great AutoFill list (in case you want to add the list to another worksheet), Excel doesn't make you re-enter the list. Just select the entire list by dragging the mouse pointer through the list. When you open the Custom Lists tab in the Options dialog box, click Import to add the selected range to the AutoFill entries. To Do: Enter Large Amounts of Series Data AutoFill is fine for a typical range of titles and for a series of a dozen or fewer entries, but some data series include numerous entries. When you want to enter a larger number of values in a series, perform these steps: -
Type the first value of the series in the first cell. -
Select the cell and all subsequent cells that will receive the rest of the series. -
Select Edit, Fill, Series to display the Series dialog box. -
Select Rows if you have selected cells from a row or Columns if you have selected cells from a column. -
Select the type of series you are entering. (Table 8.1 describes each of the four types from which you can choose.) -
Select the subtype. If the Type is Date, select a Date unit. If the series is a series of months, for example, check Month. -
Enter the Step value, which describes how each value in the series increases or decreases. -
Enter the Stop value if necessary. (You rarely need to enter one.) If you want to enter a series that increases every three months, for example, you check the Month option, and type 3 for the Step value, Excel will know the final month and you won't need to enter it. Although you won't need to indicate to Excel where to stop in most instances, a Stop value is useful if you check the Trend option in the Series dialog box. Excel starts with your initial selected value (if numeric) and estimates the values between that starting value and the Stop value that you supply. -
Click OK to create and enter the series of values. Table 8.1. Types of Series | Series Name | If You Type | Excel Can Complete with | | Linear | | 1, 2, 3, 4, 5 | | | 50, 0, 50, 100 | 150, 200, 250 | | Growth | 2, 4 | 8, 16, 32, 64 | | | 10, 100 | 1000, 10000 | | Date | 1-Jan, 1-Apr | 1-Jul, 1-Oct, 1-Jan | | AutoFill | Acctg-101, Acctg-102 | Acctg-103, Acctg-104 | | | Year '03 | Year '04, Year '05 | |