| Outlook's Mail view displays the following folders: -
Inbox Holds incoming email messages. -
Sent Items Displays mail messages you have sent to others. -
Outbox Holds messages that are queued to be sent. -
Deleted Items Keeps items, including email messages, that you have deleted but not removed from Outlook. Select Tools, Empty Deleted Items Folder to empty the Deleted Items folder. In addition to these standard folders, you'll find others. The other folders are what you or someone else created before, either in Office 2003 or a previous Office version that you updated. Outlook also creates and manages some system folders, such as an Archive folder where you can send older data that you no longer need to keep in the forefront but which you might need some day in the future. (Your other option is to delete Outlook data for good.) Organizing Messages You can leave all incoming messages that you don't delete inside your Inbox. However, you can organize your email by creating folders for different purposes and then moving email messages (related to those folders) there. For example, you might want to store business- related messages in one folder named Business, and email for your family in one folder named Family. Outlook manages email from multiple email accounts. The ability to separate messages into various folders comes in handy when you have two or more email accounts. As messages come into the Inbox, you can move those messages to a folder for that email account if you want to save them. Outlook supports a rules wizard that will even analyze your email and automatically place email messages in appropriate folders. Outlook's Hotmail Connection Outlook 2003 can integrate fully with Microsoft's free, online email account named Hotmail , located at http://www.hotmail.com. You can send and retrieve Hotmail account email messages from any Web browser in the world. Therefore, you don't need your Outlook to get your messages while traveling. Outlook supports Hotmail accounts so that, when on your own computer, you can use Outlook to send and receive Hotmail email. Therefore, you get the benefits of working in Outlook when in town, but you still get email when you're away. When you sign up for Hotmail, you can register for a Microsoft Passport account, which is a service that enables you to log into different Web sites automatically but safely and securely. With a Passport account, you can take advantage of Hotmail's Messenger chat service to talk with other Messenger users around the world. Messenger supports both typed and voice messages for Windows XP users (as long as both users have microphones and speakers headsets work the best), so you can talk free to anyone in the world. To activate Messenger once you've registered as a Messenger user , select Tools, Options, Other, and check the Instant Messaging option. | If the target folder appears in your Mail folders area, you can drag any message to that folder. You can right-click any message, select Move to Folder, and select any folder to which to move that message even if that folder is not listed on the Mail area's currently displayed folders. To remove a message, just move the message to your Deleted Items folder. You can also click to select a message and press Delete or click the Delete button on the toolbar. If you change your mind about getting rid of a message stored in your Deleted Items folder, you can move that message from the Deleted Items folder to a different folder. Only when you delete a message from within the Deleted Items folder is that message completely deleted.  | When you remove an item from the Deleted Items folder, Outlook does not send the item to the Windows Recycle Bin; Outlook deletes the item completely from your system. |
To Do: Set Up an Email Account When you first install Outlook on a computer that hasn't had a previous version used for email, you will need to set up an email account so that Outlook can send and retrieve messages. Setting up an email account can, in some situations, be difficult to describe and perform because of the differences among the way email services function. Fortunately, most current email providers are following email account standards, and email accounts are more uniform than ever before. In addition, many ISPs ( Internet Service Providers , the companies that provide end-user Internet service such as MSN and AOL) automatically set up your Outlook email account when you set up your computer for Internet access. Nevertheless, if you must install your own email account, you can expect to follow these general guidelines: -
Select Tools, E-mail Accounts. -
Click the option labeled Add a New E-mail Account and click Next . Outlook displays the E-mail Accounts dialog box that requests your email account's server type. -
Select the type of email system your ISP uses. Unless you use a Web-based email system such as Hotmail, most of today's email systems follow the POP3 standard, but you must get the server type from your ISP to be sure. -
On the next dialog box, shown in Figure 15.5, assuming that you selected a POP3 email account in the previous step (POP3 is the most common email in use today, other than the various free email sites such as Hotmail that are HTTP based), you specify the most important parameters of your email account. Specify the name that you want to appear as the recipient in messages that you send. Enter your email address as well. You will need to obtain the POP3 and SMTP information from your ISP. Finally, if your email account requires that you specify a name and password, you have to enter that information as well. The information in this dialog box is generally supplied by your ISP, so contact your ISP for the details. Figure 15.5. Set up the specifics of your email system. 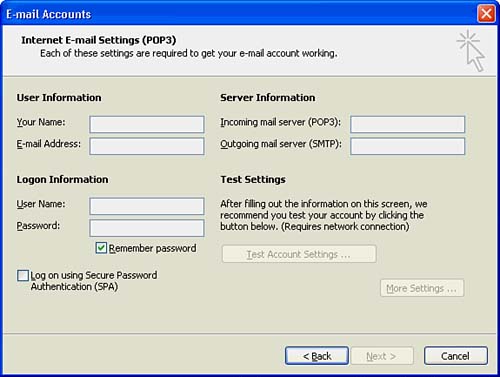 -
Click Next and Finish to finalize your account. To Do: Create and Send Messages A task you will perform often is sending a message to a recipient across the Internet. To create an Outlook email message, perform these steps: -
From the Inbox folder, click the New button (or select File, New, Mail Message) to display the Message dialog box (shown in Figure 15.6). Figure 15.6. Enter the message you want to send. 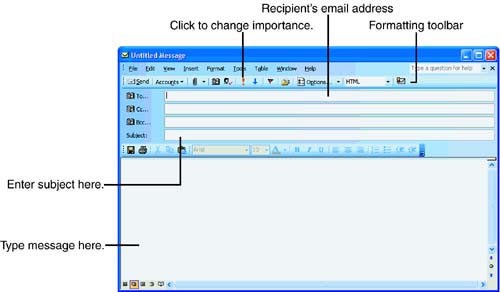 -
Enter the recipient's name in the To (your primary recipient) field. If you enter a name in the Cc (carbon copy) field, Outlook sends a copy of the message to that recipient. After you set up contacts in the Contacts folder (described in a later section entitled, "Keeping Contacts"), you only need to click the To (and Cc) buttons to display a list of contacts from which you can select. Your Contacts folder keeps track of names , phone numbers , addresses, and email addresses so that when you've built a large collection of email contacts, you'll rarely have to type an email address in the To field again. If you want to send the same message to multiple recipients, enter the email addresses directly in the To field, separating each with a semicolon (;), or select multiple recipients from the Select Names dialog box that appears when you click the To button. -
Enter the subject of the message. Your recipient sees the subject in the list of messages that he receives. The subject line is important for organizing email messages in programs such as Outlook, so be sure to include a subject.  | Always enter a subject for your email messages so that your recipient knows at a glance what your message is about. This also makes it easier for you to track sent messages. |
-
Type your message in the large message area at the bottom of the Message dialog box. If you've got automatic spell checking turned on (available from the Tools, Spelling and Grammar dialog box just as in Word), Outlook locates spelling problems by flagging them with a red wavy underline. -
Click the Options tab to select certain message options (such as the message importance level and a delivery date). The recipient, like you, can order received mail by importance level when reading through the messages. The toolbar's Importance button also determines an email's importance. -
Click the Send button. Outlook sends the message to your folder named Outbox. -
Select Tools, Send/Receive to send your Outbox messages. Outlook finishes sending your mail and also collects any incoming messages waiting for you. If you are not logged on to the Internet, Outlook displays the Logon dialog box. Always check your Inbox for mail after sending mail from the Outbox using Tools, Send/Receive in case new mail was delivered to you. Not all messages are text-only, and Outlook works with all file types. To attach another file to your message, such as a Word or Excel document, click the Insert File toolbar button and select a document file from the Insert File dialog box that appears. You'll notice that the Message window sports a Formatting toolbar just as Word and Excel does. If your recipient can receive formatted email (as most can today, with the exception of some older free email services still in use), feel free to format your message's text. Figure 15.6 shows the Bcc field that your email might or might not show. The Bcc field is the blind carbon copy field and enables you to send copies of the current email to multiple recipients without the primary recipient or the other Bcc recipients knowing that you've done so. For example, if you want to send a customer a sales letter and you want to send a copy to your boss, you can put your boss's email address in the Bcc field. Your boss will know that you sent the email to the customer but the customer will not know that your boss got a copy. If you don't see the Bcc field and you'd like to add it to your email messages in case you want to use it in the future, click the down arrow to the immediate right of your message's Options button and select Bcc from the list that appears. To hide the Bcc field if you don't use it and you want more room to see messages, you can repeat these steps to uncheck the Bcc field. Checking Mail Regularly, you need to check your Inbox folder to see what items await you. As mentioned in step 7 of the preceding section, you must select Tools, Send/Receive to send Outbox items and receive Inbox folder items. Outlook logs you on to your Internet provider if needed. Your Inbox folder on the Outlook Bar displays a number indicating how many unread messages require your attention. When you select the Inbox folder, the unread messages appear in bold.  | If you use multiple email accounts, select Tools, Send/Receive and select the email account that you want to check. You might use MSN at home and a local Internet provider at work, for example. You can set up both accounts on your home and office computer and select which account's email to retrieve when you select the Tools, Send/Receive option. |
| | Pay attention to Outlook's icons. For example, as you read an email message, the message icon changes to show that the message has been read. Revert the read message flag back to an unread state by right-clicking the message and selecting Mark as Unread from the pop-up menu. A paper-clip icon appears next to each message that contains an attached file. When you open a message with an attached file, Outlook shows the attachment as an icon that you can right-click to save or open . |
To read a message, just click on the message header to see the body of the message in Outlook's Preview pane. To open the message in a separate window, double-click it. To reply to the sender (in effect, sending a new message to your Outbox folder), click the toolbar's Reply button and type your reply. You can reply to the sender and all Cc recipients of the sender's message by clicking the Reply All toolbar button. Outlook's email management system is quite advanced with far too many options to cover in one hour . Generally, however, to send and receive email, two of the most common uses of Outlook, you already have enough Outlook skills to do the job.  |