| When developing spreadsheet templates (see 66 Create a Calc Template ) or creating spreadsheets that others less savvy in Calc will work with, you may want to protect certain cells from being changed. This protection helps ensure that formulas do not get changed and that fixed data remains fixed. Before You Begin  59 Format Cells 59 Format Cells 66 Create a Calc Template
See Also  71 Ensure Valid Data Entry 71 Ensure Valid Data Entry
In addition to protecting individual cells and ranges, you can password-protect entire spreadsheets to keep them secure and to limit access to them. -
Select Cells to Protect Select the cell or the range of cells you want to protect. (Hold Ctrl and click to select multiple cells in a range.) These cells can contain data, be empty, or contain formulas. Also, if you've stored a graphic image in a cell, you can protect that image from being moved or overwritten. NOTE  | Cells you designate as protected are only protected if you also protect the spreadsheet. | -
Request Cell Protection Select Format, Cells from the menu. The Format Cells dialog box appears. 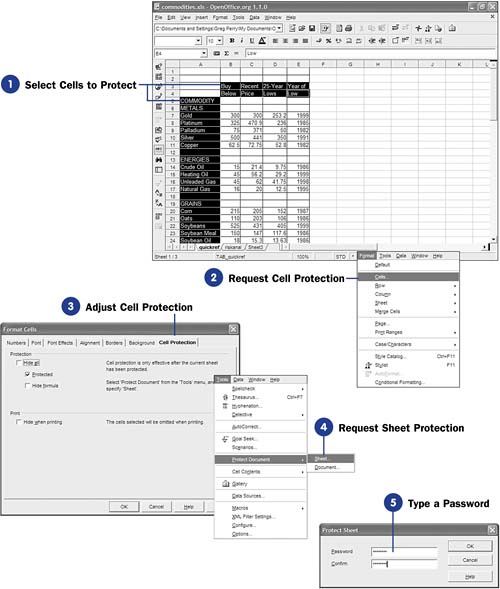 -
Adjust Cell Protection Click the Cell Protection tab to display the Cell Protection page within the Format Cells dialog box. If you click to select the Hide all option, the contents of the selected cells will not appear when the spreadsheet is viewed . The Protected option keeps the selected cells from being changed. The Hide formula option hides any formulas in the protected cells, if any formulas reside there. NOTE | | When you hide formulas, the user cannot see them but can still see the cell values that result from the formulas. | Click the Hide when printing option if you don't want the cells to appear when the user prints the spreadsheet. Once you've indicated the protection, click OK to close the Format Cells dialog box and apply the protection to your spreadsheet. -
Request Sheet Protection
Select Tools, Protect Document, Sheet to open the Protect Sheet dialog box.
-
Type a Password
In the Protect Sheet dialog box, type a password, press Tab , and type the password once more. The password does not show on the screen in case someone is looking over your shoulder. The second typing of the password ensures that you typed it correctly the first time.
Once you type the password and click OK , you've protected the spreadsheet. Any cells that you now designate as protected (or have before) will now be protected. No user can change the contents of those protected cells without first removing the protection from the entire sheet by selecting Tools, Protect Document, Sheet once again and entering the correct password.
|