| Writer gives you complete control over the way it handles AutoCorrect entries. You can modify the correction list, add your own corrections that you want Writer to make, and add to a list of exceptions so that Writer stops correcting things you don't want corrected. Before You Begin  31 About Writers Automatic Correction Tools 31 About Writers Automatic Correction Tools
If you find Writer correcting certain words and phrases that you don't want corrected, you can add those words and phrases to Writer's exception list. In addition to autocorrecting words and phrases, the AutoCorrect feature performs some formatting changes for you, most notably changing straight quotes into custom, rounded quotes, sometimes called smart quotes . KEY TERM  | Smart quotes ” The rounded quotes that curl in or out, depending on whether they begin or end a quoted phrase. Both single quote marks and regular quotations can be smart quotes. The term originally started with Word and applies to a word processor's capability to recognize whether a quote mark should be open or closed. |
-
Request the AutoCorrect Dialog Box
Select Tools, AutoCorrect/AutoFormat from the menu to display the AutoCorrect dialog box. It is from this dialog box that you control the way AutoCorrect operates on your words. Click the Replace tab to display the Replace page if it's not already displayed.
-
Scroll to See Replacements Scroll down the list to see all the replacements that Writer will make on your behalf . Many of the replacements replace common misspellings, such as believe for when you accidentally type beleiv . NOTE  | The AutoCorrect/AutoFormat menu option is badly worded. Nothing on the resulting dialog box enables you to control the AutoFormat feature of tables. The AutoFormat part of the name only applies to quote marks in this case. | -
Delete an Entry If you want Writer to stop making one of the replacements, select that entry in the list and click the Delete button to the right of the dialog box. For example, you may be writing a book and want to designate your headings using a common format such as A-heads, B-heads, C-heads, and so on, indicating each succeeding level of subheadings throughout the text. If you prefix your third-level headings with (c) , Writer immediately replaces the (c) with the copyright symbol, unless you delete that entry from the table. 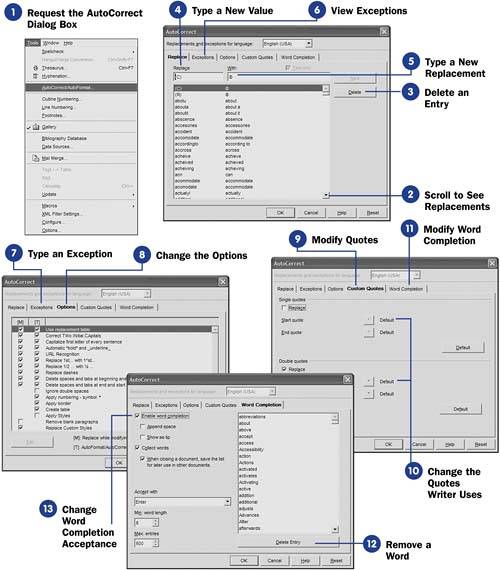 -
Type a New Value To add your own AutoCorrect entries, click the Replace text box and type your value there. This will be the value you want Writer to replace. TIP  | You can change any entry in the table by selecting it, changing either the Replace or the With word, and then clicking the Replace button. | -
Type a New Replacement Type the value you want to replace the other one with in the With text box. Click the New button that appears to the right of the dialog box when you finish the entry. TIP | | Two columns appear, labeled M and T , next to most of the options. Keep the T column checked for options you want automatically made as you type. Keep the M option checked if you want the option to be applied when you select Format, AutoFormat, Apply from the menu to manually autocorrect a document. | -
View Exceptions
Click the Exceptions tab to display the Exceptions page.
-
Type an Exception
If you regularly use a lowercase abbreviation that you don't want Writer to capitalize, type the exception abbreviation in the Abbreviations text box. If you regularly use a word with two initial capital letters , such as QBasic , type that exception in the Words with TWo INitial CApitals text box.
-
Change the Options
Click the Options tab to display the Options page. Scroll through the list of options that Writer uses for its AutoCorrect corrections. Instead of entering an exception, for example, for QBasic on the Exceptions page, you might elect to uncheck the option labeled Correct TWo INitial CApitals so that Writer stops trying to correct all such entries.
-
Modify Quotes
Click the Custom Quotes tab to display the Custom Quotes page.
-
Change the Quotes Writer Uses
You can change the quotes that Writer uses when you open or close either single quotes or double quotes (regular quotation marks). To use a different start quote, for example, when you type an opening straight quote mark, click the straight quote button labeled Start quote and select a new quote from the symbols that appear. More than likely, you'll be replacing a straight quote with a curly quote. You can replace all four kinds of quotation marks used by Writer on the Custom Quotes page.
-
Modify Word Completion
Click the Word Completion tab to display the dialog box's Word Completion page. Here, you work with word completion entries to modify the way Writer completes your typing for you (such as offering abbreviation when you type abb ).
-
Remove a Word
If you want Writer to stop completing a certain word for you, click to select the word and click the Delete Entry button.
-
Change Word Completion Acceptance
If you want to change the character used to accept a completed word, click to select either End, Enter, Space , or Right from the Accept with list. For example, if you select End , when you type abb and Writer replaces the word with abbreviation , you'll have to press the End key to accept the suggestion; otherwise , Writer erases the suggestion and lets you complete the word.
The other options on the Word Completion page enable you to request an automatic space after a completed word and show the suggested word as a ToolTip instead of having Writer complete the word at your cursor's position.
When you finish making changes to the Word Completion page, click OK to close the dialog box and return to your document.
|