| Draw certainly doesn't limit you to your own artwork. You can import other people's artwork! Draw supports virtually every kind of graphics file in use today, and you can easily import images into your drawings. Once those images are there, you can resize, move, copy, duplicate, and even convert them to 3D, just as you can do with the objects you draw. Before You Begin  110 Draw from Scratch 110 Draw from Scratch  116 About Manipulating Objects 116 About Manipulating Objects
See Also  126 Scan a Picture into Draw 126 Scan a Picture into Draw
Once you insert graphic images into your drawing, you can edit the images somewhat. When you click to select your inserted image, your Object toolbar changes to provide the following aspects that you can change about the inserted image: -
Graphics mode ” Select the graphics mode from a list of available modes (such as Watermark , which places a pale and very light version of your image on the drawing's background). -
Red, Green, and Blue ” Options that change the amount of these three primary colors in your image. Here, “100% indicates a complete lack of the color, and 100% indicates the heaviest use of the color possible. NOTE  | You can copy an image to your drawing or link to an image. Either way, the image appears in your drawing. However, if you link instead of copy the image, your drawing will update if the original image ever changes. |
-
Brightness ” Enables you to adjust the brightness from “100% (complete darkness ) to 100% (completely lit). -
Contrast ” Specifies the image's contract, from “100% (no contrast) to 100% (full contrast). -
Gamma ” Specifies the gamma value , from 0,10 ( lowest gamma) to 10 (highest possible gamma value). KEY TERMS  | Gamma value ” The brightness of an image's midtone colors. Crop ” The cutting off of parts of an image or, in the case of Draw images, the scaled shrinking of an image to a smaller size from within the Crop dialog box. |
-
Transparency ” Specifies how much transparency, from 0% to 100%, that the image shows. -
Crop ” Displays a dialog box where you can crop the image. -
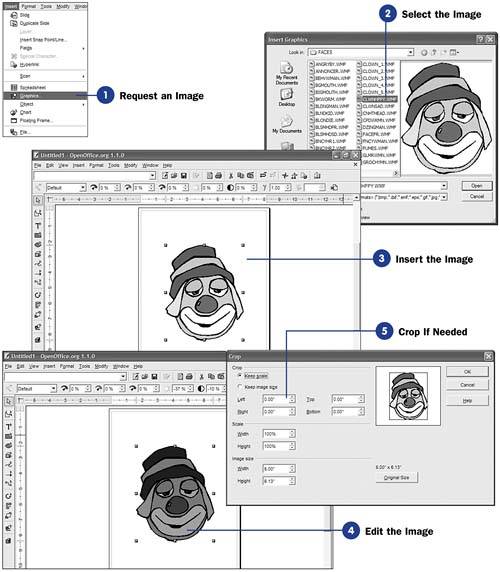
Request an Image
Select Insert, Graphics from the menu to display the Insert Graphics dialog box, where you can locate the image you want to insert into your drawing.
-
Select the Image Browse to the location where your images are on disk (or across a network) by selecting from the Look in list box. Locate the file you want to insert and click it. If you also click the Preview option, a preview of that image appears so you can be sure you have the correct one. NOTE  | Click the Link option if you want Draw to link to the image instead of making a copy and inserting the copy into your drawing. You can convert a linked image to a copy by selecting Edit, Links from the menu and selecting Break Link from the dialog box that appears. | -
Insert the Image
Click the Insert Graphics dialog box's Open button to insert your selected image into your drawing. You can resize, move, copy, and apply other Draw editing functions to your inserted image.
-
Edit the Image Select the image, and the Object toolbar changes to reflect the editing functions you can apply to your image.  -
Crop If Needed
Click the Object toolbar's Crop button to open the Crop dialog box. Remember that you can crop down or up the scale of the image (from within the Scale section) or crop off portions of the actual image itself. To restore the image if you overcrop, you can click the Original Size button to restore the image to its original form. Click OK to apply your cropping instructions.
|


