| Draw can actually convert a two-dimensional, flat drawing to a three-dimensional drawing. During the conversion, you can control many of the resulting 3D attributes, such as lighting and shading. Although the 2D-to-3D conversion is not a perfect one, and although Draw does not contain as many three-dimensional controls as the software Hollywood uses to make its movies, Draw's three-dimensional prowess is quite good. When one considers the price (free), it's about as good of value as you'll get on earth. Before You Begin  116 About Manipulating Objects 116 About Manipulating Objects 123 Add 3D Text
See Also  125 Import a Graphic Image into Draw 125 Import a Graphic Image into Draw
-
Add the 2D Image Add any two-dimensional images to your drawing area that you want to convert to 3D. Click to select an image to convert. NOTE  | Draw can take a while to convert some images to 3D and has been known to freeze when attempting to convert a rather complex 2D image. Generally, you'll have no trouble as long as your 2D images aren't already almost 3D. When working with such graphics, select File, Save regularly just in case a recent edit causes Draw to freeze and you have to close Draw and start over. | -
Request 3D Effects Select Format, 3D Effects to begin the conversion. Draw opens the 3D Effects dialog box, which displays several options from which you can choose to convert your 2D drawing to 3D. The Favorites list offers several 3D shapes in several colors and textures. When you select one of these shapes , you're giving Draw an example of how you wish your 2D image to be converted. Therefore, you'll find the closest -matching 3D image in the Favorites list to specify the general nature of the 3D look you want. The 3D Effects dialog box also contains two buttons . One is named 3D Attributes Only (rest your mouse cursor over the buttons to see their purpose). It does the least amount of work in the quickest amount of time to convert your 2D image using only enough attributes from your Favorites sample to put your shape into three dimensions. If you instead click the second button, Assign All Attributes , Draw will apply all the lighting, colors, and shadows from the Favorites item you've selected. The buttons across the top of the 3D Effects dialog box enable you to specify settings such as the 3D geometry, shading, lighting, texture, and material. NOTES | | Understanding all the mathematics that produce appropriate 3D effects is fairly advanced. This task just skims the surface. Fortunately, you can always try one of the options, adjust the 3D effect, and then select the Undo command to back up and try something else. So fully understanding the mathematics behind 3D images isn't a requirement to producing them with Draw ”fortunately! If your 2D object has a lot of white space inside its area, that space will remain white, and Draw only converts the image's edges to a 3D effect. If your 2D object is colored inside, Draw can apply more of a 3D effect to the sides of the object. | -
Convert to 3D
Select a Favorites item and click the 3D Attributes Only button. A preview of a sample 3D object that takes on the sample's characteristics will appear. Unfortunately, the preview is a sphere and not a preview of how your actual 2D image will look after being converted. When you click the Assign button, Draw converts your 2D image to a 3D image. The 3D Effects dialog box remains on the screen, where you can continue to select options from it.
-
Further Refine the 3D Effect
You can click to select from the various buttons atop the 3D Effects dialog box to apply various settings to your image. For example, if you click the Illumination button, you can control the amount and color of the lighting on your object. Click to select the Material button to apply a metal-like plating to the object.
-
Quickly Convert to 3D Draw supports a quick conversion to 3D, and you can apply this in a similar manner to how you convert 2D text to 3D (see 123 Add 3D Text ). Click to select a 2D image; then right-click the image to display a menu. Select Convert, To 3D from the menu to apply a quick 3D pattern to your item. Once the image is converted, you can click to select the converted image and then click again to display corner handles (see 123 Add 3D Text for information on corner handles) that you can use to rotate the object in 3D space so that its orientation suits your needs. You can also select Format, 3D Effects to adjust the 3D attributes, such as the illumination and material used if the image doesn't look the way you want it to look. 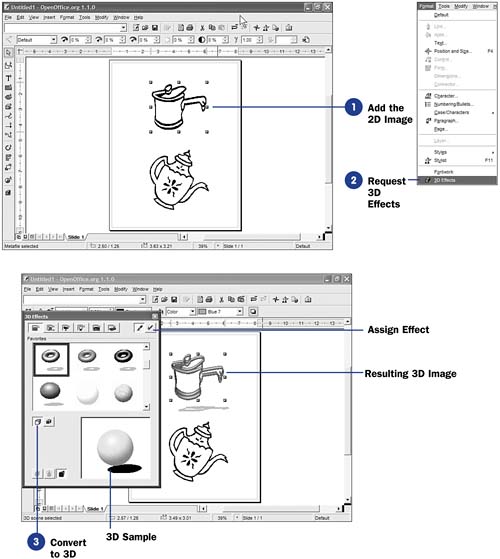 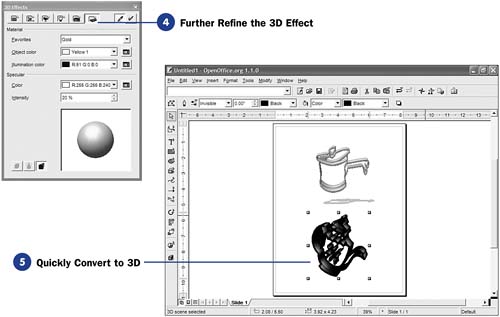 |