Using Objects in Excel


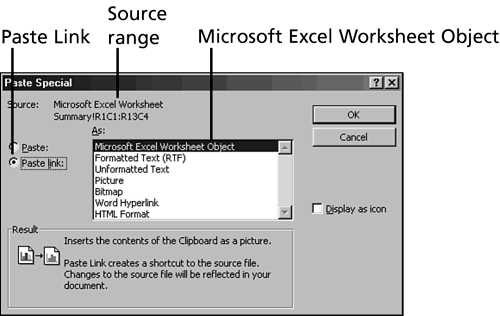
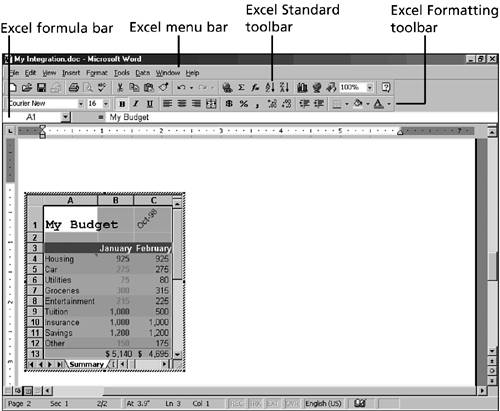
Sharing data between applications is called Object Linking and Embedding , more commonly known as OLE . This may sound complicated but it isn't. It means there's an object in a document in one Windows application that is linked to or embedded from a document in another Windows application. Many Windows applications let you link and embed information in any of these applications. For example, you can copy a Microsoft Excel chart and put it into a Microsoft Word document.

If the object is linked, it appears in your Office document but it is stored outside of your document. Your document holds the link, which is like an address, and when you want to view or print your document, Excel reads the address, fetches the object, and provides it. If the original object is changed, the next time you link to it, you see the changes.

When you take an existing Excel worksheet or chart in a Word document and copy and paste the information or import it into another Word document, you can embed the worksheet rather than linking it. If the object is embedded, it is moved into your document after it's created and becomes a part of your document, just like the text, numbers , and clip art you create while you work in Excel.

By embedding the worksheet as an object, you can double-click the worksheet in Word, and the Word menus and toolbars are temporarily replaced by the Excel menus and toolbars . It's like working in a "super application," in which one window can perform many different types of applications' tasks word processor to spreadsheet program and back. The advantage is that you can quickly and easily make changes to objects from different applications in the same window. This process is referred to as OLE. Any changes you make to the worksheet are automatically reflected in the worksheet in Word.

Object Linking

Object linking enables you to share data between programs with OLE. You can link Office documents. For example, you can take an existing Excel worksheet and copy and paste its contents or import it into a Word document. Then you can create a link between the Excel worksheet and the Word document so that each time the worksheet is updated in Excel, the worksheet data in Word is automatically updated to reflect any changes.

When you link Office documents, one document is called the source document and the other is called the target document. The source document contains the information you want to link; the target document receives the linked information. For example, if you want to link an Excel worksheet to a Word document, the worksheet file is the source document and the Word file is the target document.

When you link documents, the source document appears in the target document, but it is not physically there. For instance, you can see an Excel worksheet in a Word document, but the worksheet still resides in Excel.

Follow the next steps to link an Excel worksheet to a Word document. You'll be using the My Budget workbook and a blank Word document.
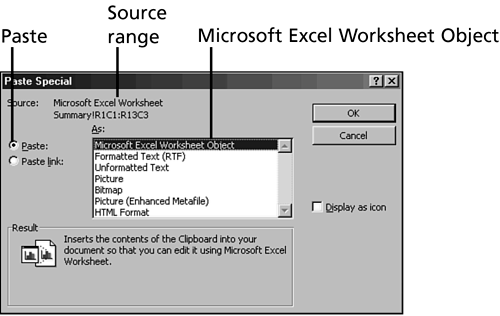
  1. First open the My Budget workbook. Be sure to update the links when you open the workbook. Then, click the Summary sheet.

  2. Now it's time to start Word. Click the Start button on the Windows taskbar, and choose Programs, Microsoft Word. You should see the Word window with a blank document on your screen.

  3. With both applications open, let's switch to Excel by clicking the Microsoft Excel button on the Windows taskbar.

  4. Select the data in cells A1:D13 in the Summary sheet. This is the source data for linking the worksheet object to the Word document.

  5. Click the Copy button on the Standard toolbar.

  6. Click the Microsoft Word button on the Windows taskbar to switch to Word.

  7. Choose Edit, Paste Special. The Paste Special dialog box appears. The selected range appears at the top of the dialog box in the Source area.

  8. In the As list, choose Microsoft Excel Worksheet Object. This tells Word which object you want to place in the Word document.

  9. Click the Paste Link option. This tells Excel that you want to create a link between the source data and the Word document. Figure 48.1 shows the Paste Special dialog box with all the selections you should have made.

    Figure 48.1. The Paste Special dialog box.

    graphics/48fig01.gif

  10. Click OK. The Excel worksheet should appear in the Word document as an object with selection handles (white squares) surrounding the worksheet's border. These handles indicate that the object is selected (see Figure 48.2).

    Figure 48.2. A linked worksheet in a Word document.

    graphics/48fig02.gif

  11. Save the Word document by clicking the Save button on the Standard toolbar. Name the file My Integration, and click the Save button.

Object Embedding

Just like linking documents, you have a source document and a target document when you embed an object in a document. Embedding a document as an object physically places a document within another document. For example, if you embed an Excel worksheet or chart in a Word document, the worksheet or chart physically resides in Word as well as Excel.

In the upcoming exercise you'll see how embedding an Excel worksheet as an object in a Word document is similar to linking Office documents. You'll be using the My Budget workbook and the My Integration document again. Follow these steps to begin embedding an object:

  1. In the Word document, press Enter a few times to insert some space beneath the worksheet object, and then press Ctrl+End to move to the bottom of the document. Press Ctrl+Enter to insert a page break. The insertion point should be at the top of page 2 now.

  2. Now we'll switch to Excel by clicking the Microsoft Excel button on the Windows taskbar.

  3. Press the Esc key to clear the flashing marquee border.

  4. Select the data in cells A1:C13 in the My Budget workbook. This is the data that we'll embed in the Word document as an object.

  5. Click the Copy button on the Standard toolbar.

  6. Click the Microsoft Word button on the Windows taskbar to switch to Word.

  7. Choose Edit, Paste Special. The Paste Special dialog box appears. The selected range appears at the top of the dialog box. Leave the Paste option selected.

  8. In the As list, choose Microsoft Excel Worksheet Object. This tells Word which object you want to place in the Word document. Figure 48.3 shows the Paste Special dialog box with the selection you should have made.

    Figure 48.3. The Paste Special dialog box.

    graphics/48fig03.gif

  9. Click OK. The Excel worksheet is now an embedded object in the Word document. Now let's change a couple of numbers in the Excel worksheet and see how Excel treats an embedded object.

  10. Double-click the worksheet object. Notice the Word window takes on the appearance of an Excel window, displaying Excel's menus, toolbars, and the formula bar (see Figure 48.4).

    Figure 48.4. An embedded worksheet in a Word document.

    graphics/48fig04.jpg

  11. Click cell C6, type 100 , and press Enter. Next, click cell C8, type 200 , and press Enter. This changes two numbers in the Excel worksheet. Notice that the value in the Total row has been updated to reflect the new numbers.

  12. Click outside the worksheet. The Word menu and toolbars appear. Notice the worksheet now contains the new numbers and the formulas have been recalculated automatically to reflect the changes you made. It's like magic!

  13. Close the Word document and save the changes. Then, close Word by double-clicking the Word Control icon in the upper-left corner of the Word window. You should see only the Excel window on your screen.


Sams Teach Yourself Office Productivity All in One
Sams Teach Yourself Office Productivity All in One (Sams Teach Yourself All in One)
ISBN: 0672325349
EAN: 2147483647
Year: 2003
Pages: 474
Authors: Greg Perry

flylib.com © 2008-2017.
If you may any questions please contact us: flylib@qtcs.net