Formatting Drawing Objects
| Do you want color ? Lines? What type of arrows do you want on your lines? Do you need the arrow to be placed at the other end of the line? The drawing objects you have learned to draw in this hour can be formatted in so many different ways. PowerPoint is like that famous fast-food chainyes, you can have it your way! Working with ShapesThe shape of AutoShape objects can easily be formatted with color and lines, which is discussed in this section. The Manhattan cocktail pictured at the beginning of this chapter had different color and line options set for each object. The three shapes that made up the glass were colored white, with no lines. The liquid was colored light brown and enhanced with gradient shading and no lines. The cherry, colored red, had gradient shading and no lines, and its stem was a single curved line that was three points thick. If you have entered text into an AutoShape, you can format its appearance just as you would any other text object. You can use the Format Font dialog box or any of the text formatting tools on the formatting toolbar. You can also move or resize an AutoShape just as you would any other object in PowerPoint. Using Colors and LinesYou can add or change the color and lines of any AutoShape. How you combine these options depends on the effect you want. At first, it might seem as though it takes a while to figure out how to get a certain special effect, but eventually you will find yourself seeing every object in your home as a combination of PowerPoint AutoShapes with color and lines. To change or add color or lines to any AutoShape, follow these steps:
Working with LinesThere are hundreds of ways to format a line. PowerPoint offers you choices for changing the look for any type of line you might have drawn. The following sections cover the available options for these attributes:
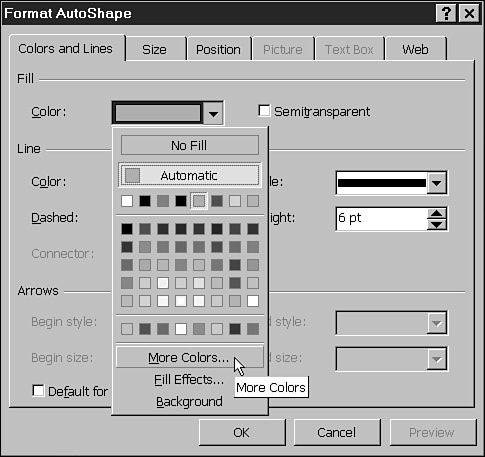
Formatting Line StylesAll the lines you draw can be formatted with many options for just the right look. You can change the line color, select one of PowerPoint's dashed line styles, or choose a custom line pattern. You can also change the line's thickness simply by changing the line weight to a larger point size. On the Green Earth's Shipping Lines slide, the connector lines have been formatted as dashed lines, only .25 point thick. To change the line style, use the following steps:
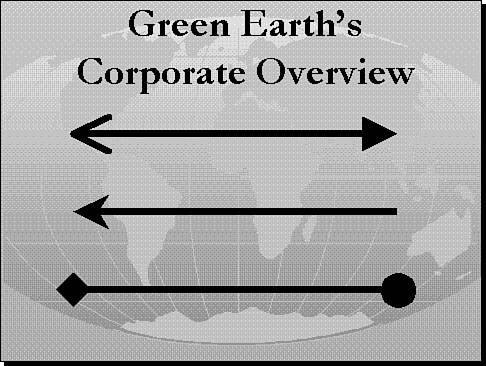
Using ArrowheadsYou can easily add or edit arrowheads on a line. You might realize that you need arrowheads or that an arrowhead ended up on the wrong side of the line after you drew it. You also have several arrowhead styles to choose from. The option of adjusting the arrowhead size without changing the line's thickness is a new feature in PowerPoint. Not only can you adjust the size, but for double-arrowhead lines, you can also have a different style and size for each end of the line! Figure 27.12 illustrates a line with different arrowhead styles and varying sizes for each end of the line.
Figure 27.12. PowerPoint offers different arrowhead styles. Using Connector LinesConnector lines can also be formatted with all the options previously discussed. In addition to the standard formatting options, you can change the connector line style, if you want. The connector can have the following styles:
Follow these steps to change the Style of a Connector Line:
|
EAN: 2147483647
Pages: 474