Before You Begin  72 About Titles and Credits 72 About Titles and Credits
See Also  79 Add Special Effects to Titles and Credits 79 Add Special Effects to Titles and Credits 80 Freeze a Video Frame
No matter where you want to place your titles, the procedure is the same. You first determine where you want the title to appear (such as before the movie or following a clip), select that location on the timeline, and type the title's text. Movie Maker typically offers two fields in which to type your titles: a primary text field, or title field, and a secondary text field, or subtitle field. When the title appears, the title field's text will display on top of the subtitle and in a larger font. - Click to Show Timeline
Show the timeline by clicking the Show Timeline button if your storyboard currently appears.
TIP  | If you want to apply the title before, on, or following a specific clip, click to select the clip on the timeline before continuing. | - Select Tools, Titles and Credits
To add titles or credits, select Titles and Credits from the Tools menu.
- Determine Where Title Goes
Select where you want the title to appear by clicking one of the location options in the Where do you want to add a title? dialog box.
- Type Primary Text
Type the title text in the top field. As you type, Movie Maker displays the text in the Monitor pane for your review.
- Type Secondary Text
Type the subtitle text in the bottom field. As you type, Movie Maker displays the subtitle in the Monitor pane for your review.
NOTE  | If you're adding credits to the end of your movie, you'll have several secondary text fields to enter for all the credits you want to add ( see 78 Add End Credits ). | - Click to Change Font
If you want to change the font size , color , or format, click Change the text font and color to display the Select Title Font and Color dialog box.
- Select Font
Click to open the Font list and select a different font.
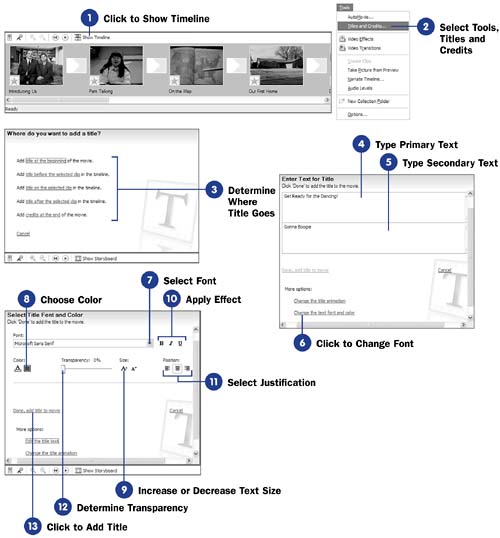 - Choose Color
Click to open the Color dialog box, from which you can select a color for the text. Click OK to close the Color dialog box after you choose a color.
- Increase or Decrease Text Size
To increase or decrease the text size, click one of the Size options.
NOTE | | When you increase or decrease the title's text size, both the title and the subtitle's size increase or decrease. You cannot change the size of the title (or subtitle) by itself. | - Apply Effect
Click one of the bold, italic , or underline options to apply that effect to the text. The effect applies to both the title and the subtitle text and as you click an effect, the Monitor pane updates to reflect the results.
- Select Justification
Movie Maker will left-align, center, or right-align your text when you click one of the Position options. The default is centered text, and rarely will you need to change from this default position.
- Determine Transparency
Titles can appear on top clips as title overlays. Usually, your title text will overwrite the clip's video that appears beneath it. You can make your text transparent and adjust the level of transparency by dragging the Transparency slider control left or right.
- Click to Add Title
Click Done, add title to movie to add the title to your movie.
|