See Also  2 Plan Your Video 2 Plan Your Video 6 About Shooting Tirelessly and Editing Relentlessly 15 White-Balance Your Scene
Video editing is not as complicated as it might seem at first. If you've never studied digital video production, some terms might be new to you. You'll also need a short primer on lighting and sound and getting the right shot. This task provides more of a sneak peek at what lies ahead. By laying out the steps you should expect when making digital videos here, you will be more comfortable with the rest of the book when you see the details of this task's overview. - Create a Plan
KEY TERM  | Storyboard ” A storyboard shows a movie's planned sequence of events. The storyboard might be sketches of proposed scenes, or snapshots of pictures with actors posing for the scenes. | Most producers use a plan called a storyboard . The storyboard can be a sketch of scenes you draw to help you focus into the movie's sequential events ( see 2 Plan Your Video ).
- Install Ample Memory
TIP  | Use a bulletin board for your storyboard layout so you can easily rearrange your movie as you plan it. | Make sure your computer has the horsepower to handle the movie's editing job. Memory is a lot like good looks ”you rarely can have too much. The more memory your computer has, the faster your editing process will go and the smoother your videos will play onscreen. Although Movie Maker requires only 128 megabytes of memory to run, your digital editing sessions won't begin to go smoothly until you get at least 512 megabytes of memory. Add even more and you will be able to do other tasks on your computer while you capture or save your movies without a noticeable slowdown .
NOTE  | Movie Maker provides a digital storyboard that lets you rearrange clips after you shoot your movie ( see 28 About Movie Maker's Storyboard ). | - Check Hard Drive Space
Check your My Computer window's status bar to make sure you have at least two gigabytes of free disk drive space. Click on the disk drive where Movie Maker is installed (normally this is your C: drive) and read the free space remaining at the bottom of your screen on your My Computer window.
NOTE | | An hour of video can consume as much as five gigabytes or more. A hard disk upgrade is a must for serious video editing. Consider one of the large capacity multi-gigabyte external USB 2.0 or FireWire hard drives if you plan to keep all your movies on disk as your video library. | - Install Video Capture Card
You must be able to move your movie from your digital video camcorder to your computer. If you plan to capture video from a VCR or from an older digital video camera that has no FireWire connection, install a video capture card in your computer.
- Shoot Video
Load the proper film cartridge in your video camcorder, perform a white balance to ensure you've got good color balance in your video, and start shooting! ( See 15 White-Balance Your Scene .)
- Capture Video
You now must grab the video from your video camcorder and capture it, or download it, to your computer. Once on your computer, you can edit the video ( see 18 Start a Movie Maker Project ).
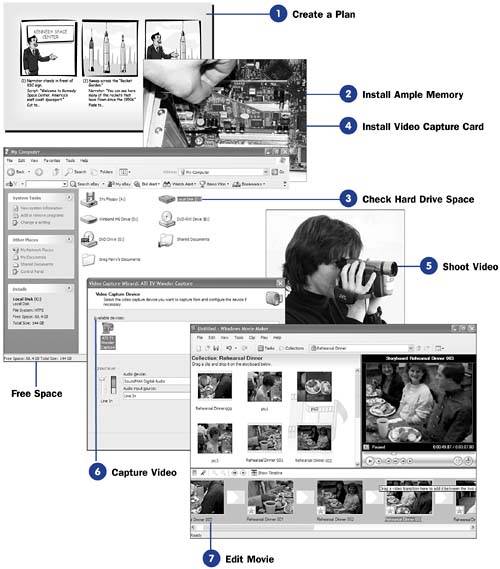  - Edit Movie
Organize the video clips you've just captured to your hard drive by referring to Movie Maker's storyboard ( see 20 Capture Video into Movie Maker ). You can drag clips to the storyboard and rearrange them to order your video into the sequence you prefer.
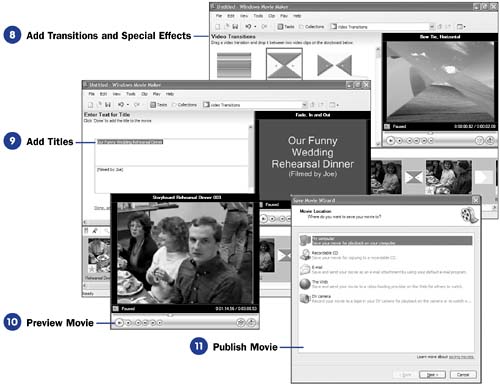
- Add Transitions and Special Effects
Transitions can offer elegant ways to move from scene to scene. Choose from your editing software's vast array of wipes, fades, and dozens of other effects ( see 69 Transition from Clip to Clip ).
Just be sure you use transitions in moderation so they do not distract from the message of your movie. To add pizzazz, a few special effects will capture your audience's attention ( see 65 Add a Special Effect to a Clip ).
- Add Titles
You can add opening credits, titles on still video clips, subtitles , and captions to help identify your video to your audience. At the end of your movie, you can add closing credits, too ( see 72 About Titles and Credits ).
- Preview Movie
At any point in the production, you can preview your video creation on your computer from within Movie Maker to get a rough idea of what the movie will eventually look like ( see 81 Preview Your Final Movie ). After you've completed your movie and are ready to publish the final product, preview the entire movie in Movie Maker to ensure your movie contains exactly the footage you intend it to contain.
- Publish Movie
After you've reviewed the entire movie and decided your creation is complete, generate the finished movie by saving it to your computer, sending it via email, storing it on the Web, or sending it to a CD or DVD ( see 92 About Putting Movies on DVD ).
|