Before You Begin  92 About Putting Movies on DVD 92 About Putting Movies on DVD 106 About Advanced Movie Production Software
A debate rages among advanced digital videographers as to whether Adobe's Premiere Pro or Ahead's Nero is the better tool for the job. In a way, the debate is moot because Nero and Premiere Pro truly are two different products, although both are considered top performers. Some feel that Nero takes many of the best features of Roxio's CD & DVD Creator ( see 108 Produce DVDs with CD & DVD Creator ), such as the label maker and CD/DVD burning tools, and combines them with the feature set of a video capture and editing program that rivals that of Adobe Premiere Pro ( see 110 About Editing Professionally with Adobe Premiere Pro ). Nero is certainly the most feature-packaged software on the market, with tools that you can begin using today and others that you'll grow into. NOTE  | Although Nero is the most feature-packed software described in this book, Nero is not necessarily the best program for each specific job. CD & DVD Creator offers more options for burning media, and Premiere Pro provides far more advanced video-editing tools. |
This task provides a glimpse into Nero's various features. Nero provides a free trial with all features available at http://www.nero.com if you want to see what all the fuss is about. You can follow this task and delve much more deeply into the product by downloading the trial version. - Select Make Movie from StartSmart
NOTE | | Nero offers an important tool that is surprisingly not found in most other video-editing software: a sound mixer and audio editor that allow you to combine audio from several sources (such as from a music soundtrack, as well as a sound effects recording for your movie). You can combine the audio into one and edit it to filter unwanted noises and clean up other parts of the recordings as needed. | To have access to Nero's massive collection of tools, you need to begin with StartSmart, Nero's controller software that gives you access to Nero's many tools. Although you can start most of Nero's individual tools, such as the Nero Cover Design program with which you can create CD and DVD covers and case inserts , StartSmart works as a wrapper application that provides one-click links to the other tools. As you rest your mouse pointer over StartSmart's window pop-up, ToolTips appear describing each function that will start if you click on that icon. For example, when you click the Favorites category, one of the tasks available to you is called Make Movie. Click the DVD icon and then select Make Movie from the Favorites category to start Nero's movie-making application.
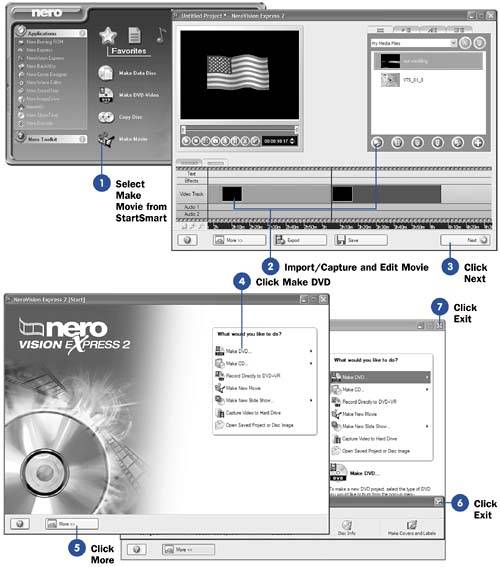 - Import/Capture and Edit Movie
NOTE | | Click the DVD or CD icon in Nero's upper-right hand corner to see all the tools available for that kind of media. Nero's major tools appear by name down the left side of StartSmart, and these categories appear as icons across the right side of StartSmart: Favorites, Data, Audio, Photo and Video, Copy and Backup , and Extras . As you click each of the six categories, a list of related tasks appears beneath such as those related to DVD production, CD and label printing, and audio editing. | You will now spend quite a bit of time importing video (or capturing it) and editing your movie. Many of the tools are similar to Movie Maker's, except Nero calls transitions wipes . You will click the Capture button to start a video capture and edit using tools similar to Movie Maker's.
- Click Next
Click the Next button after you've completed the movie to move to the next phase and burn your movie to DVD.
- Click Make DVD
You can burn your movie to DVD, CD, or as a movie on a CD by clicking the Make DVD option. As you can see, Nero takes you right to the burning stage after you've completed your movie. You also have the option of creating another movie, writing the current movie elsewhere, or making a slideshow disc if you imported digital still images to the timeline when you created the movie.
TIP  | Note Nero's two audio tracks ”they correspond to Movie Maker's Audio track and Audio/Music track. | - Click More
Click the More button at the bottom of the screen to see more options. Notice you can make covers and labels for your movie's disc from the window that appears.
NOTE | | Remember, these tasks just give you a glimpse into the screens of the more advanced programs you might want to consider as your video-editing skills and needs grow. | - Click Exit
Click the Exit button to return to the StartSmart window where you can take advantage of the many other tools Nero has to offer, such as the sound mixer.
TIP | | Given Nero's everything-but-the-kitchen-sink-approach, if you want to be able to do a lot of things with your digital content, Nero is considered the most well-rounded program you can get. There's only room here to show you some video-production screen samples. | - Click Exit
Click the Exit button on the StartSmart window to exit Nero if you've been taking this tour along with the task steps.
|