Sphere8
If you think about it, you ve learned a tremendous amount up to now. You should now have the knowledge to program a basic 3D game with collision detection, keyboard control, music, screen messages, several camera views at one time, and game logic. However, you have probably already come to the conclusion that the graphics are still somewhat primitive. We are now going to take a giant step forward by importing images made with MilkShape 3D , a 3D modeling package that allows you to easily create 3D objects.
In this section, we will also improve the game logic with some new programming tools: Boolean operators and if-else statements.
Figure 4.13 shows a screenshot of the game. You will see some pretty big improvements, including a seascape with two rugged-looking islands.
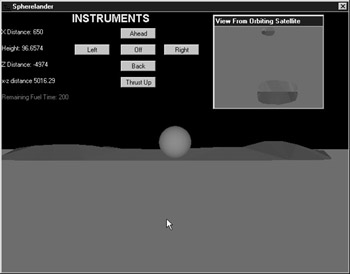
Figure 4.13: Screenshot of Sphere8 game.
Before we proceed, please make a new game, and call it Sphere8.
Making Graphics Objects Using 3D Modeling Packages
Yes, you could make just about any complex object in Jamagic by joining triangles in three dimensions, but you probably already have a feel for how difficult this could be. Imagine making a 3D spaceship by figuring out where to place and join triangles !
On the CD For this reason, the 3D graphic objects in games are usually made using some form of software that makes this task much easier. There are many of these on the market, and they can cost thousands of dollars. However, there is one excellent product that is very reasonably priced ” MilkShape 3D from chUmbaLum sOft. A free, limited-use version is included with the CD-ROM that comes with this book, and it will be used to make better-looking graphics for our games.
MilkShape 3D was used to make the two islands that will be placed in our 3D world, as seen in Figure 4.13. These have been given the names mtnlow and plains . The procedures used to make these 3D images are covered in further detail later in this section. These procedures are not meant to be a complete guide to MilkShape, but are merely enough to get you started. If you take the time to learn MilkShape, you will find that you can make beautiful and complex 3D images using this software. Please consult www.swissquake.ch/chumbalum-soft/ for more complete tutorials, or Clayton Crooks 3D Game Programming with DirectX 8.0 (2001. Charles River Media, Inc.) .
Eventually, you should try to make your own islands using MilkShape 3D so that you know how it works. However, we recommend that when you run this program, you use the islands that came with the CD-ROM since the code was written with the exact size of these islands in mind.
To make these islands, we begin by clicking the MilkShape 3D icon that should have been created on your desktop when you loaded the software. You should now see the image shown in Figure 4.14.
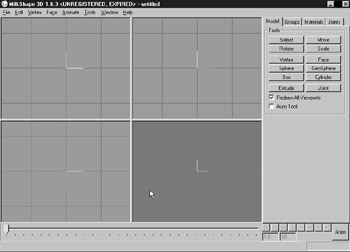
Figure 4.14: MilkShape 3D initial screen.
| Tip | If the MilkShape icon did not appear, then look for it under Programs in the Start menu. If this does not work, you may have forgotten to load MilkShape ! |
Notice that there are four windows on the screen. In each window, you will see different views of the object you re drawing: the upper-left window shows a frontal view, the upper-right shows a view from the left, the lower-left shows a top view, and the lower-right shows an isometric view (you may recall from Chapter 2 that isometric views are taken at angles). Let s explore these views.
You will see a surface that looks something like a floor on the isometric view, and if you drag your mouse on the window, you can change the angle of your isometric view. This surface will not be part of the object drawn; it s just there to help orient you in the 3D world.
On the right of the screen you can see several buttons . Click the one marked Vertex. This will allow you to make points in the windows that will become triangles, which will be joined to make our 3D object.
Now move your mouse to the front view and begin clicking. Each time you click, a point will be made on the screen. Position the points so that they mark the outline of what our island is going to look like. Figure 4.15 shows what this should now look like. Notice that the points are visible from the top view as well.

Figure 4.15: Points added to make island.
The more points you make the smoother the final result will be. However, keep in mind that a large number of points will result in a large number of triangles, which could slow down your program. How many points is enough? This depends on your game and your own standards. Experience and trial and error are the best tools here.
Next we need to mark the outline of the island as seen from the top (the previous procedure gave us the outline as seen from the front). On the top view, click points marking the island s shape, as shown by Figure 4.16.
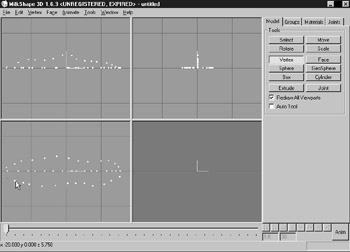
Figure 4.16: Points showing outline of island from top.
Now we need to tell the program which points are connected to make triangles. To do this, follow these steps:
-
Click the Face button from the buttons at the right.
-
Now click three points, one after the other. Pick points that are close to each other, and that you could envision forming a triangular surface on your desired object. Please select the points in a clockwise order to ensure visibility (the opposite direction from the winding order in Jamagic !). You will see that a red triangle has been formed once you click the 3rd point. This process is shown in Figure 4.17.
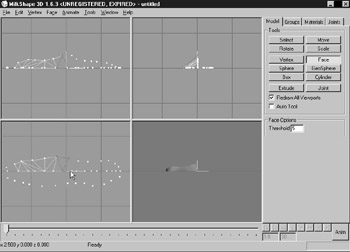
Figure 4.17: Points joined to make triangles. -
Pick another three points and repeat the procedure until you have your desired shape made of triangles.
We are now finished with our island! Make sure that you have left no faces blank, or you will see a hole in your figure.
Now we need to make sure that this island gets saved in a format that Jamagic will recognize. Jamagic will accept 3D files in the following formats from different software packages:
3DS ”Files made with 3D Studio
DXF ”Files made with Autodesk AutoCAD
OBJ ”Files made with Wavefront
COB ”Files made with trueSpace
MilkShape allows you to save your project in the first three formats. To do so, click File in the upper-left corner of your screen, then select Export, and pick one of the three formats. The islands drawn for our game were saved in AutoCAD DXF format. You will be prompted as to where you want to save your new 3D object. You can put it almost anywhere , but it probably makes the most sense to save it directly into C:\Program Files\Jamagic\Projects\Sphere8.
Importing the New 3D Graphics
Now we need to import the images we just made into our game. Get back into Jamagic and open our new game, Sphere8. At the left, a few lines beneath Sources, you will see 3D. Right-click 3D, select Import, and follow the prompts to bring the image in. At one point, you will be asked for the location of the directory from which you will get the textures for this image (see Figure 4.18). In this case, we will apply our own colors from the RGB scale (but just about anything would do), so just instruct Jamagic to use the Pictures category in your game.
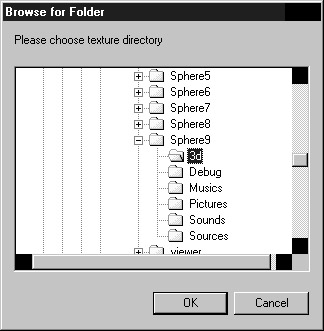
Figure 4.18: You will be prompted for the directory where textures are located.
When you double-click 3D on your Jamagic screen, the two images you imported should be listed (see Figure 4.19). If they are not there, you have made some form of error, and should repeat the procedure.

Figure 4.19: The imported files should be visible under the 3D category.
Improving the Previous Game
On the CD In the previous section, we saw how to make a 3D island using MilkShape 3D. We suggest that you use the island 3D images created by the author for this game because the game has been designed around them. As mentioned earlier, there are two 3D images of islands that we will use ” plains and mtnlow ”which are located on the CD-ROM which came with your book. To import them, simply do as instructed in the preceding section, but when prompted for the location of the images, simply specify your CD-ROM. When you are prompted for the texture directory, you may select anything because there will be no textures applied to the two islands; we will use the RGB color scale instead.
We have imported our object into our game, but we still need code telling Jamagic to bring it to the screen and where it should be placed. We will now discuss particular lines of code.
oworld.Load("mtnlow"); This is easy enough to understand; the image called mtnlow is to be loaded into our world, oworld .
oflatland = oworld.GetObject(oworld.GetNObjects()1);
This line instructs Jamagic to get all of the objects that might be associated with the previous load statement: pictures, lights, and so on. The new 3D object is to be called oflatland , but you could have given it nearly any other name .
oflatland.Scale(10);
This line of code shows a very useful feature; you do not have to worry about how big to make your object at its initial construction. With this statement you are making oflatland ten times bigger than it would appear on your screen normally. You can even change the size of 3D objects in specific directions. For example, consider this line:
oflatland.Scale(10,5,0.5);
This statement instructs Jamagic to make the object ten times wider in the x direction, five times higher in the y direction, and one-half the size in the z direction (these values were determined by trial and error).
The following statements associated with our first island should all be familiar to you. Basically, we are setting the position of the island and setting its color with the RGB scale (incidentally, the RGB color (100,200,0) was also arrived at by trial and error). In addition, we are assigning Gouraud shading to the island and specifying it as a static object.
oflatland.SetPosition(0,0,3000); matflatland =New Material(oworld,GetRGB(100,200,0)); matflatland.SetMapped(ON); oflatland.SetGouraud(ON); oflatland.ReplaceMaterial(matflatland); oflatland.SetStatic();
A similar set of commands is executed to load the second island. Please see the full code listed later for more details.
In the previous game, we controlled only the x, y position of the sphere as it dropped. We would now like to add the capability to move up by adding an upward thruster. You might recall that we had subjected our sphere to a downward gravitational pull with the command
mysphere.SetGravity(0.002);
We can now make the sphere move up at the same rate as it falls by adding a new button marked Thrust Up that activates this line:
mysphere.SetGravity(0.002);
The negative sign (“) causes a movement up, and we can reset gravity to 0.002 when the Off button is clicked.
We also wish to fix some logical errors that were introduced in the previous program. For one thing, as the program is now set up, clicking any thruster directly after another thruster has been on resets the fuel remaining to the full amount, rather than producing an accurate count of fuel. In order for the fuel count to remain accurate when going from thruster to thruster, we must first click the Off button.
So, we would like to make it so that the program user has to click the Off button before using another thruster. How do we do this? By using some form of flag, we can know if a specific button has been pressed. For example, we want the thrusters to be activated only if the Off button has been pressed before they are activated. In the previous project, we did something exactly like this by setting a flag to zero or one, depending on whether a button had been clicked. In that situation, a value of one could mean the button had been clicked, while a value of zero could indicate the button was not clicked. We wish to do the same thing in a different way now, using Boolean variables .
Boolean Variables
Earlier, we introduced integer and floating point variables. You should remember that integers are whole numbers with no decimals, while floating point numbers have decimal points.
A Boolean variable is even simpler to understand, since a Boolean can only have two values ”TRUE or FALSE ”which makes them great for flags. You can set a variable, say, one that you called clickcheck , to TRUE at the beginning of your program, and then you can specify that a thruster can only be activated if clickcheck is TRUE. Once a thruster is activated, clickcheck is automatically set to FALSE. Under these conditions, it is impossible to go from one thruster command to another. The Boolean clickcheck is reset to TRUE only when the Off button is clicked, thus allowing the thrusters to come on.
Look at the following code, which is activated when the user clicks the Off button to stop the sphere s motion. You will see some familiar lines as well as the new line that sets clickcheck to TRUE:
Function dostop { clickcheck = TRUE; mysphere.Stop(); fuelflag = 0; fuel = fuelleft; mysphere.SetGravity(0.002); } The code for the right thruster would be as follows :
Function doright { if (block == FALSE && clickcheck == TRUE) { mysphere.MoveRight(5000,50); ftime = System.GetElapsedTime; fuelflag = 1; clickcheck = FALSE; } } You may be wondering what is the purpose of block = = FALSE in the if statement. From one of the previous programs, you should already recognize that the && represents an AND statement, which means that both conditions must be met in order for instructions in the if statement to be performed. In other words, block must be FALSE and clickcheck must be TRUE.
The block Boolean is there to account for the case in which the fuel is completely consumed before the sphere lands on its target. It seems reasonable not to allow any of the thrusters to operate if all of the fuel is consumed. The following lines of code handle this possibility (recall from the previous program that fuelleft is the quantity of fuel remaining):
if(fuelleft<0) { mytext5.SetText("FUEL GONE!!"); block = TRUE; } Now you can see that if fuel remains ( block = FALSE ) and the Off button has been clicked ( clickcheck = TRUE ), then the Right, Left, Ahead, Back, and Up buttons can be activated.
Discriminating Between Good and Bad Collisions
We have added another change in Sphere8. We have made a second smaller plane our target and placed it farther away on the furthest island. The collision detection in the game will now detect when we hit the target plane, but it also detects when we hit the other island or the water surface. Therefore, we now need a way to discriminate between a collision with the target plane surface (which indicates that the player has won) and a collision with any of the other objects in the game.
To do this, in the game loop, we constantly calculate the distance from the target plane to the sphere. When there is a collision between the sphere and any other object in the game, we check the distance to the target plane. If the distance is less than 50, as calculated by Jamagic , then we conclude that the collision took place between the target plane and the sphere, and therefore, the game player has been successful.
Why 50? The sphere measures 50 in radius, and the plane is 50 long by 50 wide. Recall that when we calculate the distance between objects, we are calculating the distance from center to center, so for a collision to have occurred, the distance between the two objects must be less than or equal to 50.
We call this distance totalxz , and it represents the distance between the sphere and the target plane in the x-z plane ”the distance along the x and z directions only ”the height difference is not considered . We do not consider the height difference between the two because it will automatically become zero when the sphere and the plane collide.
The following code in the game loop calculates distance totalxz between the sphere and the target plane using the Pythagorean theorem. The target plane is placed at an x coordinate of (“150) and a z coordinate of (2974).
distx = (mysphere.GetX) + 150; mytext.SetText("X Distance: " + distx); disty = (mysphere.GetY) ; mytext2.SetText(Height: + disty); distz = (mysphere.GetZ)2974 ; mytext3.SetText("Z Distance: " + distz); totaldist = Sqrt(distx*distx + disty*disty + distz*distz);//one line totalxz = Sqrt(distx*distx + distz*distz); mytext4.SetText("x-z distance "+ totalxz); The function docollision then distinguishes between a successful collision with the plane and an unsuccessful collision with any other object. It uses something that you have not seen until now: the else statement. See if you can figure it out. It s pretty self-explanatory.
Function docollision { if(totalxz <= 50) { mytext5.SetText("You landed on target!"); mysphere.Stop; } Else { mytext5.SetText("Back to flight school for you!"); mysphere.Stop; } } The function docollision above is called when any collision occurs. If totalxz is less than or equal to 50, then a successful collision has occurred, and the user is given the appropriate message on the screen. If totalxz is greater than 50, then an unsuccessful collision has occurred. The else statement merely says that if the condition of the if statement is not met, then the computer should perform the instructions specified in the else statement.
| Note | Notice that you do not really need the else statement in the sense that another if statement could do the same job (by saying if totalxz > 50 ). However, this is more work for you, and it is probably slower for the computer. |
Now you are ready to type in the code. Please note that we have moved some of the text messages around to make room for the Up button and we have eliminated all music and sounds for now.
Enjoy the game, and remember that you will have to land the sphere on the target plane on the second island, while keeping an eye on the remaining fuel.
Sphere8 Code
// // Sphere8: 8th Spherelander game. This program will //(a) Make the fuel amount critical. //(b) Add terrain from MilkShape program. //(c) Add upward thruster. //(d) Removed background sounds //(e) Change target to be small landing pad on smaller island. //(f) Use if-else statements. //(g) Use Boolean operators. //(h) Make it so "Off' must be activated before changing thrusters // // New Main Window owindow = New Window("Spherelander",640,480,Window.STANDARD); // New Child Window owindow1 = New Window(owindow,"View From Orbiting Satellite",200,150,Window.GAME);// one line owindow1.SetPosition(390,5); owindow1.Show(); owindow.Show(); owindow1.SetAutoRefresh(OFF); owindow.SetAutoRefresh(OFF); // New World oworld = New World(); // Import and massage the 1st 3D object made with // MilkShape oworld.Load("mtnlow");//one line oflatland = oworld.GetObject(oworld.GetNObjects()1); oflatland.Scale(10); oflatland.SetPosition(0,0,3000); matflatland =New Material(oworld,GetRGB(100,200,0)); matflatland.SetMapped(ON); oflatland.SetGouraud(ON); oflatland.ReplaceMaterial(matflatland); oflatland.SetStatic(); // 2nd 3D object oworld.Load("plains"); mountain = oworld.GetObject(oworld.GetNObjects()1); mountain.Scale(30); mountain.SetPosition(400,0,0); matmount =New Material(oworld,GetRGB(100,200,0)); matmount.SetFlat(ON); mountain.SetGouraud(ON); mountain.ReplaceMaterial(matflatland); mountain.SetStatic(); //Initialize variables. fuel = 200.; fuelleft = 200.; ftime = 0.0; fuelflag = 0; block = FALSE; clickcheck = TRUE; // New Cameras ocamera1 = New Camera(oworld,owindow); ocamera2 = New Camera(oworld,owindow1); ocamera1.SetPosition(500,500,5000); ocamera2.SetPosition(0,10000,1200); ocamera2.TurnDown(Pi/2.0); // Instruments mytext6 = New StaticText(owindow, "INSTRUMENTS",130,0,170,20);//one line mytext6.SetBackColor(GetRGB(0,0,0)); mytext6.SetColor(GetRGB(0,255,255)); fnt = New Font("ARIAL",20,Font.BOLD); mytext6.SetFont(fnt); mytext7 = New StaticText(owindow,"Remaining Fuel:",0,150,170,20); mytext7.SetBackColor(GetRGB(0,0,0)); mytext7.SetColor(GetRGB(255,0,0)); mytext = New StaticText(owindow," ",0,30,110,20); mytext.SetBackColor(GetRGB(0,0,0)); mytext.SetColor(GetRGB(255,255,255)); mytext2 = New StaticText(owindow," ",0,60,110,20); mytext2.SetBackColor(GetRGB(0,0,0)); mytext2.SetColor(GetRGB(255,255,255)); mytext3 = New StaticText(owindow," ",0,90,110,20); mytext3.SetBackColor(GetRGB(0,0,0)); mytext3.SetColor(GetRGB(255,255,255)); mytext4 = New StaticText(owindow," ",0,120,140,20); mytext4.SetBackColor(GetRGB(0,0,0)); mytext4.SetColor(GetRGB(255,255,255)); mytext5 = New StaticText(owindow," ",0,170,220,20); mytext5.SetBackColor(GetRGB(0,0,0)); mytext5.SetColor(GetRGB(0,0,255)); //Buttons myButton=New Button(owindow,"Ahead",220,30,65,20); myButton.OnClick = Doahead; myButton2=New Button(owindow,"Off",220,60,65,20); myButton2.OnClick = Dostop; myButton3=New Button(owindow,"Back",220,90,65,20); myButton3.OnClick = Doback; myButton4=New Button(owindow,"Right",300,60,65,20); myButton4.OnClick = Doright; myButton5=New Button(owindow,"Left",135,60,65,20); myButton5.OnClick = Doleft; mybutton6 = New Button(owindow, "Thrust Up", 220,120,65,20);//one line mybutton6.OnClick = doup; // Create a sphere with Gouraud shading. mysphere = oWorld.CreateSphere(50,50,50,20,20); mysphere.SetPosition(500,150,2000); omaterial = New Material (oworld,GetRGB(50,150,200),"lightblue");//one line omaterial.SetFlat(ON); mysphere.SetGouraud(ON); mysphere.ReplaceMaterial(omaterial); // Create a plane and rotate it so it's flat. myplane = oworld.CreatePlane(10000,10000); myplane.SetPosition(0,0,0); matp =New Material(oworld,GetRGB(0,100,255)); matp.SetFlat(ON); //myplane.SetGouraud(ON); myplane.ReplaceMaterial(matp); myplane.SetAngle(-Pi/2,0,0); myplane.SetStatic(); // Create a target plane and rotate it so it's flat. myplane2 = oworld.CreatePlane(50,50); myplane2.SetPosition(150,40,2974); matp2 =New Material(oworld,GetRGB(100,200,0)); matp2.SetFlat(ON); myplane2.SetGouraud(ON); myplane2.ReplaceMaterial(matp2); myplane2.SetAngle(-Pi/2,0,0); myplane2.SetStatic(); // Camera ocamera1.Follow(mysphere,2000); oworld.Optimize(ocamera1); oworld.Optimize(ocamera2); //Set collision detection. oworld.OnCollide = docollision; mysphere.SetCollision(TRUE,Object.COLLISION_TYPE_STOP); // Set gravity on. mysphere.SetGravity(0.002); //Game loop While(1) { // Distance calculations // distx = (mysphere.GetX) + 150; mytext.SetText("X Distance: " + distx); disty = (mysphere.GetY) ; mytext2.SetText("Height: " + disty); distz = (mysphere.GetZ)2974 ; mytext3.SetText("Z Distance: " + distz); totaldist = Sqrt(distx*distx + disty*disty + distz*distz);//one line totalxz = Sqrt(distx*distx + distz*distz); mytext4.SetText("x-z distance "+ totalxz); // Refresh ocamera1.ActivateRender(); owindow.Refresh(); ocamera2.ActivateRender(); owindow1.Refresh(); //Fuel calculations if(fuelflag == 1) { time2 = System.GetElapsedTime; fueltime = time2 ftime; fuelleft = fuel fueltime/1000.; } mytext7.SetText("Remaining Fuel Time: " + fuelleft); if(fuelleft<0) { // myshpere.Stop(); mytext5.SetText("FUEL GONE!!"); block = TRUE; } //End of game loop follows. } Function docollision { if(totalxz <= 50) { mytext5.SetText("Congratulations! You landed on target!");// one line mysphere.Stop; } Else { mytext5.SetText("Back to flight school for you!");//one line mysphere.Stop; } } Function doahead { if (block == FALSE && clickcheck == TRUE) { ftime = System.GetElapsedTime; mysphere.Move(5000,50); fuelflag = 1; clickcheck = FALSE; } } Function doback { if (block == FALSE && clickcheck == TRUE) { mysphere.Move(5000,50); ftime = System.GetElapsedTime; fuelflag = 1; clickcheck = FALSE; } } Function doright { if (block == FALSE && clickcheck == TRUE) { mysphere.MoveRight(5000,50); ftime = System.GetElapsedTime; fuelflag = 1; clickcheck = FALSE; } } Function doleft { if (block == FALSE && clickcheck == TRUE) { mysphere.MoveLeft(5000,50); ftime = System.GetElapsedTime; fuelflag = 1; } } Function dostop { clickcheck = TRUE; mysphere.Stop(); fuelflag = 0; fuel = fuelleft; mysphere.SetGravity(0.002); } Function doup { if (block == FALSE && clickcheck == TRUE) { mysphere.SetGravity(0.002); ftime = System.GetElapsedTime; fuelflag = 1; clickcheck = FALSE; } } EAN: 2147483647
Pages: 105