#69. Working with InDesign Packages in GoLive Once you've successfully saved your InDesign document as a package, you're ready to work with it in GoLive. You open an InDesign package in GoLive by double-clicking on it. The package then opens in a separate window in GoLive where you can quickly browse and zoom in on assets, and then drag them into your working GoLive page. Here's a rundown of how to get up and running with the package window. Selecting Assets in the Package Window If the asset you're attempting to select is obstructed by several other objects, Control-click (Mac) or right-click (Windows) on the stack of objects and choose Select > {object name} from the contextual menu. Alternatively, you can use the Assets tab palette. This tab displays all the assets in the package as a list of stories, images, movies, and sounds. Browse through the list of assets until you find the one you're looking for. Then double-click the asset name to jump directly to where it exists in the InDesign Layout tab. |
Highlighting, tool tips, defaults: Hover over items with your mouse in the InDesign Layout tab, and the bounding box of the item will highlight in green. Wait a second and a tool tip will appear providing details about the item. Items appended with TextFrame will result in HTML text by default when dragged onto a page (Figure 69a), whereas anything else will result in a graphic by default. Figure 69a. Hovering over a page in a package window will highlight the item in green and eventually display a tool tip with details about the item. 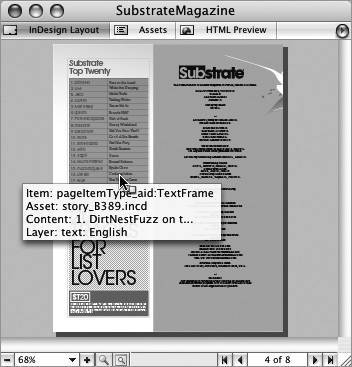 Adding text or tables: To add text or a table to your GoLive page, simply drag the item from the InDesign Layout tab in the package window onto your page. You have three options available to you as to how the text should be inserted: Smart Component, Editable Text, or Snapshot Image. You choose the insert option of a text item before you add it to your page by clicking it in the InDesign Layout tab and then open the Inspector palette. You then choose one of the options from the Insert As menu (Figure 69b): Figure 69b. With a text frame selected in the package window, you can open the Inspector palette to decide on the format the text should be inserted as. 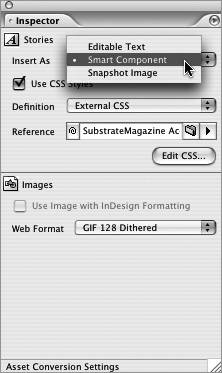 Updating InDesign Packages Since all assets placed from InDesign into GoLive result in Smart Objects by default, you can experience the power of this feature firsthand when you perform changes within the InDesign document. Make any changes you need to in the InDesign document. Select Package for GoLive as before and point to the location of your original package. InDesign should then ask if you want to update the package. Click Update and once the update is complete, all the assets that you placed in your GoLive site as Smart Objects update automatically. |
Editable Text: With the Editable Text option, you can directly edit the inserted HTML text in GoLive, but you lose any formatting or automatic updating from InDesign. Smart Components: By default, text frames and tables are inserted as Smart Components. Smart Components have a dynamic link back to the source InDesign document, allowing the text and formatting to automatically update when the package is updated. But this means you must go back to the InDesign document to edit the text or rely on GoLive's XML editor. Snapshot Image: The Snapshot Image inserts the text frame as a Smart PDF object. A Smart PDF creates an image file from the text, allowing you to preserve any unusual fonts or formatting the text may have that can't be reproduced reliably in HTML alone. And since Smart is in its name, yep, you guessed it, it will automatically update when the InDesign package is updated. Adding an image or graphic: To add an image or graphic, drag the object from your package window to your page. All images and graphics dragged from your package window are Smart Objects (see #70) by default. As with text frames, you can click on an image or graphic in the InDesign Layout tab and then open the Inspector palette to adjust the asset conversion settings (Figure 69c). In the Inspector palette you can select the Use Image With InDesign Formatting setting to keep any formatting you may have applied such as clipping paths, cropping, and borders (provided you saved your package with this option). You can also select an optimization preset from the Web Format menu. Figure 69c. When inserting graphics, you can jump to the Inspector palette to decide whether to use the InDesign formatting of the image or graphic along with the optimization setting. 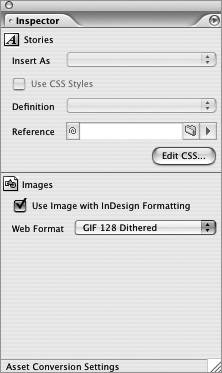
|