Understand Form Elements
|
When creating a form with XHTML, whether it’s a guestbook, a catalog, an order form, or an e-mail form, you need the <form> element along with a combination of controls. As you would expect, the <form> element creates the form, whereas the controls determine what kind of information your visitors can send you. The kind of form you want to create determines the types of controls you choose to include in it.
Project 21: Create a Simple Guestbook Form
Before you experiment with different form controls, try creating a simple guestbook for your Web site. This form will provide a text box where your visitors can write you a note that will be e-mailed to you when they press Submit. Open template.htm and save it as formsample1.htm; then create a form by adding the <form> element to your code, like this:
<body> <form> </form> </body>
If you save and view this page in your browser, you’ll get a blank page. You must add the form controls before you will see anything. However, before you begin adding the controls to your form, you must include some attributes in the <form> element that tell the browser (and the server) what to do with the data your visitors type in. To do this, use the action and method attributes.
Understand the action Attribute
The action attribute tells the browser where to send information in the form. Most of the time it tells the browser to use a Common Gateway Interface (CGI) program to process the data. (The CGI program then sends the information to you—it’s the information handler.) CGI is covered later in this chapter, so you needn’t be too concerned with it at this point. For now, just keep in mind that for a form to work, you must store a CGI program on your Web server.
Because we haven’t covered CGI in detail yet, for this exercise you will use the mailto: protocol as your action. This tells the browser to e-mail the contents of the form directly to you. This isn’t really the best way to handle form data, although it is unquestionably the easiest. Because not all browsers allow you to use the mailto: protocol for form processing, if you plan to use a lot of forms, you will want to learn how to use CGI scripts. However, mailto: is a great tool for learning how to work with forms. To add the action attribute and mailto: protocol to your form, modify the opening <form> tag to read as follows:
<body> <form action="mailto:my_e-mail@my_server.com"> </form> </body>
If you want your form to work, you need to use a CGI program because XHTML is not a programming language. XHTML is a markup language that was created to structure documents and enable them to be shared easily. To process data, you need more programming power than XHTML has. CGI programs usually are written in Perl or some other programming language and pack a little more punch than XHTML. If you know how to program, you can write your own CGI programs (usually called scripts). If the idea of programming causes you to break out in hives, don't despair. Plenty of CGI scripts are available online and many are free of charge. Later in the chapter, you'll learn how to incorporate a pre-written CGI script into a form. Check out the table at the end of this chapter for sources of ready-to-use CGI scripts.
Once you’ve specified the action, you’re almost ready to begin designing your form. However, before you begin adding buttons, menus, and text boxes, you must tell the browser how to handle the data it receives. To do this, add the method attribute to the opening <form> element.
Understand the method Attribute
Whereas the action attribute tells the browser where to send the information collected from a form, the method attribute tells it how to send it. You have two possible choices (values) with this attribute: get or post. The get value simply tacks the information on to the end of the URL where the information is to be sent. Post sends the information separately to the specified location. Each method has its pros and cons; for the most part, you will want to stick with post.
To add the method=" " attribute to your sample form, modify the opening <form> tag as in the following listing:
<body> <form action="mailto:my_e-mail@my_server.com" method="post"> </form> </body>
Use Tables to Add Structure to Your Form
Before you begin adding controls, you will want to define some type of structure for your form. Although the table element is not supposed to be used for layout purposes, it remains the easiest way to give structure to your form. Using tables enables you to create a balanced and dependable layout for your form. If you skip this step, your form’s appearance will be at the mercy of every browser that displays it—and often will turn out looking pretty ragged.
| Tip | If you are going to use a table to structure your form, you might find it helpful to sketch your table layout on a piece of paper before you write your code. You also might find it helpful to put an x inside each of the table cells to get them to display before you add your form elements. |
To insert a table inside your form, simply nest a set of <table> tags in between the <form> tags; then create whatever cells you need to give the form the design you want it to have. The following code creates a simple four-row single-column table to contain your guestbook form:
| Note | Some other presentation adjustments have been made by using the <style> and <div> elements. These are in bold type, along with the table elements you will be adding. |
<!DOCTYPE HTML PUBLIC "-//W3C//DTD XHTML 1.0 Transitional//EN" "http://www.w3.org/TR/xhtml1/DTD/xhtml1-transitional.dtd"> <html xmlns="http://www.w3.org/1999/xhtml"> <head> <title>Forms Sampler</title> <style type="text/css"> body {background-color: white;} table {background-color: aqua;} </style> </head> <body> <div align="center"> <p style="font-size: 2em">Sample Guestbook Form</p> <form action="mailto:my_e-mail@my_server.com" method="post"> <table> <tr><td> </td></tr> <tr><td> </td></tr> <tr><td> </td></tr> <tr><td> </td></tr> </table> </form> </div> </body> </html>
Add Controls to Your Guestbook Form
For a simple guestbook form, you need only a few controls: an input line for your visitor’s name, a text box for a brief note, a Submit button, and a Reset button. As you add these controls, you will be learning the basics of using the <input> element and its numerous attributes. The <input> element enables you to create a form specifically suited to your needs. Along with input, you will use the type attribute to tell the browser what kind of controls to display.
Add Lines of Text with <input type="text" />
To add lines for text input (for names, addresses, and so on), use the <input /> element with the type="text" attribute. Input is an empty element, so you don’t need to include a closing tag. (Don’t forget to put the slash at the end of the tag.) The type attribute specifies the type of control you want to place in the form. By choosing text as a value for the type attribute, you are telling the browser to create a small, one-line text box.
You can tell the browser how many characters to accept by adding the size attribute and supplying a number. For example, a value of 40 allows a visitor to input 40 characters. The id attribute is used to assign an identifying name to the information that the user inputs. This is the name by which the information will be identified when it is relayed to you. When you create your form, choose the values you put in the id attribute carefully so you won’t have difficulty understanding or sorting your data. And remember that each id value may be used only one time. IDs are like fingerprints; no two should be alike.
To add a text input line for visitors to insert their names, modify the table in your guestbook form to look like the following code listing:
| Note | In HTML, you would use the name attribute to assign an identifying name to user input. However, because the name attribute is deprecated in XHTML 1.0 and dropped entirely from XHTML 1.1, you are encouraged to use id instead of name. Keep in mind that every id must be unique. <tr><td>Please sign my guestbook.</td></tr> <tr><td>Name: <input type="text" size="15" maxlength="30"/></td></tr> |
| Tip | If you want a text window to accept more characters than it actually displays, use the maxlength attribute. For example, if you set a text box to read size="15" maxlength="30", only 15 characters will display. However, your visitor will be able to enter up to 30 characters. |
Add a Text Box with <textarea>
The next item your guestbook will need is a larger text box for your visitors to use when writing comments about your site. Although you could do this with a text line as in the preceding example, a text line would not allow your visitors to view more than one line at a time while they wrote their messages. Therefore, instead of using the <input /> element with a type="text" attribute, you will use the <textarea> element.
The <textarea> element allows you to create a larger working space for your form data. You tell the browser how large to make the text box by using the rows=" " and cols=" " attributes. For example, if you want to display a text box with 10 rows and 45 columns, you would add the attributes as in the following listing:
<textarea rows="10" cols="45"> </textarea>
Notice also that even though <textarea> has a closing tag, it functions as an empty element. Nothing goes in between the two <textarea> tags. All the information necessary to create the text area goes inside the opening tag.
After you have added your text box, you must create a way for your visitors to send you the information they have entered. Also, you must provide them with a way to clear the form and start over—just in case they don’t like what they’ve written. You do this by adding Submit and Reset buttons.
Add Submit and Reset Buttons with <input />
Creating buttons for your forms is easy. As you’ll see later in the chapter, you have quite a bit of room for creativity when you put buttons into your forms. However, if you just want to add Submit and Reset buttons, you can do it simply by using the <input /> element with the type attribute set either to submit or reset. You can add these buttons to your guestbook by modifying the bottom data cell in your form/table to read like the following listing:
<input type="submit" /> <input type="reset" />
| Tip | You can add white space between your buttons by adding space between the <input /> elements. |
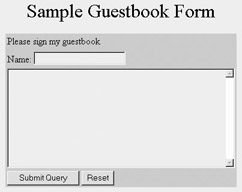
When you have added the various lines described in the preceding paragraphs, you will have a simple guestbook form that will work with many browsers. If you post it on your site and someone clicks the Submit button, it should send you the data by using your visitor’s e-mail server. If you haven’t done it already, try adding the form elements just described to formsample.htm. Then save and display it in your Web browser. It should look something like the illustration that follows the code listing:
<form action="mailto:my_e-mail@my_server.com" method="post"> <table> <tr><td>Please sign my guestbook.</td></tr> <tr><td>Name: <input type="text" size="15" maxlength="30" /></td></tr> <tr><td><textarea name="message" rows="10" cols="45"> </textarea></td></tr> <tr><td><input type="submit" /> <input type="reset" /> </td></tr> </table> </form>
Would you like your visitors to be able to search your site and search the Web from your site? If so, Google provides an easy solution. Just go to www.google.com/searchcode.html and you will find three pre-written HTML forms that you can copy and paste into your own site. One form adds a simple Google search engine form. The second form is designed to provide a “safe” (that is, no pornographic or explicit content) search. The third form enables your visitors to search your site in addition to the Web search. The form code is free and can be a great addition to your Web site.
Project 22: Create a Visitor Survey
Now that you have created a simple form and have a feel for how forms work, you will want to discover the other form tools available in the XHTML toolbox. There are so many to choose from; the best way to learn how to use them is to build a form that is useful (so all this work won’t be wasted) but allows you to use all the various form elements. The form that will best accomplish these goals is a visitor survey.
Plan Your Survey
A visitor survey is self-explanatory: It is nothing more than a form on your site that asks your visitors to share their opinions. For example, if you have a site devoted to cooking, you could survey your visitors about their favorite cookbooks, cooking shows, spices, recipes, and so on. You could even create a guestbook that would allow them to add recipes to your site for other visitors to use. In other words, a visitor survey can be whatever you want it to be.
For the purposes of learning to create XHTML forms, a visitor survey will allow you to experiment with most of the different form elements. The survey you will create in this project is geared toward readers and book lovers. If you want to modify the form so that it will better fit your own needs, simply change the information in the form elements to ask for different information. By modifying this form rather than merely copying the code, you’ll find that you will learn how to use forms even more quickly.
The first step in creating your survey is to decide what information you want to collect from your visitors. If you are developing a survey for book lovers, you will want to obtain basic information such as names, ages, where your visitors live, and so on. You also will want to collect specific information about their reading and purchasing preferences. As you develop a list of the information you want to collect, you might come up with some of the following possibilities for a book-lovers survey:
-
Your visitors’ names
-
Where they live
-
Their ages
-
Male or female, married or single
-
Reading preferences (fiction or nonfiction)
-
Fiction genres (mystery, romance, thriller, historical, and so on)
-
Nonfiction topics (computer, cooking, parenting, history, and so forth)
-
How/where they buy books (online, bookstores, used books)
-
Favorite authors
-
Comments on their favorite book this year
You could come up with other possible options, but these will give you enough to create a form using most of the possible form elements. To begin building your form, open template.htm and save it as formsample2.htm. Add a set of <form> tags to create the form, like this:
<body> <form action="mailto:my_e-mail@my_address.com" method="post"> </form> </body>
Build Your Survey
There are many different ways you can structure a visitor survey; the simpler it is, the better. Arrange the elements logically so your visitors will not have to spend time trying to understand your form and what you are asking for. Also remember to use tables to help develop a pleasing layout for the survey.
Add Text Input Lines with <input type="text" />
Because you have already practiced adding a text line to your form, this part will be easy. Because you are surveying only your visitors’ opinions, it won’t be necessary to collect complete address information. However, you might want to at least know the part of the world where your visitors live. Thus, the first part of your form will be primarily text-input lines. Remember that to add these lines you use the <input /> element with the type="text" attribute. Add the following lines to formsample2.htm:
First Name: <input type="text" size="15" maxlength="20" /> Last Name: <input type="text" size="15" maxlength="20" /> City: <input type="text" size="15" maxlength="20" /> State: <input type="text" size="2" /> Country: <input type="text" size="15" maxlength="20" />
| Tip | As you write the code for the form, be sure to observe how each attribute functions in the <input /> element. You might even want to experiment by adjusting some of the values. The more you play with the code, the faster you’ll learn how it works. |
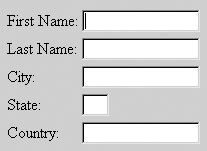
When you save this form and display it in your browser, you will understand why most forms are laid out with tables. Simply using form elements without some way to give them structure leads to a form that works but is not visually appealing. For example, the preceding code produces a form that looks something like this:
![]()
When you enclose the code in a table, you can add structure and a pleasing appearance to your form. Notice how different the same data fields look when they are put into a table, as in the code listing and illustration that follow:
<table> <tr> <td style="text-align: left">First Name:</td> <td style="text-align: right"> <input type="text" size="15" maxlength="20" /></td> </tr> <tr> <td style="text-align: left">Last Name:</td> <td style="text-align: right"> <input type="text" size="15" maxlength="20" /></td> </tr> <tr> <td style="text-align: left">City:</td> <td style="text-align: right"> <input type="text" size="15" maxlength="20" /></td> </tr> <tr> <td style="text-align: left">State:</td> <td><input type="text" size="2" /></td></tr> <tr> <td style="text-align: left">Country:</td> <td><input type="text" size="15" maxlength="20" /></td> </tr> </table>
Offer a Single Choice with Radio Buttons
When you want your visitors to select a single item from a list of possible choices, you’ll want to use radio buttons. If you are familiar with older cars, you won’t have much trouble figuring out why these controls are called “radio buttons.” Old car radios usually had a series of five or six buttons for preselected stations. When you wanted to go to a favorite station, you simply pushed the appropriate button. One thing you obviously could not do with the radio buttons was to select more than one station at a time. Likewise, the radio buttons you use in a form allow your visitors to choose only one option. The following list demonstrates how a single radio button element can be constructed:
-
To add radio buttons to your form, use the <input /> element with the type=" " attribute set to radio.
<input type="radio" />
-
Be sure to give all of your radio buttons the same id attribute. That’s how the browser knows to associate all the choices. Because these radio buttons are used to ask your visitors’ ages, the most logical value for id is age.
<input type="radio" />
-
You also need to assign a value with the value element. You didn’t need to do this with text boxes because your visitors add their own values when they input text. With radio buttons and other controls where you supply the choices, you also must add the values.
<input type="radio" value="31-40" />
-
To preselect an option, add the checked attribute to one of the <input /> elements. In the days of HTML, this attribute did not require a value. All you needed to do was add the word checked inside the tag. However, with XHTML’s stricter rules, you must add a value to the checked attribute. Although it may seem redundant, you would write it this way: checked="checked".
<input type="radio" value="31-40" checked="checked" />
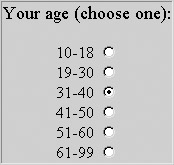
For example, if you want your visitors to specify their ages by choosing from a series of age ranges and want the 31–40 age range preselected, you could write something that resembles the following listing and illustration:
<p style="font-size: 1.1em;">Your age (choose one):</p> 13-18 <input type="radio" name="age" value="13-18" /><br /> 19-30 <input type="radio" name="age" value="19-30" /><br /> 31-40 <input type="radio" name="age" value="31-40" checked="checked" /><br /> 41-50 <input type="radio" name="age" value="41-50" /><br /> 51-60 <input type="radio" name="age" value="51-60" /><br /> 61-99 <input type="radio" name="age" value="61-99" />
l
| Tip | The line break element, <br />, is placed at the end of each of the input elements to move the next one to a new line on your page. If you want the options to display side by side, simply omit the line breaks. |
Use Check Boxes for Multiple Choices
If you want to provide a visitor with multiple choices, you need check boxes rather than radio buttons. In the book-lovers’ survey you are building, you will want to ask your visitors about their reading preferences. Obviously this is a situation in which you should provide more than one option. With check boxes, your visitors can choose as many items as they like.
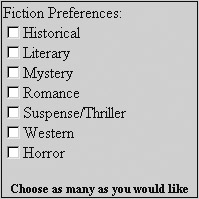
To create a check box, you again use the <input /> element. However, this time you must add the type attribute with the value set to checkbox. As with radio buttons, if you want to preselect an item, simply add the attribute checked="checked" to the <input /> element. As in the preceding example, you need to assign the same id to all of your options. You also need to specify a value for each option. The code for a series of check boxes might look something like the following code and illustration:
Fiction Preferences:<br /> (Choose as many as you want.)<br /> <input type="checkbox" value="historical" />Historical<br /> <input type="checkbox" value="literary" />Literary<br /> <input type="checkbox" value="mystery" />Mystery<br /> <input type="checkbox" value="romance" />Romance<br /> <input type="checkbox" value="thriller" />Suspense/Thriller<br /> <input type="checkbox" value="western" />Western<br /> <input type="checkbox" value="horror" />Horror<br />
Create Pull-Down Menus with <select>
If space is a consideration or if you want to add a bit of variety to your form, you can create a pull-down menu for your visitors to choose from. These menus are easy to create, and they can function either as single choice lists (like radio buttons) or as multiple option lists (like check boxes). Although constructing pull-down menus is not difficult, the elements you use are somewhat different from those you’ve worked with so far.
To build a pull-down menu, use the <select> element instead of <input />. You add choices with the <option /> element and use the and value=" " attributes. To see how easy it is, add a pull-down menu to the survey that allows your visitor to select from either male or female. You would write your XHTML code like this:
<p>Your Gender:</p> <select > <option value="male" >Male</option> <option value="female" >Female</option> </select>
| Note | Because Internet filters often block access to sites that use the word “sex,” it’s a good idea to use the word “gender” if you are asking whether a visitor is male or female. |
To create a list with several options or a list that displays more than one choice at a time (sometimes called a scrolling list), you must add the following attributes to the opening <select> tag:
-
Size The size attribute, with a numerical value added, tells the browser to display more than one option in the pull-down list. For example, size="4" displays four choices simultaneously.
-
Multiple The multiple attribute allows for more than one selection to be made from the list (similar to check boxes). As with the checked attribute, you should write this as follows: multiple="multiple". Keep in mind that for your visitors to actually be able to select more than one option with a menu list, they probably will have to hold down the CTRL key while clicking. It’s good to add an instruction to your form, in case they don’t know how to do this.
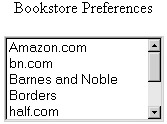
In the sample form you are building, perhaps you want to find out where your visitors buy their books. Although you could do this with a series of check boxes, a scrolling menu also works well. By typing in the following code, you create a menu that displays five bookstores and allows the visitor to scroll down to display more. They also will be able to select more than one option because the multiple="multiple" attribute has been added.
<p>Bookstore Preferences</p> <select multiple="multiple" size="5"> <option value="amazon">Amazon.com</option> <option value="bncom">bn.com</option> <option value="bn">Barnes and Noble</option> <option value="borders">Borders</option> <option value="halfcom">half.com</option> <option value="hastings">Hastings Entertainment</option> <option value="walden">waldenbooks</option> <option value="hpbooks">Half Price Books</option> <option value="powells">Powells Books</option> </select> <p>For multiple selections, hold down the Control key while clicking.</p>
| Caution | In HTML, the <option> element often was used without its closing tag. Although your form will work properly if you write it this way, it’s not good XHTML. For well-formed XHTML you must always use either closing tags or (in the case of an empty element) a slash at the end of the opening tag, like this: <empty_element />. |
Give Your Form Structure with a Table
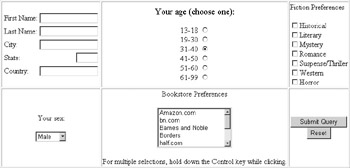
Now that you have designed your form controls, create a simple table to give the form some structure. Your table should have six cells arranged in two rows with three cells each. After you have created the table, follow these steps:
| Tip | Give your table a border (border="1") to make it easier for you to visualize your layout. |
-
In the first cell (top left), nest the table you created for name and address info.
-
The second cell (top center) should hold the radio buttons for Age information.
-
Place the Fiction Preferences check boxes in the third cell (top right).
-
The fourth cell (bottom left) should hold the Male/Female drop-down menu.
-
Place the Bookstore Preferences controls in the fifth (bottom center) cell.
-
In the sixth cell (bottom right), add a Submit and Reset button so that your form can be submitted or cleared.
When you have finished, your completed form should resemble the following illustration. If you are having difficulty getting your form to match the illustration, the complete code for the form is reproduced in the Quick Reference section at the end of this chapter.
The form controls you have covered thus far in this chapter are those you will use most often. They will enable you to create virtually any kind of form you need. However, there are some other controls that enable you to add more specialized functions to your form.
Use Special Form Controls
The following form controls enable you to add password boxes to a form, create customized buttons, and much more. You might not use these all the time, and some of them (such as the password box) require a script to make them work, but it’s good to have them in your form-designing arsenal:
-
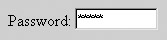
<input type="password" /> By using the password value with the <input /> element, you can create a password input field. If you’ve spent more than five minutes on the Web, you have encountered a password field. What makes it distinctive is that the characters typed in are masked to keep your password secret. An asterisk (*) displays for each character entered.
<input type="password" size="10" />
Note Just using the password field does not mean you will have a password-protected or -encrypted page. You also need a CGI script to accomplish that task. The password field merely works with the script to help get the job done.
-
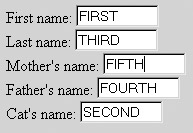
tabindex If you’ve filled out forms on Web pages, you’ve probably discovered that you can move from field to field by using the TAB key. What you might not know is that, as a form designer, you can tell the browser in which order you want your visitors to be able to tab through your forms. By inserting the tabindex attribute in each field and adding a numerical value, you can set the priority for your form fields. To see how this works, put the following code inside a set of form tags, save the page as tabindex.htm, and then tab through the fields:
First name: <input type="text" tabindex="1" size="10" /><br /> Last name: <input type="text" tabindex="3" size="10" /><br /> Mother's name: <input type="text" tabindex="5" size="10" /><br /> Father's name: <input type="text" tabindex="4" size="10" /><br /> Cat's name: <input type="text" tabindex="2" size="10" /><br />
-
type="hidden" There will be times when you need to add hidden fields to your forms. These cannot be seen or altered by your visitors, and generally they are used to provide necessary information to the CGI program on your server. You do this by using the <input /> element with the type attribute set to hidden.
<input type="hidden" />
-
type="image" If you want to be creative with your forms and use images as buttons, one way you can do it is with the type="image" attribute. Used with the <input /> element, this attribute allows you to convert any image into a clickable button.
<input type="image" src="/books/4/238/1/html/2/mybutton.gif" />

-
type="button" You can create a more conventional-looking custom button with the type attribute set to the button value. This creates a generic button that has no function itself. However, as you’ll see in Chapter 15, you can assign functions to the button with JavaScript or other scripting languages.
<input type="button" value="CustomButton" />

Tip The text that displays on the face of the button is created with the value attribute.
-
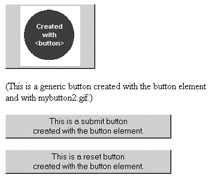
<button> The newest (and preferred) way to create buttons is with the <button> element. With this element, you can convert images and even text to buttons. By using the type attribute, you can assign a value to your buttons that allows them to function as Submit or Reset buttons, or (as with the preceding example) to respond to script-related functions.
<p><button value="button"><img src="/books/4/238/1/html/2/mybutton2.gif" /> </button></p> <p>(This is a generic button created with the button element<br />and with mybutton2.gif.)</p> <p><button value="submit">This is a submit button<br /> created with the button element.</button></p> <p><button value="reset">This is a reset button<br /> created with the button element.</button></p>
Thus far you have learned how to create a form, how to tell the browser what to do with it, and how to add form controls. Then you saw some special form elements in action. All along, you’ve been working to build a survey form that collects information from your readers. However, at this point your form is about as useful as a car without an engine. It might look nice, but it won’t actually do anything. If you want your form to work, you have to venture from the safe and comfortable harbor of XHTML into the uncharted waters of CGI.
If you are planning to set up an online business, you will want to provide a form for your customers to send payment online through a credit card, debit card, or bank draft. If you've investigated online payment processors, you've probably found that accepting credit cards online can be an expensive proposition. An inexpensive, but secure, alternative is to use PayPal. Now a part of eBay, PayPal is rapidly becoming the primary solution for online payment processing. After you sign up for a free PayPal membership (www.paypal.com), you can click on the Merchant Tools tab, which takes you to a page where you can copy and paste the form code to channel your payments through their server and into your merchant account. For their fee, PayPal takes a small percentage of each payment you receive through them.
|
EAN: 2147483647
Pages: 126
- Chapter IV How Consumers Think About Interactive Aspects of Web Advertising
- Chapter V Consumer Complaint Behavior in the Online Environment
- Chapter IX Extrinsic Plus Intrinsic Human Factors Influencing the Web Usage
- Chapter XIV Product Catalog and Shopping Cart Effective Design
- Chapter XV Customer Trust in Online Commerce